Cerwyn
Cerwyn (Site Admin)


Number of posts : 11090
Age : 65
Location / Country : North Wales
Registration date : 2008-07-20
 |  Subject: Marushin UZI... Basic Clean & Lubrication Guide Subject: Marushin UZI... Basic Clean & Lubrication Guide  Tue Aug 05, 2008 9:47 am Tue Aug 05, 2008 9:47 am | |
| Basic Cleaning & Lubrication Guide... Marushin UZI***UNDER CONSTRUCTION*** Field Stripping has already been covered in a previous Step by Step Guide so this guide begins with your UZI already stripped into it’s component parts. Field Stripping has already been covered in a previous Step by Step Guide so this guide begins with your UZI already stripped into it’s component parts.
Cartridge cleaning is also covered at length in its own Section.
Inspection of parts for damage will be dealt with in a separate Guide.
Just like the real steel version, to keep your UZI in good working order you must clean it thoroughly at the end of each session.
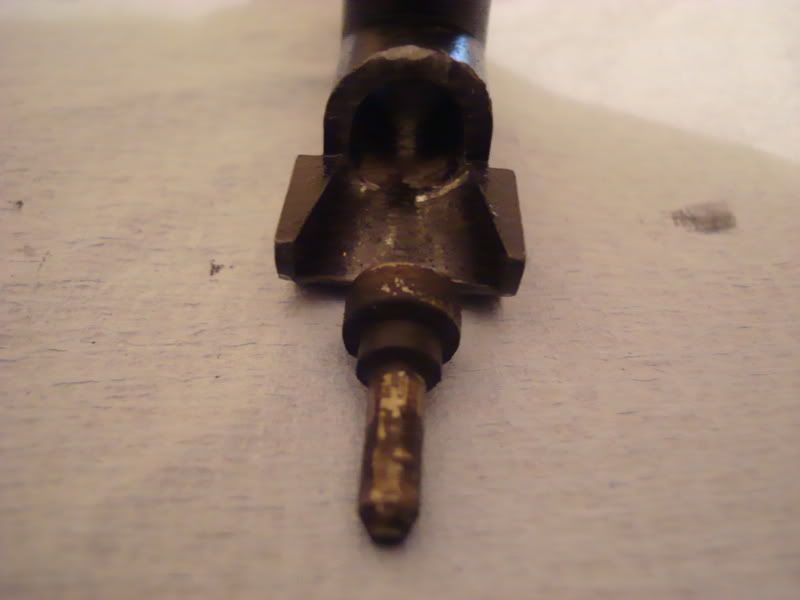
Smoke and residue created by the caps igniting leaves corrosive residue throughout the gun so it must be removed to prevent damage.[size=18]1. Detonator Pin and Chamber.The metal Detonator Pin is a held by a single screw in the cast zinc alloy Detonator Chamber. After firing, it will be covered in black sooty deposits and will possibly have wet residue due to the Lithium or Silicone based grease used inside the cartridges.Ref: …https://mp40modelguns.forumotion.net/modelgun-stripping-and-rebuild-guides-f12/marushin-uzi-basic-strip-down-guide-t14.htm Basic Strip Down Marushin UZI Wipe off the majority of the dirt with a rag or paper towel. Wipe off the majority of the dirt with a rag or paper towel.
Stubborn dirt can be removed with Wire Wool I usually wash mine with all the cartridges in the UltraSonic cleaner for good measure then Tumble Polish it in the Lyman Polisher. Ref:https://mp40modelguns.forumotion.net/beginner-s-guides-tocartridges-f15/cleaning-and-preparing-fired-cartridges-t931.htm Beginner’s Guide to… Cleaning CartridgesThe Chamber needs thorough cleaning to prevent deposits building and clogging it up. A dirty chamber can lead to difficulties extracting and ejecting fired cartridges and subsequent misfires and jams. I usually wash mine with all the cartridges in the UltraSonic cleaner for good measure then Tumble Polish it in the Lyman Polisher. Ref:https://mp40modelguns.forumotion.net/beginner-s-guides-tocartridges-f15/cleaning-and-preparing-fired-cartridges-t931.htm Beginner’s Guide to… Cleaning CartridgesThe Chamber needs thorough cleaning to prevent deposits building and clogging it up. A dirty chamber can lead to difficulties extracting and ejecting fired cartridges and subsequent misfires and jams.
The UZI also has a "gas bypass" feature allowing smoke to pass from the detonator chamber through to and out of the barrel.
Clean this passageway thoroughly.
A mascara brush is ideal, followed by wiping with a Cotton Wool Bud (Q-Tip). Once the Cotton Bud is clean, a final wash in the UltraSonic cleaner should have it spotless.
A very light spray with WD40 or Gun Oil will protect both Pin and Chamber.2. Magazine.If left uncleaned after firing, the magazine will be coated in rusty brown deposits from the smoke created by the caps.
Wipe the top of the magazine thoroughly with a damp rag using a little detergent. Stubborn deposits will come off with a stiff brush (toothbrushes work great, but make sure you use your wife’s not your own). Wipe the inside of the magazine’s feed lips and spring loaded carrier. Wipe the inside of the magazine’s feed lips and spring loaded carrier.
Spray the top of the magazine with a little WD40, Silicone Oil, or Gun Oil allowing some to run down into the mag’ body. Periodically, strip the magazine itself by removing the bottom plate, withdraw the spring and cartridge carrier. Wipe everything clean, re oil and re-assemble. Periodically, strip the magazine itself by removing the bottom plate, withdraw the spring and cartridge carrier. Wipe everything clean, re oil and re-assemble. 3. Barrel.Wipe inside the barrel with a rag or paper towel. The UZI has an open barrel that allows smoke through. Dirt and sooty deposits will build up here surprisingly quickly! 3. Barrel.Wipe inside the barrel with a rag or paper towel. The UZI has an open barrel that allows smoke through. Dirt and sooty deposits will build up here surprisingly quickly!
4. Receiver Block.This is basically a simple box so I tend to use a spray on Gun Oil and a rag for this. Wipe the inside of the receiver along its entire length to remove all traces of old oil, soot, dirt and smoke residue.
Wipe the Ejector clean, then lightly spray or coat with WD40, Gun Oil or Silicone Oil 5. Trigger and Grip AssemblyWipe the inside surface clean of dirt and residue with an oily rag. Check the trigger mechanism for smooth operation and give the Sear a thorough wipe down.Spray a little Gun Oil over the mechanism.6. Bolt Carrier, Bolt, Recoil Spring and Guide Rod.The Bolt is probably the most important component in any model gun. We’ll discuss inspection in a separate Guide and concentrate on cleaning here…
Wipe all traces of old oil, soot and dirt from all the Bolt’s surfaces. Pay particular attention to the Bolt FaceThe groove that slides over the EjectorThe ExtractorOnce thoroughly cleaned, spray the Bolt assembly with Gun OilYour UZI is now ready for Re-assembly...
Ref: https://mp40modelguns.forumotion.net/modelgun-stripping-and-rebuild-guides-f12/marushin-uzi-basic-strip-down-guide-t14.htm Basic Strip Down
Ref: https://mp40modelguns.forumotion.net/modelgun-stripping-and-rebuild-guides-f12/marushin-uzi-basic-reassembly-guide-t15.htm Basic Reassembly
Ref:https://mp40modelguns.forumotion.net/beginner-s-guides-tocartridges-f15/loading-marushin-9mm-mp40-uzi-cartridges-t922.htm Loading Marushin 9mm Cartridges
Ref:https://mp40modelguns.forumotion.net/beginner-s-guides-tocartridges-f15/loading-mgc-type-cartridges-t924.htm Loading MGC c.p. type Cartridges
Ref: https://mp40modelguns.forumotion.net/modelgun-cleaning-guides-f11/marushin-uzi-basic-parts-inspection-guide-t33.htm Basic Parts Inspection GuideCerwyn | |
|
