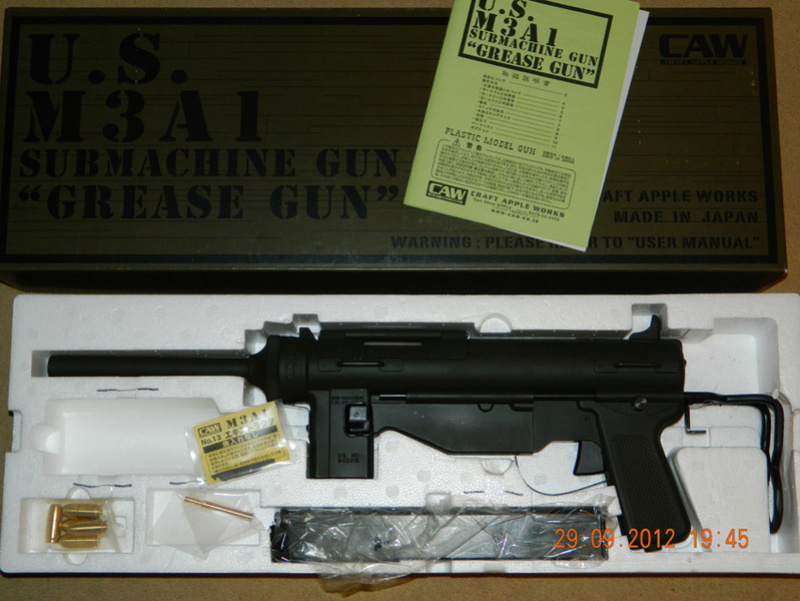
***Work in Progress***Craft Apple Works M3A1 "Grease Gun" Photo from E-Hobby Asia
 Brief History
The “Grease Gun” was an American .45-caliber submachine gun adopted for U.S. Army service on 12 December 1942, as the United States Submachine Gun, Cal. .45, M3. The M3 was intended as a replacement for the Thompson submachine gun as it was cheaper to produce, lighter, and more accurate. The M3 was commonly referred to as the "Grease Gun" or simply "the Greaser", owing to its visual similarity to the mechanic's tool.
The M3 and its improved successor, the M3A1 began to replace the Thompson in first-line service in late 1944 and early 1945. Due to delays caused by production issues and approved specification changes, the M3/M3A1 saw relatively little combat use in World War II. However, the both variants were used during the Chinese Civil War, Greek Civil War, Korean War, Bay of Pigs Invasion, Vietnam War, and the Falklands War. The M3 and M3A1 were largely withdrawn from U.S. frontline service in 1957, but continued to be used until the mid-1990s by armoured vehicle crews and truck drivers during the 1991 Gulf War.
Design details
The M3 was an automatic, air-cooled blowback-operated weapon that fired from an open bolt. Constructed of plain .060-in. thick sheet steel, the M3 receiver was stamped in two halves that were then welded together. The gun used metal stamping and pressing, spot welding and welding extensively in its construction, reducing the number of man-hours required to assemble a unit. Only the barrel, bolt and firing mechanism were precision machined. The receiver consisted of two sheet metal halves welded together to form a cylinder. At the front end was a knurled metal cap which was used to retain the removable barrel.
The M3 was striker-fired, with a fixed firing pin contained inside the bolt. The bolt was drilled longitudinally to support two parallel guide rods, upon which were mounted twin return (recoil) springs. This configuration allowed for larger machining tolerances while providing operating clearance in the event of dust, sand, or mud ingress. The M3 featured a spring-loaded extractor which was housed inside the bolt head, while the ejector was located in the trigger group. .
The weapon's only safety was the hinged ejection port dust cover. This cover had a projection on the underside that engaged a notch on the bolt, locking the latter in its forward and rearmost positions. The M3 had no mechanical means of disabling the trigger, and the insertion of a loaded magazine would load the gun. With receiver walls made of relatively thin-gauge sheet metal, the M3/M3A1 were subject to disabling damage if dropped on an open dust cover - the covers bent easily, negating the safety feature. Dropping the gun on a sharp or hard surface could dent the receiver enough to bind the bolt.
Variants : M3A1In December 1944 a modernized version of the M3 was introduced into service known as the M3A1, with all parts except the bolt, housing assembly, and receiver interchangeable with those of the M3. The M3A1 had several improvements, the most significant was the elimination of the troublesome crank-type cocking lever assembly, replaced by a recessed cocking slot machined into the top front portion of the bolt, allowing it to be cocked by inserting a finger into the cocking slot and pulling back the bolt. The retracting pawl notch was removed, and a clearance slot for the cover hinge rivets was added. The ejection port and its cover were lengthened to allow the bolt to be drawn back far enough to be engaged by the sear, and the safety lock was also moved further to the rear on the cover. To facilitate loading the single-feed magazine, a magazine loading tool was welded to the wire stock; it also served as a cleaning rod stop. The barrel bushing received two flat cuts that assisted in barrel removal by using the stock as a wrench.
At 7.95 pounds empty, the M3A1 was slightly lighter than the M3, at 8.15 pounds empty, primarily due to the simplified cocking mechanism. The M3A1 was formally approved for production on 21 December 1944.
The M3A1 modifications resulted in a submachine gun with reduced weight and improved reliability, improved maintenance, and easier field stripping (the original M3 required removal of the trigger guard and detachment of the cocking crank assembly from the receiver housing before unscrewing the barrel, whereas the M3A1 required the user to merely unscrew the barrel).
A concise History can be found here
http://en.wikipedia.org/wiki/M3A1_Grease_GunThe CAW Modelgun
Craft Apple Works purchased manufacturing moulds to produce HWABS models of the M3A1 when the original manufacturer, Hudson, closed for business.
Hudson had manufactured a Steel and Zinc Alloy modelgun before Japanese legislation banned the use of steel in 1977. Hudson then utilised ABS and HWABS plastics for future production.
Reviews of Hudson’s Steel, HWABS and M3A1 can be read here:
https://mp40modelguns.forumotion.net/t232-hudson-s-grease-gun-in-1973https://mp40modelguns.forumotion.net/t267-hudson-s-m3a1-grease-gunCAW set out to improve upon Hudson’s HWABS model cosmetically and it’s firing performance from the outset. One regular complaint about the Hudson was it’s lack of weight making it feel very unrealistic. The material’s colour came under frequent criticism also. Although my own personal experience of the Hudson HWABS model’s firing performance was favourable, finding it reliable and consistent, the only real complaint of mine was the model’s rate of fire was far too fast.
One part that has failed in my own model is the plastic detonator chamber. This requires twisting to unscrew from the barrel and regular twisting caused the plastic to shear.
Other owners have suffered Bolt breakages, Barrels blowing off the threads, Detonator Pins being pushed through the rear of the chamber, Ejectors breaking easily. The ABS model is even more fragile cracking Receivers too.
CAW would need to make some major improvements to this model. More of which later:
CAW M3A1 WEIGHT: 2.2 Kgs (No Magazine fitted)
HUDSON M3A1 WEIGHT 1.36 Kgs (No Mag N.B. Custom Aluminium Chamber fitted)
First Impressions
CAW uploaded videos of their prototype M3A1 onto you tube as they neared release dates. News from Japan stated that 1 Kg of ballast weight had been built into the model. This was achieved by inserting cast metal parts into the Pistol Grip, the Ejector housing and as part of the Bolt & Recoil Guides / Springs assembly.
The correct Chequered pattern is now moulded onto the Pistol Grips, colour of the HWABS improved. The most significant change as far as Firing is concerned is a complete redesign of the Detonator Chamber and utilising CAW’s own .45ACP cp-hw cartridge.
CAW’s videos can be viewed here:
Overall, the CAW M3A1 certainly looks good, details are better than Hudson’s so a modelgun worth pursuing.
Does the Modelgun come up to First Impressions?
The BoxA nicely printed box lid like this looks so much better than the plain cardboard boxes Hudson produced and manufacturers like Marushin are turning out now
Opening the box reveals the moulded polystyrene inner. This contains the Modelgun, Magazine, 5 cartridges, metal cartridge Loading Tool in individual plastic bags, an Instruction Book (reproduced in
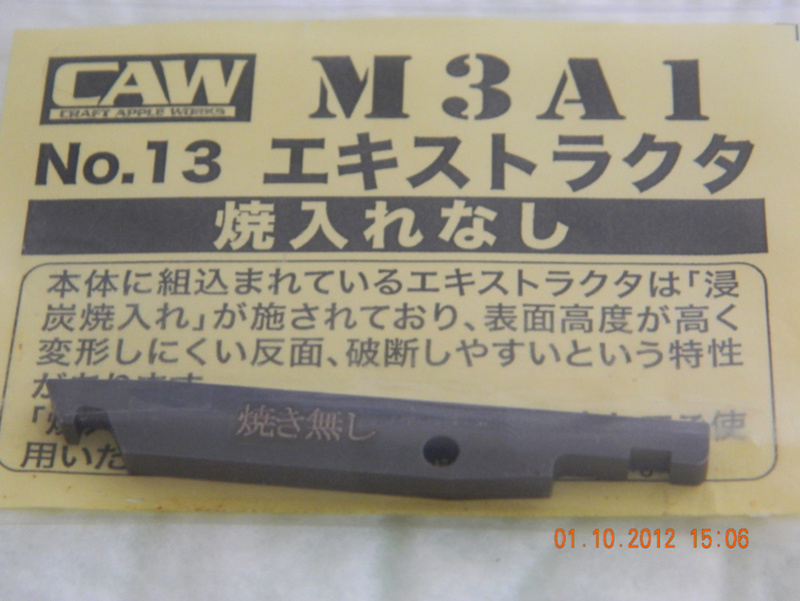
https://mp40modelguns.forumotion.net/t3621-caw-m3a1-grease-gun ), a couple of other sheets of paper printed in Japanese and, surprisingly, a new spare Extractor with a Japanese scripted label. I’ve never seen spare parts like this provided by any manufacturer. (More of this later)
 Spare Extractor
Four boxes each containing 8 new cartridges were included as I had ordered them when purchasing the model.
Taking the model gun from its’ compartment, the extra kilo of weight is immediately apparent. Colour of the HWABS is a dark matt green, which, in my opinion does look better than Hudson’s HWABS and ABS versions.
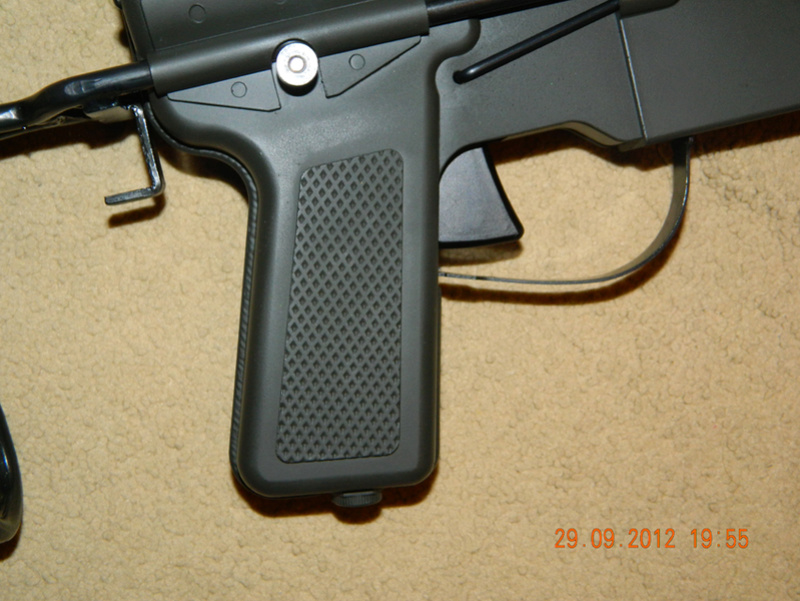
Detailing on the model is good. The correct chequered grips that appeared on the M3A1 are nicely reproduced.
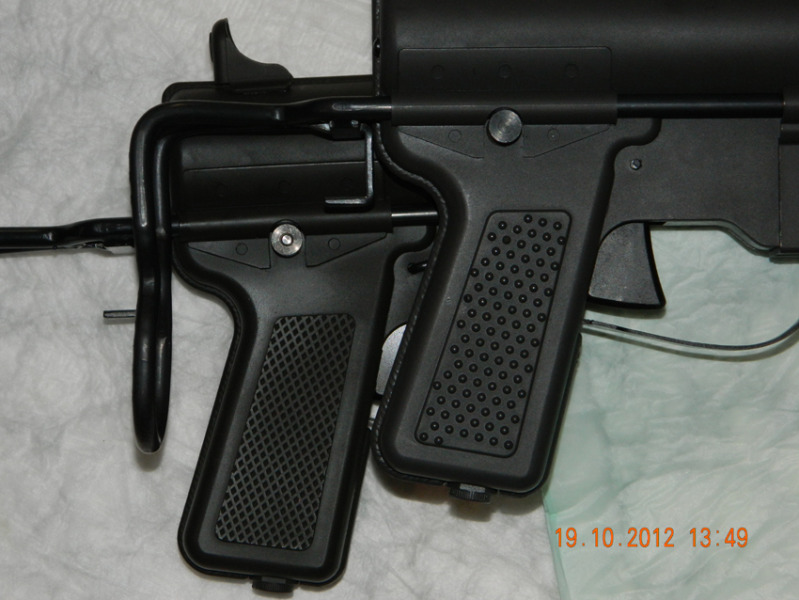
 CAW Chequered Grip Detail
 CAW on Left, Hudson Grip Pattern on Right
Opening the Ejection Port cover (which also acts as the gun’s only safety mechanism) reveals the black Plastic Bolt Carrier. As per the real thing, two indents are cast into this to allow your finger to be inserted and pull the Bolt back to Cocked position. This engages with the Sear and sets the trigger in Firing position.
Looking into the Breach shows a nice machined Zinc chamber, unlike Hudson’s plastic chamber), the metal Ejector and the machined Zinc Boltface.
First task is to strip the modelgun and make sure it’s well lubricated before attempting to fire.
Strip-Down Procedure:
The Instruction Manual provided describes stripping procedure well. The drawings are adequate despite the text being in Japanese. Prior knowledge of Hudson’s M3A1 helps as there are several similarities.
Step 1: Remove Wire StockDepress the spring loaded Retainer and withdraw the stock
Step 2: Trigger Guard Removal
Made of spring steel, the Trigger Guard clips into the grip and ejector housing. Starting at the Grip, simply push the Trigger Guard Up and Inwards to unclip it.
Next, unclip the Guard from the Ejector Housing
Step 3: Ejector Housing RemovalThe Housing is a push fit only onto the Receiver. Grasp the rear of the Housing, pull downwards away from the receiver, withdraw the two retaining lugs from the rear of the Magazine Well.
The Ejector can be removed from it’s housing by removing these two socket head screws. Removal at this stage is not required however. It is worth noting that Both screws were loose “out of the box”. This makes it worth noting that even new models need a good check over before commencing firing
Step 4: Barrel Removal
Hold the spring steel retainer clip beneath the barrel’s retaining ring away and unscrew the barrel and retaining ring away as one item
Note: Differences between CAW’s and Hudson’s design features of the Detonator Chamber and Bolt Assy start to become clear from this point on.
Step 5: Chamber and Bolt Assembly RemovalEnsure Ejection Port Cover is Open, and that Bolt is Closed.
Grasp the Chamber and withdraw the assembly from the Receiver
Note two lugs, one either side of the Chamber. These loosely locate the Chamber into slots in either side if the Receiver
The assembly will not withdraw completely until the Trigger is squeezed to depress the Sear. A little twisting of the assembly may be required
Step 6: Dismantling Bolt & Chamber Assembly.
As seen in the photos above, the assembly consists of two Guide Rods and Recoil Springs fitted through the Ballast Weight / Buffer, Plastic Bolt Carrier with integral Zinc Bolt and the Zinc Chamber into which both Guide Rods thread into.
To strip, stand the assembly vertically, resting on the rear of the Chamber.
Grasp the Ballast weight / Buffer and push and hold downwards against Recoil Spring pressure.
Grasp each Guide Rod in turn and unscrew from the Chamber.
Pull each rod up through the Bolt and Buffer to remove. Note Springs are under tension. Secure them to stop them flying off as they may cause injury or damage to nearby objects.
Step 7: Separate Bolt from Carrier.NOTE. This should only be done when absolutely necessary. The Zinc Bolt is fixed to the plastic carrier by five self-tapping screws. This is a copy of Hudson’s design and something of a disappointment. Self Tapping screws cut a thread into the object they are screwed into. This type of screw is not designed to be removed and refitted regularly as inevitably they will damage and destroy the threads cut into the Carrier.
Underside of Zinc Bolt showing Five Phillips head screws. Note the longitudinal groove running over the Ejector
Step 8: Ejector Removal
IF the Extractor requires attention, then the Bolt Assembly must be separated. The Ejector is held in place by a Socket head grub screw acting as it’s pivot. Remove the screw and withdraw the Ejector and Spring.
Step 9: Detonator Pin Removal
A good Ultrasonic Cleaner using propriety cleaning solutions and / or White Vinegar & Bicarbonate of Soda will clean the Chamber and Pin without removal. For more stubborn dirt, remove the socket head grub screw here, then withdraw the Pin.
The gun is now stripped ready for basic Cleaning and Maintenance.
Firing the M3A1:
Loading CAW’s own .45 ACP cartridges is explained in detail here:
https://mp40modelguns.forumotion.net/t3622-loading-caw-45-acp-cp-hw-type-cartridgesCAW recommended loading the magazine with a maximum of 25 only even though actual mag’ capacity is 30.
As was found with the real M3 and M3A1, plus MP40 and STEN magazines, loading the mags to maximum capacity more often than not resulted in jammed magazines.
CAW’s magazine did indeed jam even during loading 25 cartridges.
Stripping the magazine requires removing the Base Plate, Spring and Follower.
Wipe inside the mag’ to clean and apply a little light oil.
Apply a little grease to the edges of the Follower then reassemble.
This gave a smooth and jam free action to the magazine.
The M3A1’s wire stock has a built in Magazine Loader which can be used to aid pushing each cartridge into the mag while inserting the next, if reqd.
Open the Ejection Port Cover, draw the Bolt back to Cocked position.
Insert the magazine and squeeze the trigger….
My first attempt at firing proved to be a major disappointment. The bolt fed the first cartridge into the chamber, it fired but failed to extract and eject. Clearing the breach and chamber, I tried again.
Same result…. Not a good start at all.
The magazine was removed and the gun inspected for possible causes. Re cocking the bolt and checking the Boltface showed that the Extractor Claw had snapped off.
So the new spare Extractor supplied in the box was there for good reason?
The M3A1 and cartridges were supplied by John at PFCGUK and he had asked me to let him know how this modelgun performed. Being the gent that he is, he offered to make me a new steel extractor and also try to translate the printed sheet packed with the spare example by CAW if I would send it to him by Post.
Spare Extractor supplied with the M3A1
Broken Extractor
John was as good as his word and I received an e-mail the next day giving this translation and explanation of the spare Extractor:
"The extractor, originally attached to the gun been hardened treatment. It is hard on surface, but fractures on shock. Therefore, the one came as an extra has no hardened treatment. If you feel you want to make it hardened, then, please do so at your own decision.... "Clearly then CAW are aware of the original Extractors’ faults and quite likely shipped out the new replacement to their Japanese Distributors and Wholesalers.
John’s steel extractor arrived, fitted to my bolt, the following day. Excellent service for which I am extremely grateful.
The question now, is how will CAW’s M3A1 perform with a decent Extractor fitted???
It fires very well indeed ! 24 cartridges using MG 7mm caps had been loaded into the magazine. Short bursts of 3-4 rds were tried first then one long burst to empty the mag’. Apart from 2 misfires, both due to faulty caps, the gun fired really well. The rds were gathered and re-loaded for another mag of 24. Same result (including a couple of faulty caps)
Great sound, smoke and clean powerful ejection of the spent rds. Rate of Fire is possibly slightly slower than Hudson’s version but clearly faster than the real M3 / M3A1 guns.
Something I have never seen before was yellow / orange FLAME licking from the muzzle for approx 1 inch (25mm) or so, as some rds fired. Very spectacular and unusual from a cap firing model like this.
I‘ve seen cap flash from short barrelled pistols before when using MG caps but never Flames like this.
I intend making a video of the M3A1 asap and hopefully, we’ll see this again. I am also hopeful that adding a small amount of magnesium powder to each cartridge might just produce good muzzle flash … we shall see.
The new extractor John had made obviously worked well and made up for my initial disappointment with CAW’s M3A1.
Stripping the model down for cleaning did highlight a potential problem however. The Zinc Alloy Boltface is soft and has marked up already. The plastic bolt carrier has chipped directly above the Extractor and the photo below shows what may be a crack running from the chipped area. Lightly sanding the chipped area with a Dremel tidied it up easily enough and, hopefully, relieve any stressed points)
New, Unfired Boltface:
Bolt after 50 - 55 shots only:Cartridges are marked by both the Ejector and Extractor too. Blowback is strong when this model fires and any brass cartridges will mark eventually after regular strikes by metal bolts and ejectors. This marking does strike me, personally, as a little premature though. CAW do list replacement Cartridge cases only to restore damaged carts which will probably be required soon if this is fired regularly.
New Cartridge Base:
Cartridge fired 2-3 times only:Update : I fired 72 rds through the M3A1 yesterday, every cartridge fired, extracted and ejected perfectly. This gun fires like a dream

John's extractor clearly works very well. I'd cleaned up the chipped area of the Bolt Carrier by very lightly sanding with a Dremel. No further damage can be seen as yet. The suspicious looking crack I'd reported in my Review is actually just visible in a photo taken of the brand new unfired bolt so this may actually be a moulding mark or slight defect.
The wire stock was fully extended during firing yesterday. The Ejector Housing had been pushed backwards and out of postion during the last magazine of 24rds. Obviously the ejector is struck hard by each cartridge but I certainly wasn't expecting the Housing to become dislodged like that. Something to keep an eye on in future and if it persists, always fire with the Stock fully retracted
 Update: I soon realised that the Ejector Housing is held and locked in place by correct location of the Trigger Guard. Once the guard is firmly in place, the ejector housing will not move during firing with stock extended. Overall Impressions:
There’s no doubt CAW have produced a much better looking and feeling M3A1 replica compared to Hudson’s HWABS and ABS versions. Detail finish is good. Firing performance is compromised by the hardened steel extractor originally fitted to the model. CAW have addressed this by supplying replacement non-hardened extractors to (presumably) all stock still held unsold by their distributors. No doubt CAW will be building current and future M3A1s with this new extractor.
My particular model has a custom tool steel extractor very kindly made and fitted by PFCGUK which has transformed this into a great firing modelgun. Time will tell how long the boltface will last and also if the plastic bolt carrier will stay in one piece.
A great looking modelgun, sadly let down by a suspect bolt. (See Also Update above)
