Cerwyn
Cerwyn (Site Admin)


Number of posts : 11090
Age : 65
Location / Country : North Wales
Registration date : 2008-07-20
 |  Subject: Loading Shoei MKb42(H) Blowback Cartridges - 2012 model Subject: Loading Shoei MKb42(H) Blowback Cartridges - 2012 model  Thu Nov 08, 2012 2:57 pm Thu Nov 08, 2012 2:57 pm | |
|
_________________
Cerwyn
Hobby collector of Replica model guns and Militaria.
also member of Living History Reenactment Groups.
| |
|
Cerwyn
Cerwyn (Site Admin)


Number of posts : 11090
Age : 65
Location / Country : North Wales
Registration date : 2008-07-20
 |  Subject: Re: Loading Shoei MKb42(H) Blowback Cartridges - 2012 model Subject: Re: Loading Shoei MKb42(H) Blowback Cartridges - 2012 model  Tue Feb 05, 2013 2:59 pm Tue Feb 05, 2013 2:59 pm | |
|
LOADlNG SHOEI MKb42(H) BLOWBACK CARTRIDGES 2012 VERSION
This Guide deals with loading clean, prepared cartridges. Dismantling and cleaning fired cartridges are described in seperate articles.These cartridges have been redesigned to provide much more blowback pressure than previous types. Gas seal within the fired cartridge is contained almost 100% as long as the 0-Rings are in perfect condition. No smoke or ignition sound escapes past this excellent seal.The benefits are Much improved firing performance over previous Shoei designs and no dirt deposits are left on the modelgun after firing.Disadvantages are dirt buildup inside the cartridge, the piston is blown extremely hard into the top of the cartridge making dismantling difficult (more on this later).When loading the only tool required is a small brush.
Mascara brushes are ideal for this! Get your Girlfriend, Wife, Mother or just go yourself to the nearest Make Up shop and borrow sample brushes (Debenhams are ideal )
Silicone or Lithium based grease make perfect lubricants
The all important Caps, in this case 1 x 7mm MG and 1 x 5mm MG or cheap alternative. Do NOT use Marushin caps as the aluminium particles contained in the charge to create sparks will foul the cartridge internals (more details later)Check that all the parts are present... Cartridge case, Insert, Piston, Cartridge Top...
Step 1. Run the mascara brush through the cartridge case and over the threads to ensure cleanliness. It is VITAL that all components are spotlessly clean for correct operation
 *** Photo shows 9mm MGC cartridge for illustration only - correct photo to follow*** *** Photo shows 9mm MGC cartridge for illustration only - correct photo to follow***
Step 2. INSERT PISTON.
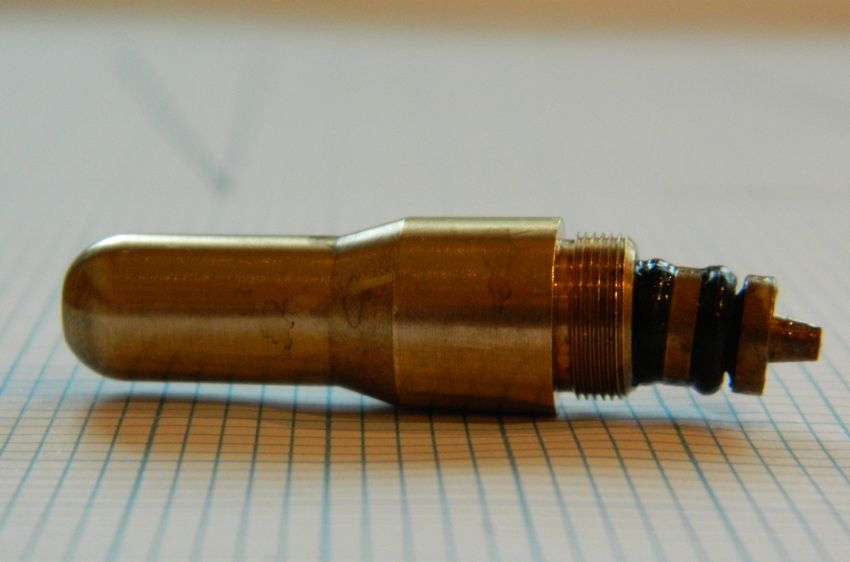
As part of the redesign of these cartridges, Bore diameter of the case has been tightened compared to the older examples. However, machining tolerances have caused some cartridges to be slightly too narrow. For example, of 30 cartridges I have, 12 were tight. After firing, the piston can become jammed in the top of the cartridge. These proved impossible to remove by hand, needing a punch and small hammer to drive them out. Shoei suggested using a 7.1mm dia Reaming tool to open the bore out OR alternatively adding extra 0-rings to the piston as a buffer. I resorted to adding 3 0-Rings, 3.4mm I/D x 1.9mm Cross Section, as shown below.
Smear Silicone Grease around the pistons' 0-Rings then insert into the Cartridge
 
Slide the piston into the case until the firing pin tip is flush with the threads. Gently ease the piston in a further 1mm approx.
Step 3. Insert Caps
Place 1 x 7mm cap on a firm level surface, powder charge facing upwards. Place the 5mm cap inside the 7mm as shown
Hold the cartridge case vertically and push it downwards over the caps. The cartridge is slightly chamfered making this an easy task. Ensure the 7mm cap lies flush with the threads
Step 4. Assemble Cartridge Base
Smear silicone grease on the 0-Ring then place the Insert into the Base ensuring the 0-Ring is near the top. Push the Insert firmly into the Base to sit level as shown in the photo above.
Step 5. Screw Cartridge together.
Last step is to screw the Base to the Cartridge Case.
Finally, I have found that rather than use expensive 5mm MG caps as the second cap, satisfactory performance can be achieved using much cheaper caps sold in rings of 8 shots. I've used the ones shown below with no problems.
_________________
Cerwyn
Hobby collector of Replica model guns and Militaria.
also member of Living History Reenactment Groups.
| |
|
