Cerwyn
Cerwyn (Site Admin)


Number of posts : 11090
Age : 65
Location / Country : North Wales
Registration date : 2008-07-20
 |  Subject: Beginners' Guide ... Loading WaShan Colt 1911 Cartridges Subject: Beginners' Guide ... Loading WaShan Colt 1911 Cartridges  Sun Feb 03, 2013 6:19 pm Sun Feb 03, 2013 6:19 pm | |
| Beginners' Guide to Loading WaShan Colt 1911 Cartridges Your modelgun will only function correctly if your cartridges are prepared and loaded correctly. This is intended as a Step by Step guide on how to do this.
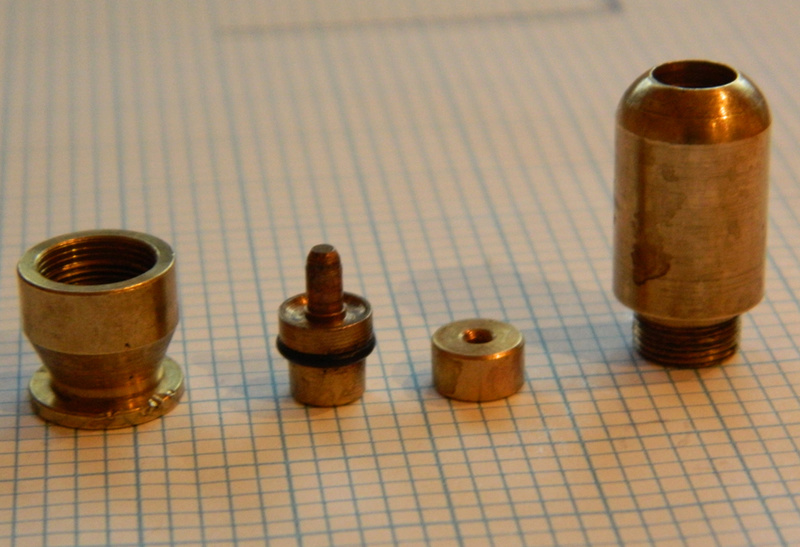
Cleaning of used cartridges is dealt with in a separate article... WaShan's 1911 cartridges use the same design as Marushin's early Single 0-Ring Centre Fire type. Unfortunately a single 0-ring is not a particularly good gas seal which is the reason Marushin adopted a second 0-ring in their later design. However, the use of silicone grease and a second cap as detailed below can improve performance. The Colt 1911 model is manufactued in metal which makes it heavier than pistols made in ABS or HWABS. So, unlike most Modelgun cartridges, this WaShan 1911 version performs better when using 1x 7mm cap (either MG, Marushin or Real-Flame) with 1 x 5mm cap. In this instance, the 5mm cap is used to produce more blowback pressure. I found that the much less expensive 8 shot cap rings provide enough pressure to cycle the 1911 very well. See below:Please note however that using two caps in ABS or HWABS modelguns can produce too much power and damage the modelgun and / or cartridge.The Cartridge consists of: Cartridge Body, Drilled Washer, Striker Pin with 0-Ring, Cartridge Rim Cartridge Body, Drilled Washer, Striker Pin with 0-Ring, Cartridge Rim
2. Cotton Bud (Q-Tip) 3. Small Brush. Mascara brushes are ideal for this! Get your Girlfriend, Wife, Mother or just go yourself to the nearest Make Up shop and borrow sample brushes (Debenhams are ideal )
Silicone grease is highly recommended as perfect lubricant The all important Cap, in this case Marushin 7mm  and the additional 5mm cap cut from these 8 shot Rings and the additional 5mm cap cut from these 8 shot Rings Step 1. Run the mascara brush through the cartridge case and over the threads to ensure cleanliness Step 1. Run the mascara brush through the cartridge case and over the threads to ensure cleanliness  Step 2. Dip the Cotton Bud in either only a little Silicone Oil and smear the inside of the cartridge bore. This aids lubrication and gives a little extra smoke effect too. Step 2. Dip the Cotton Bud in either only a little Silicone Oil and smear the inside of the cartridge bore. This aids lubrication and gives a little extra smoke effect too.  Step 3. Note the Drilled Washer has a slight chamfer around the drilled hole on one face only. Push the washer into the cartridge body ensuring the flat, unchamfered side faces outwardsStep 4. Squeeze a little grease from the tube, this much should be plenty, and smear it over the outside edges of the cap. DO NOT smear grease onto the powder charge in the cap. Apply grease to the 0-Ring also Step 3. Note the Drilled Washer has a slight chamfer around the drilled hole on one face only. Push the washer into the cartridge body ensuring the flat, unchamfered side faces outwardsStep 4. Squeeze a little grease from the tube, this much should be plenty, and smear it over the outside edges of the cap. DO NOT smear grease onto the powder charge in the cap. Apply grease to the 0-Ring also These cartridges rely on the cap acting as the blow back piston to operate your gun. The cap must be adequately greased to ensure smooth and free sliding inside the cartridge otherwise it will not function correctly. These cartridges rely on the cap acting as the blow back piston to operate your gun. The cap must be adequately greased to ensure smooth and free sliding inside the cartridge otherwise it will not function correctly.
Step 5. Place the caps into the cartridge, powder charge facing up Screw the two cartridge halves together to complete the task...
_________________
Cerwyn
Hobby collector of Replica model guns and Militaria.
also member of Living History Reenactment Groups.
Last edited by Cerwyn on Sun Nov 26, 2017 11:23 am; edited 2 times in total (Reason for editing : images converted to servimg) | |
|
