Number of posts : 11090 Age : 65 Location / Country : North Wales Registration date : 2008-07-20
Subject: Taking Better Photographs Sun Aug 31, 2008 3:35 pm
Post by erikthecat
this post might even be in the correct area, there's always a first time for everything.
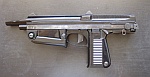
this is a photo related post. how is it that my images of modelguns always look so much worse that everyone else's? has anyone any tips on what settings to use, good backgrounds etc there are many images on plain white backgrounds, the weapons stand out really well, how are these done? don't say they are taken on a white background, that would just be too easy:)
TIA _________________ Hudson AK-47 factory PFC, non functioning obviously. Maruschin XM177E2 kit PFC, non functioning obviously.
Last edited by Cerwyn on Sun Aug 31, 2008 3:41 pm; edited 1 time in total
Cerwyn Cerwyn (Site Admin)
Number of posts : 11090 Age : 65 Location / Country : North Wales Registration date : 2008-07-20
Subject: Re: Taking Better Photographs Sun Aug 31, 2008 3:36 pm
Post by shazhib
mate,
I'm not a "pro" on photo shooting (we make lot of nice camera, but that doesn't necessarily mean we are all good photo taker, just to note because I've asked this question more than couple times outside mycountry), some of the tips I use. 1, alway pay attetion to a lightning. This is very cruitial. 2, most of digital camera nowaday has a setting for "outdoor", "cloudy day" or "indoor" kinds, test which would work the best. 3, if you have a tracing paper or just a sheet of paper, then, use this thing to place between a source of light and a gun. It makes more softer lighing 4, this is for placement, usually it looks more nice if you place a thing pointing at the corners, not like straight horizontal or vertival, but "white cross line in St. Andrews" kind of direction (you say "diagonal"? Claymore, please correct me!).
Hope this will help a little.
Cerwyn Cerwyn (Site Admin)
Number of posts : 11090 Age : 65 Location / Country : North Wales Registration date : 2008-07-20
Subject: Re: Taking Better Photographs Sun Aug 31, 2008 3:37 pm
Post by 8ace
I have got a camera with image stabilizing on it and it makes a huge difference with close-up (macro) and poor light shots.
As for the white background I use printer paper or for large items a bed sheet.
Cerwyn Cerwyn (Site Admin)
Number of posts : 11090 Age : 65 Location / Country : North Wales Registration date : 2008-07-20
Subject: Re: Taking Better Photographs Sun Aug 31, 2008 3:38 pm
Post by Jez_JRP
I use a samsung S600 For a cheap camera it's pretty badass and most of the time I can get by just fine with Auto mode, though I do sometimes make the effort to set things up myself if it ain't broke, I don't fix it
Taken in artifical light (tungsten bulb, 3x60W) with no flash using auto-focus and no image stabilisation. Backgroud = battered old suede jacket. I thought the texture was kinda nice.
smootik Modelgun Perfectionist
Number of posts : 1823 Location / Country : Poland Registration date : 2009-03-03
Here is some hints about taking pictures of modelguns (and not only).
Very often pictures of modelguns are not of such quality as we would like them to have. Fortunately in many cases you can work around limitations of your camera to get a decent photo.
Theory (just a bit) All cameras work based on the same principle - they capture light. Exact mechanism varies, as the light can be captured on film or on electronic sensor, but how it works is common to them. In order to capture picture that is not too bright or too dark, a certain amount of it must reach sensor or film. Amount of light captured depends on two factors:
intensity of light - the brighter light source (or scene that you intend to capture), the more light gets to the sensor.
length of capture - the longer you capture the light, the more gets to the sensor.
This means that for a correct photo you either need to make the object (modelgun) brighter (for example put it under sunlight or a lamp), or choose longer exposure time. Problem with longer exposure is that it causes blurry photo, because your hand will likely move during photo.
How to make sure that you get a clear photo? You can manipulate camera settings (depending on camera capabilities) and you can manipulate environement.
There are three camera parameters that influence how light is captured:
sensitivity - it is a number that looks like ISO100. Higher sensitivity means that film/sensor captures larger amount of light - this is good! Unfortunately higher ISO sensitivity means grain (for film) or "noise" (for digital sensor). For small consumer cameras usually ISO higher than 400 gives a noticeable noise. There is always a tradeoff...
aperture - another number that looks like F4.5. Aperture is a "hole" in lens that allows more or less light to get in. A higher number (F16) means smaller aperture (tiny hole), so for closeups it is best to take picture with as small F number as camera allows (F2.8, 3.5 or 4.5 is typical). Note: when you "zoom in", the F number will automatically go higher (technical limitation of most cameras) - avoid that!
exposure - a number that looks like 1/200s. It says how long (in seconds) camera captures light for one picture. If there is not enough light, F number is high (say, F8), sensitivity is low (ISO80), camera needs longer time (1/50s). If you add more light, time goes shorter. This is important, because usually you need time shorter than 1/60s (for example 1/200s is ok, but not 1/4s) to avoid blurry picture.
Camera in automatic mode will usually choose all three parameters based on its program, and it will often display them when you half-press button. That will immediately tell you if there is a chance for a good picture - look at exposure time. Make sure that time is under 1/60s and that aperture is the lowest for your camera. If your camera allows manual setting of some parameters, you can manipulate them to enforce better quality. For example you could increase film sensitivity from ISO100 to ISO400, that will shorten time from 1/30 to 1/60 and help you take a clear picture.
Another parameter to control is zoom. Maximum exposure time to avoid blur depends on zoom level. At normal zoom it is about 1/30 to 1/60s, but with 10x zoom this decreases proportionally to 1/300s! If you take picture at 1/60s with 10x zoom, it will be most likely blury. To capture enough light during very short exposure you need to put much more lighting on object.
Blur - stabilization Some cameras have picture stabilization. That feature helps a bit to increase exposure time without blur. How good it is depends on camera and on stability of your hands, but you can expect that it should reduce maximum time from 1/60s to 1/40s or even 1/30s. When it's dark, this feature will not help much - it usually works best for zoom photos, reducing time from 1/300s (at 10x) to about 1/100s).
Blur - add light What if camera says exposure time is long, for example 1/15s? This means it is too dark to take a non-blur picture from hand. You can mount camera on tripod to avoid shaking. You can also add more light to the object, for example by shining a lamp on object. If you shine it directly, there will be a very bright spot where lamp points, and darker non-uniform area around it, so it is not a good thing. This is a reason why flash usually does not look good - it makes this bright spot appear. You can "bounce" light from a piece of white paper, or put a white linen between lamp and object to diffuse light.
Light is the key to good pictures. If there is not enough light, nothing will help you enough.
Blur - autofocus hints Cameras usually use autofocus to measure the distance and make sure the picture is sharp. Regardless of the distance, cameras need a bit of help to properly focus. Most compact cameras can only focus if you have a vertical edge (different colours on each side, or a distinct line) somewhere near center of the screen. If the surface is uniform or it has horizontal lines - autofocus cannot work. With horizontal lines you can always rotate camera 90 degrees, focus (half-press), then rotate back (carefully keeping similar distance) and take the picture properly focused. You can also focus on another object at the same distance, and then move camera to what you want to photograph, but take note that lighting is the same.
For closeup photos it still does not always work as it should. Cameras usually have a certain minimum below which they cannot focus properly. For example for my Sony this is normally 40cm. If something is closer, camera will ignore it and find another area to focus on (making object blurry), or just not focus at all. Try taking picture from a larger distance if you have this problem.
However, if you switch the camera to "Macro" mode, you tell camera to look for closer objects, and minimum distance is reduced - in my camera this is 10cm, for other it can be even lower. "Macro" mode is often activated by a button or menu position with flower picture.
Do not use "zoom" for closeup photos, because it increases minimum distance even more (1m in my camera) - zoom out completely. Keep about a hand's length (~20cm) between camera and object, it should be enough to good focus in Macro mode.
Wrong colours - "white balance" setting Camera does not know if it "sees" a white colour in a shadow, or gray colour in light. To help camera correctly see colours, there are several profiles that are called "white balance" setting. Typical ones are: sun, clouds, lightbulb, fluorescent, flash (and of course automatic). Camera tries to "guess" this setting, but it does not always come out right - picture will be too blue, or too yellow. You can manually change that setting to get better result.
Summary Remember that you can half-press the button to set focus/exposition first, and then move your camera before you press button fully to take the picture. This helps in a lot of situations.
put light on your object. Do not use flash, try shining a lamp but not directly onto object.
verify that distance is not too small for your camera. If it does not focus correctly, switch to "Macro" mode, or increase the distance.
verify that exposure time is short, say shorter than 1/60s (= 1/100, 1/200...). If it is longer, you need to use tripod or add more light (or have an extremely steady hand ;-) ).
if camera cannot focus because it does not "see" vertical edge, try to set distance manually, or focus first on another part of object at the same distance, then move camera back. If you use this technique, keep in mind that this other part should be of similar colour, otherwise exposure time migh be set incorrectly.
if colours on picture do not look ok, change "white balance" setting.
Last edited by smootik on Sun Apr 18, 2010 1:17 pm; edited 1 time in total (Reason for editing : my English was not English enough ;-))
smootik Modelgun Perfectionist
Number of posts : 1823 Location / Country : Poland Registration date : 2009-03-03
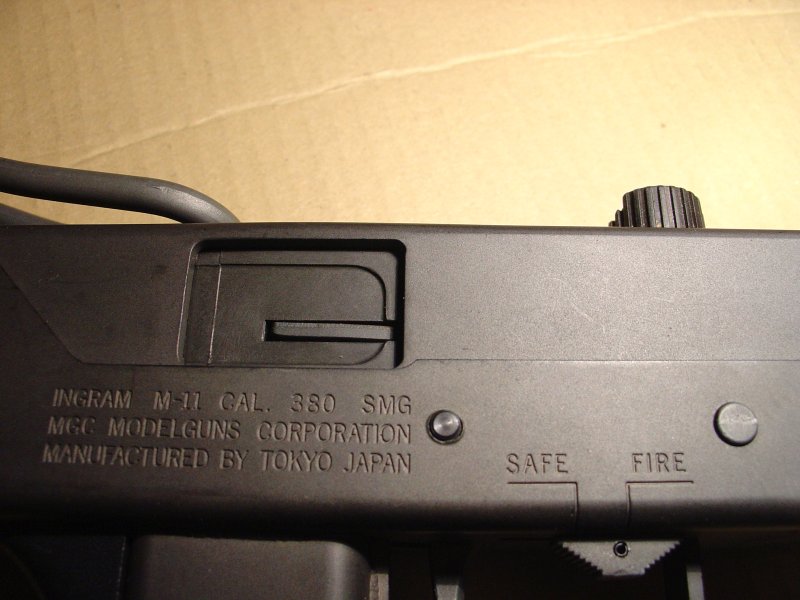
To better illustrate how this works in practice, let's try to take a good closeup picture of markings on MGC MAC11.
Camera that I have is Sony DSC-V1. It was made in 2003, so it's pretty old for today's standards. It does not have any stabilization features. Minimum F setting (maximum aperture hole) is F2.8, which is pretty good. Better cameras have F2.4, F2.2 or F2.0, going below that number means a very good thing! ISO settings range from 100 to 800, but at the maximum sensitivity there is a lot of visible "noise" (white and coloured spots). I usually limit ISO to 100 for outdoor shooting, and to 200 or at most 400 for indoor.
I have arranged a modelgun on table (without trying for a nice composition, this is not objective of this post), picked up my camera and just took the first shot. I only verified that it was manually set to ISO400, as it is night here and the room at the moment is dark, except for a single 75W bulb.
Obviously there is a problem - this picture is completely blurred. While taking picture, I have noticed that exposure time choosen by camera was 1/2s. Half a second! I cannot hold my hand steady that long, and tripod is in another room (lazy!), so I have found another solution - I moved a table lamp so it shines directly on the model. As the model surface is not shiny, this does not cause too much problem.
Let's snap a second picture with a help of a table lamp.
Looks the same? Quick check revealed that picture was taken at 1/80s, enough to avoid blur due to handshake. Blur must be due to something else. I have also noticed another problem - picture is yellowish. This is way different than what I see with my eyes.
"White balance" setting of my camera was "cloud" icon, which means shaded outdoors. I have changed it to "bulb" which means indoor incadescent lighting = my lamp. (note: if there are several different light sources, it might be impossible to correctly set white balance!)
Let's take a look at picture with correct white balance setting.
Much better colours, but still blurry. Distance to the model is about 15-20cm, much below minimum 40cm for correct autofocus operation (value is from a camera manual). Fortunately I know that I can switch to "Macro" mode (flower icon) that reduces minimum distance to 10cm (again, value from the manual).
Hmm, something is still not right. Picture is still blurry, even with correct distance (~15cm). If you look in the middle of the picture (this is area where autofocus usually works), you can see that it is a uniform surface (in front of ejection port). This has made autofocus unable to find the distance (lack of contrasting edge) and picture came out blurry.
Let's take another picture, but pointing at a vertical edge slightly to the left of previous picture center (front edge of ejection port).
Much better! Autofocus has picked up the edge and correctly judged the distance. Picture now looks just as I wanted. I could have also half-pushed the button while pointing camera at the edge, and keeping button half-pushed shift camera back to previous position, so that focus and other parameters are locked - then press button fully and take picture. Exposure would be correct because what camera sees while focusing (half-press) is the same shade as intended target (when full-press is made) - do not do that if focus and target surfaces are contrasting.
Instead of enabling "Macro" mode, I could have moved my camera further from model, to about 40-45cm distance. I did not have a ruler, so I just moved back and half-pressed until camera focused correctly. You can see here the lamp that I have used, in that case shining directly. Area directly under lamp is bright, but surrounding areas are dark. If I had used a white paper to reflect the light, or a white material to diffuse it, all should have a more uniform brighteness. Even better idea is to put object in sunlight, for example close to window, during day. That would provide naturally diffused light, the best for pictures.
In case you wonder - yes, I go through this process most of the time I take closeup pictures. I usually remember to set up light and correct white balance setting before making the first shot, but getting correct focus is trial and error. Sometimes the very first shot is perfect sometimes camera refuses to focus the way I want for a long time.
(edit: minor spelling/grammar)
Browning Modelgun Enthusiast
Number of posts : 119 Location / Country : Cambs, UK Registration date : 2009-03-12
Subject: How I set up my photographs Sun May 15, 2011 10:54 pm
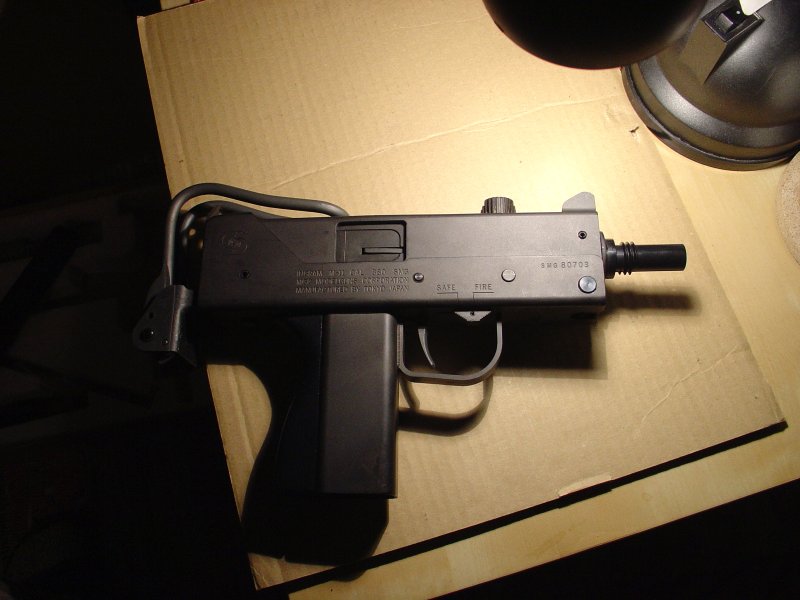
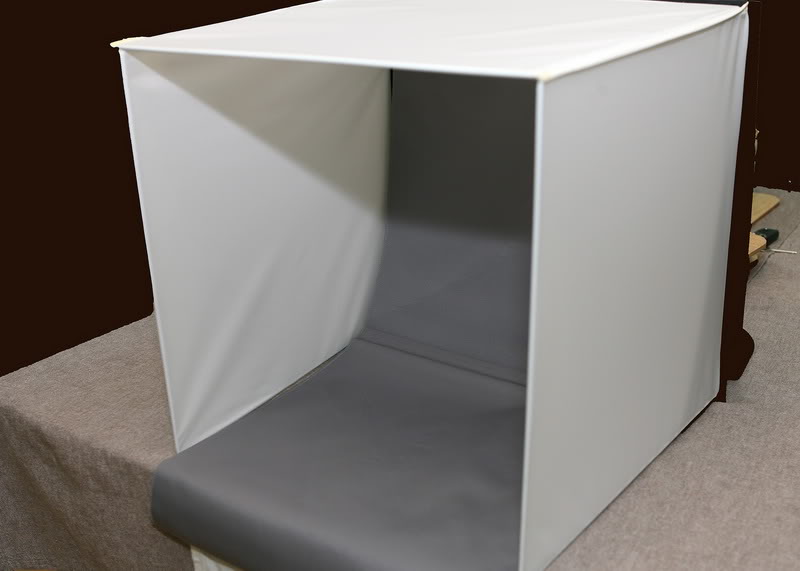
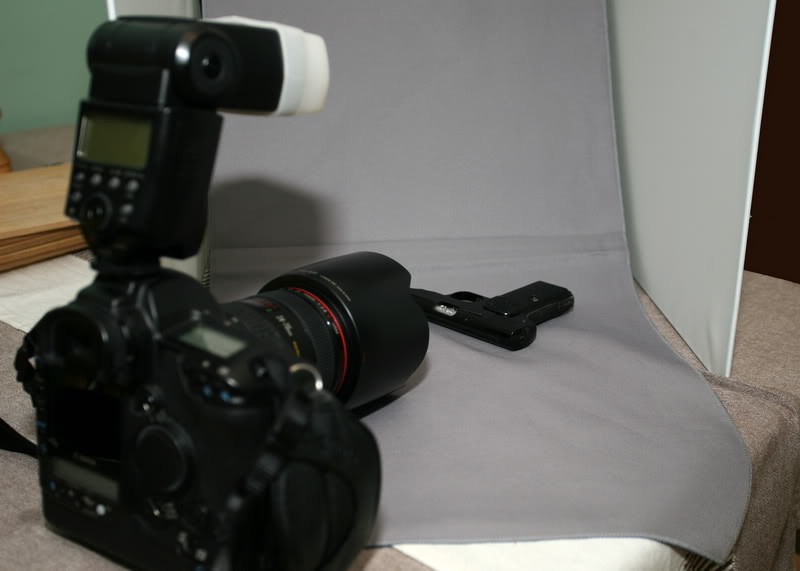
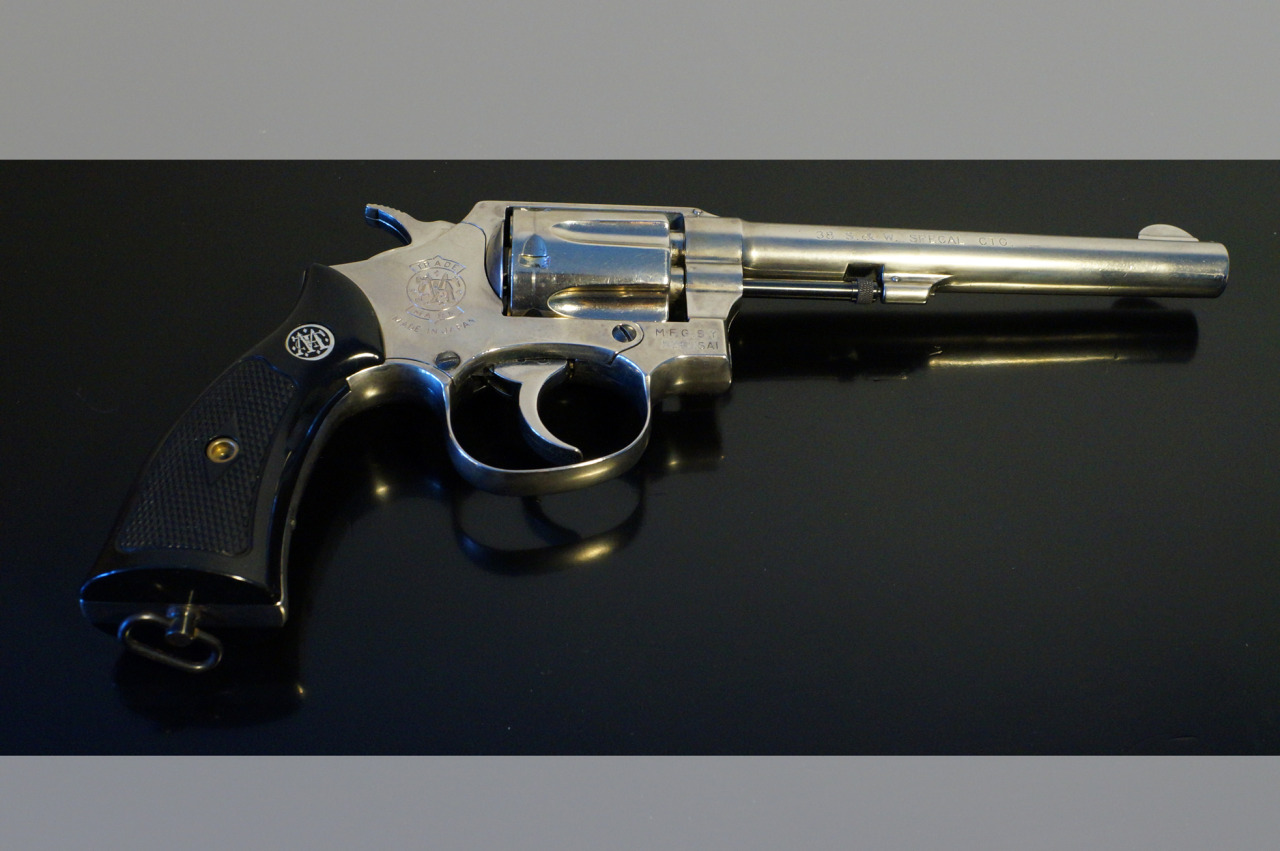
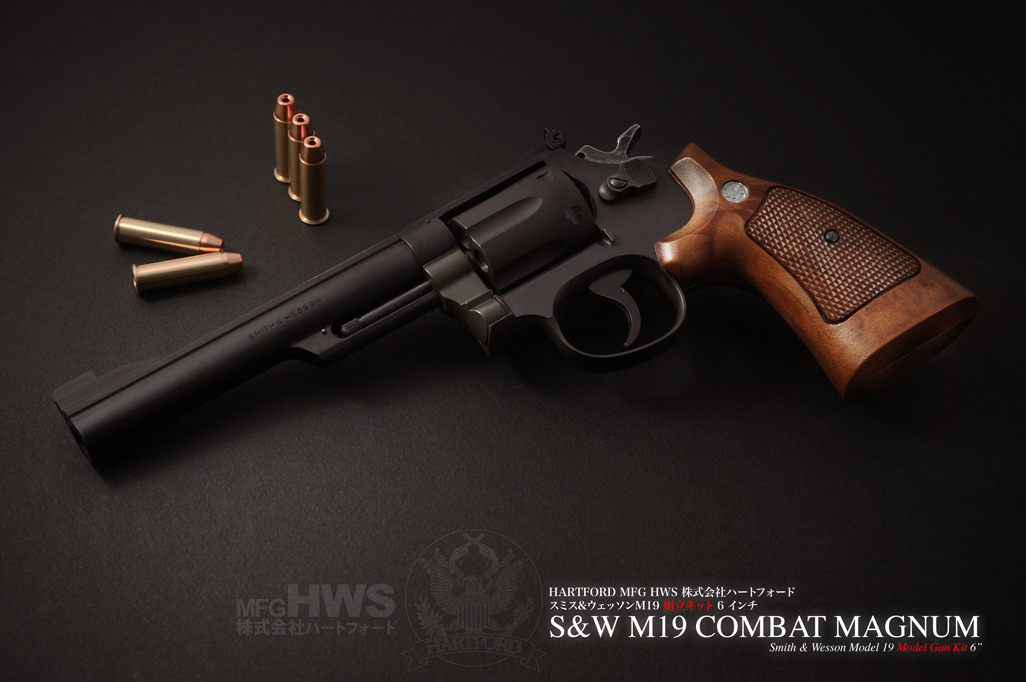
In response to Smootiks suggestion, I am going to share my set up on how I produced images such as this one:
I have a small, portable light studio which measures approx 50cm x 50cm, it folds flat for storage/transport and consists of a semi rigid outer case that opens up to provide support and it contains 3 inner sides - 2 hinged/joined and 1 that Velcro's to the others to make a 3 sided cube, these sides are translucent. The "background" is a double sided soft sheet (mine is Grey and Blue) that Velcro's on to create the "infinity " curve. When assembled it looks like this:
I did a quick search on that well known auction site, and found a these going in the UK, for around £20 (plus postage). I know someone who made a version using a cardboard box lined with white paper and a top that was covered in translucent "tracing" paper, to diffuse an external light source. Now you could go the whole hog and set your studio lights up either side of the "studio" and get shooting, but I decided to see how my flashgun would work, if it was fired through the top translucent panel. I got good results from the first shot, so I stuck with the same set-up for the rest! The only other "internal" thing I did, was to put something under the background, to enable the model gun to be angled slightly/
As for camera and settings, I used my trusty Canon EOS 1dMkIIn Digital SLR, fitted with an EF 24-70mm f2.8 L lens and my 580 EX Speedlight. The Speedlight itself is fitted with a diffuser, which helps to bounce the light around (at the optimum angle, it helps to avoid those harsh shadows that you can get with direct flash!) When shooting, I made sure that the Speedlight was firing through the top panel. These modern Speedlights are very intelligent and they communicate with the camera during firing and will cut off the flash output, when the camera's internal sensors tell it that the optimum exposure has been achieved. As I was trying this set-up out for the first time, I used complete manual exposure on the camera, but left the flash on it's TTL (Through The Lens) setting. Starting off with exposure at f4 @ 1/60th and dialling in a little extra f stop if I was getting too much flash.
The camera and flash are here and you can see how tall the Speedlight sits above the Camera and lens:
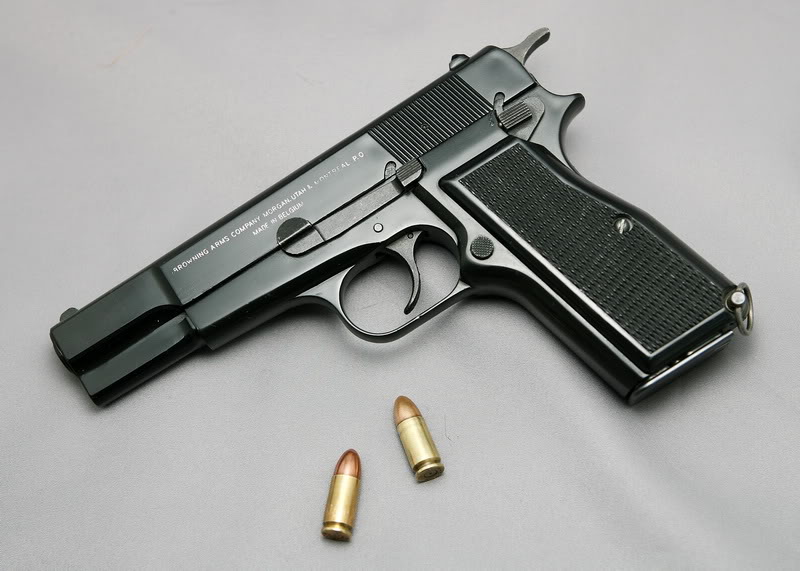
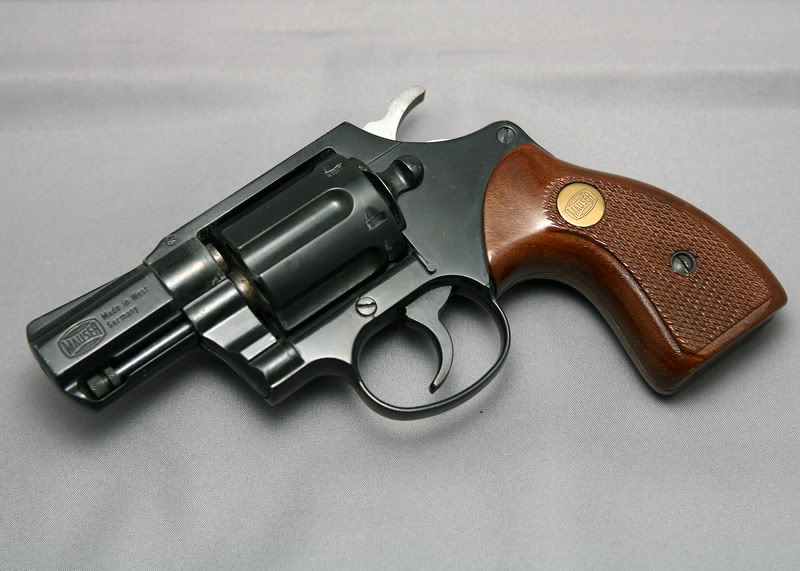
All my picture processing is done through Photoshop. I know not everyone can afford the full version, but the "consumer" version - Elements - is more than capable. I tend to just apply a little levels correction, some Curve if necessary to brighten the image up a little, and then finish off with a little "sharpening". I crop to a standard 7x5 inch format and also save a resized copy for web publishing. When setting up for this small article, I shot a blank firer that I also own. I wanted to see how the light reflected off of "Real Steel" over the ABS of the modelguns. The result is:
I also appreciate that my Camera Kit is a little more exotic than most peoples, but I have seen other peoples efforts with kit that costs a fraction of what mine did, that surpass my own efforts!
cosmitron Modelgun Enthusiast
Number of posts : 175 Age : 49 Location / Country : Germany Registration date : 2013-08-30
Subject: Re: Taking Better Photographs Sun Oct 27, 2013 3:01 pm
For those who could be interested here's my basic process.
Minimum preperation In this case, I use: my blank wall, my toy box (but any table works fine ) a large gloss black thick paper, an orientable lamp and of course my camera. I usually shoot by night so there's one kind of light source.
The light orientation will effect the white wall which will put reflection on the paper and the gun.
I'll play around with the light to get what I want light wise depending on the camera>object angle.
Photoshop touch ups.
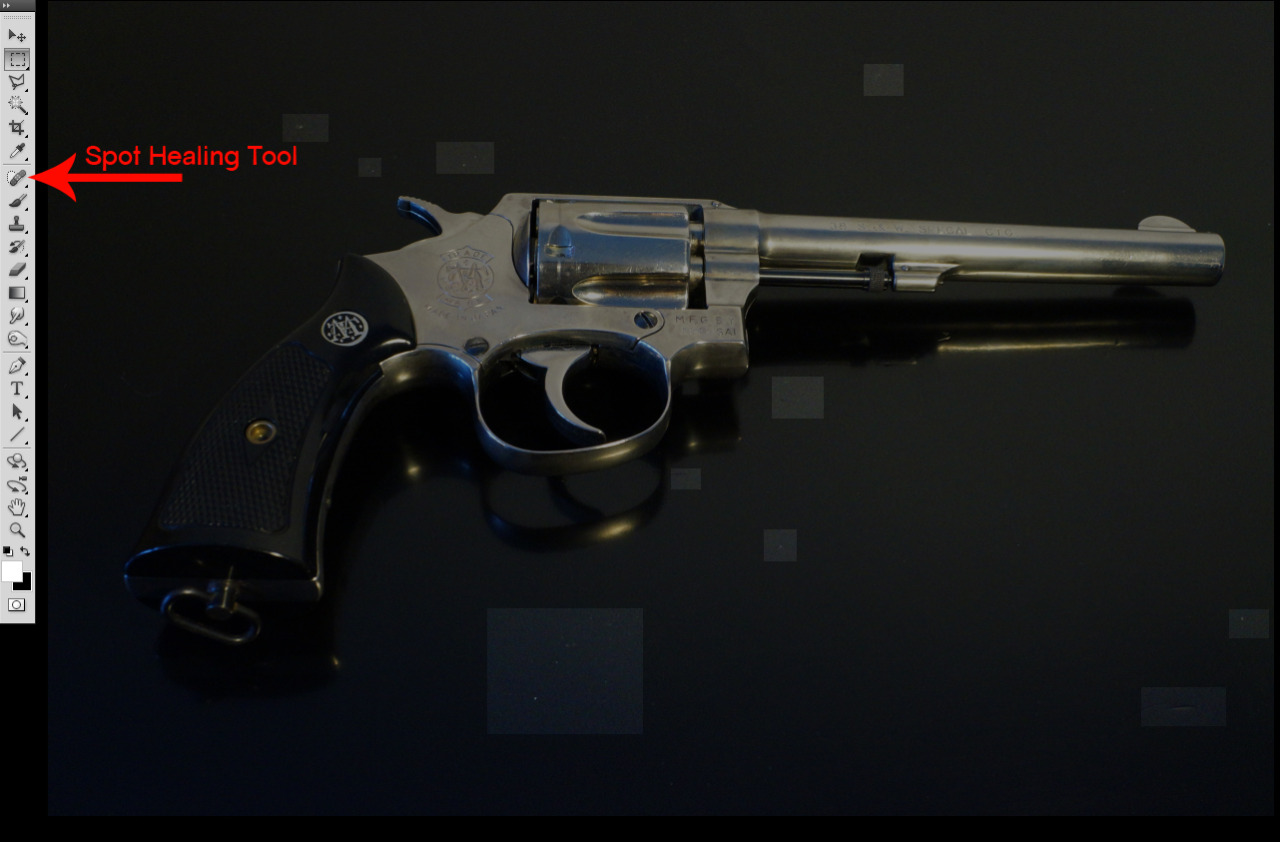
Cropping the picture helps the composition, even if it's a super simple one:
Spot Healing Tool. Here's a tool I've found when I shot my first modelguns. For some reason it's always full of dust whatever I do to avoid that.
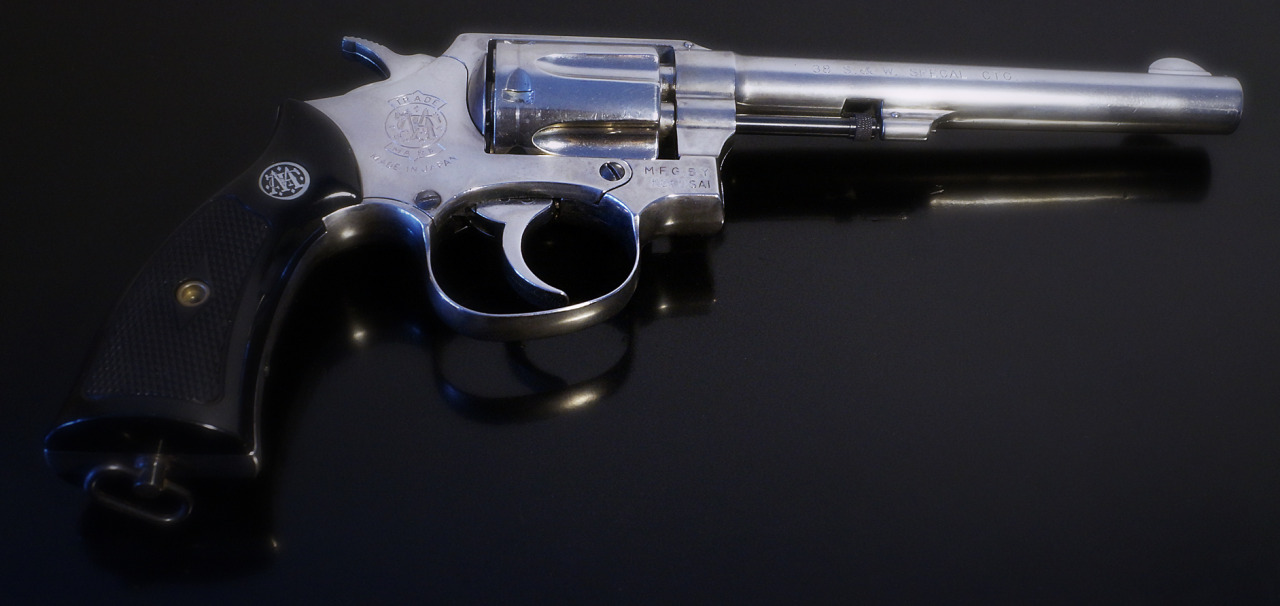
Here's the result after a few minutes of touch ups:
and finally I'll play with the warm/cold balance using curves tool (image>adjustments>curves) to get the tones I want and add a subtle ala Hamilton blur on top of the picture for some 70's erotism feel.
Composition There are rules for the composition but I have to admit I don't really think about that. I basically work with diagonals when I think about it. But you can dig more about this subject cause I know it's very helpful at some point.
Camera The Sony Nex-5N camera is perfect for my use. I set up the right light source (Cloudy, Sunny, warm light etc), and use the autofocus to set what area I want to show. The 18-55 lens that was offered with the camera is a good all around lens, but also use a macro lens for the close ups.
And voilà.
Hope this is interesting.
Last edited by cosmitron on Sat Jul 18, 2015 11:44 am; edited 2 times in total
smootik Modelgun Perfectionist
Number of posts : 1823 Location / Country : Poland Registration date : 2009-03-03
Subject: Re: Taking Better Photographs Sun Oct 27, 2013 8:06 pm
Thanks for sharing!
Even if simple, there are always additional ideas one can find. Glossy paper, nice trick!
And that IKEA (?) lamp, it is such a great value for money! :-D
cosmitron Modelgun Enthusiast
Number of posts : 175 Age : 49 Location / Country : Germany Registration date : 2013-08-30
Subject: Re: Taking Better Photographs Sun Oct 27, 2013 8:29 pm
Haha Yes Smootik It's the IKEA lamp
cosmitron Modelgun Enthusiast
Number of posts : 175 Age : 49 Location / Country : Germany Registration date : 2013-08-30
Subject: Re: Taking Better Photographs Wed Oct 30, 2013 7:56 am
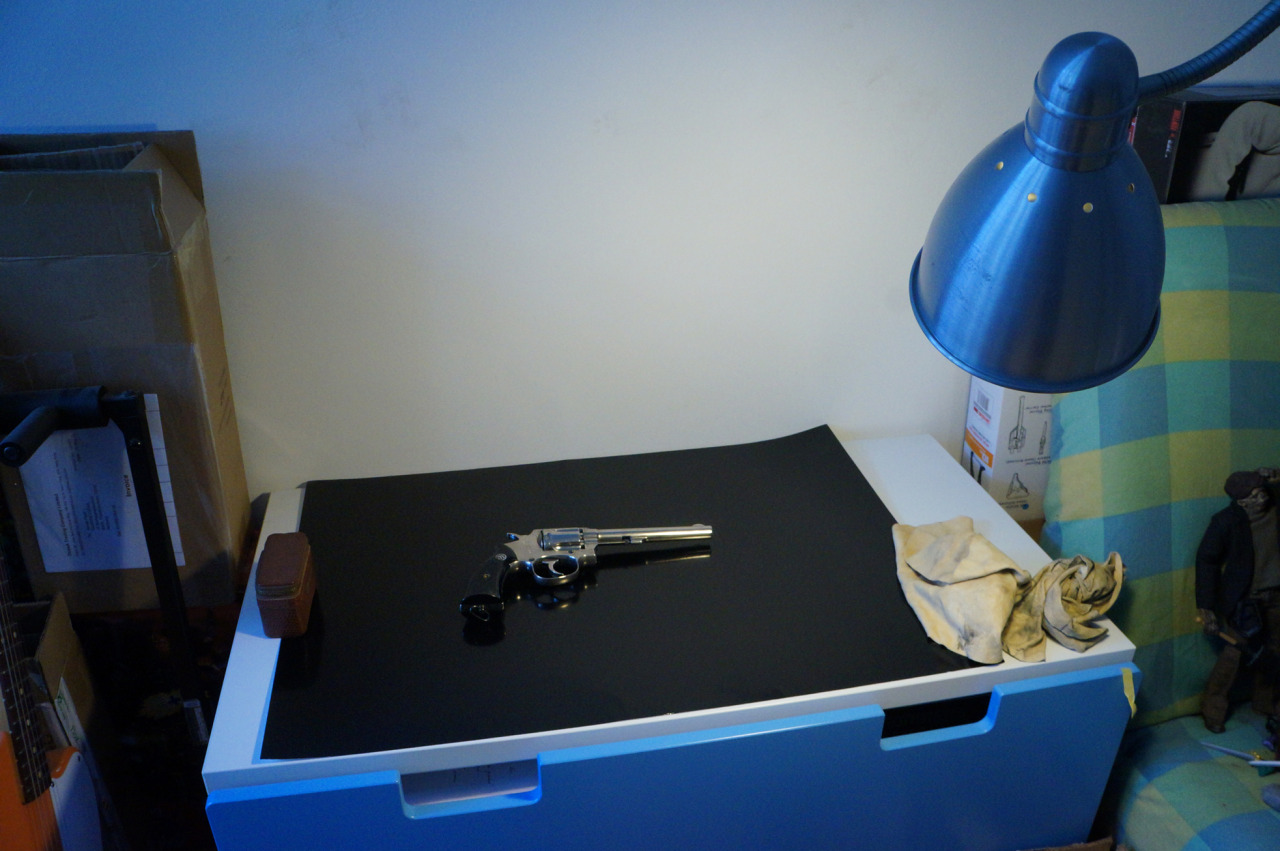
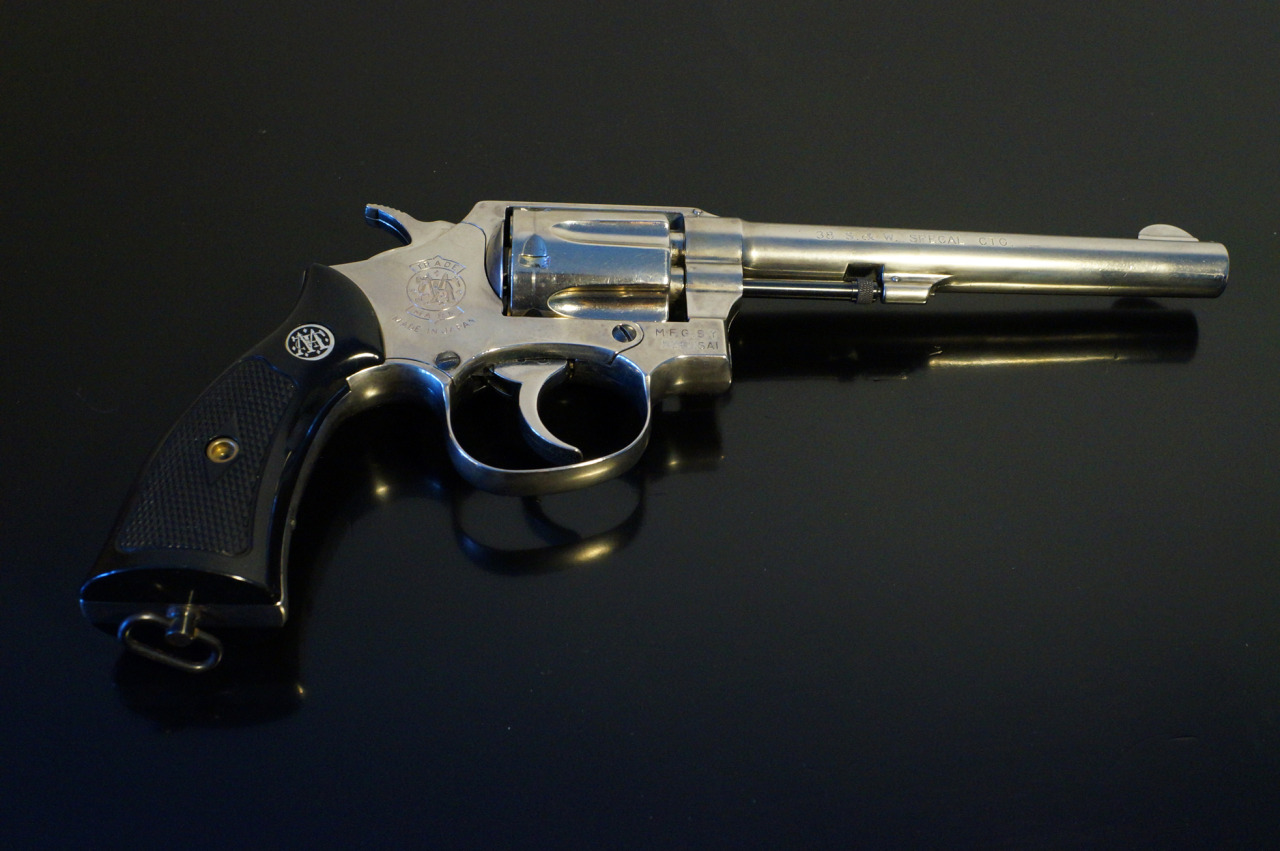
Here's a lightbox test. Actually suits handguns photo shooting imho
Now the process:
#1: Recycle an old box into a light box. Cut 2 opposed sides and cover the holes with white paper. #2: As my lens is a "simple" 18-55 I need a camera stand for 6" long poses to get the details I want. #3: The model is very reflective (what you expect from chrome material) so I wrapped the inside of the box with a large sheet of white paper with no tape visible. #4: I've put a black paper in front of the model and use it as a cheap reflector. (it's actually the Gloss black paper I used for my previous photos) in order to minimize as much as possible the reflection sources. #5: The model is set on a black matt paper. No other lights are gonna be used except for the spotlight on #6. Otherwise, the chrome parts of the gun will reflect what's enlighten. #6: the spotlight mentioned before. #7: view from inside the box with spotlight on.
Hope this helps ^^
Here are more photos using the same pattern:
I'll post the photoshop process soon.
Last edited by cosmitron on Sat Jul 18, 2015 11:48 am; edited 2 times in total
cosmitron Modelgun Enthusiast
Number of posts : 175 Age : 49 Location / Country : Germany Registration date : 2013-08-30
Subject: Re: Taking Better Photographs Sun Nov 03, 2013 1:22 pm
Here's the photoshop process:
shazhib Modelgun Perfectionist
Number of posts : 323 Age : 57 Location / Country : Tokyo, Japan Registration date : 2008-09-07
I am not try to be nosy around member's personal life, but in many cases, what attracts me is something in a photo which is not intended to be shot (in this case, something other than a Gun). I saw you play the guitar which I really envy you. Also, noticed a white warrior from start wars (or is that "Stig"?) lying on a couch which is a classic for all model funs across the globe.
Anyway, I see you took a really nice photos.
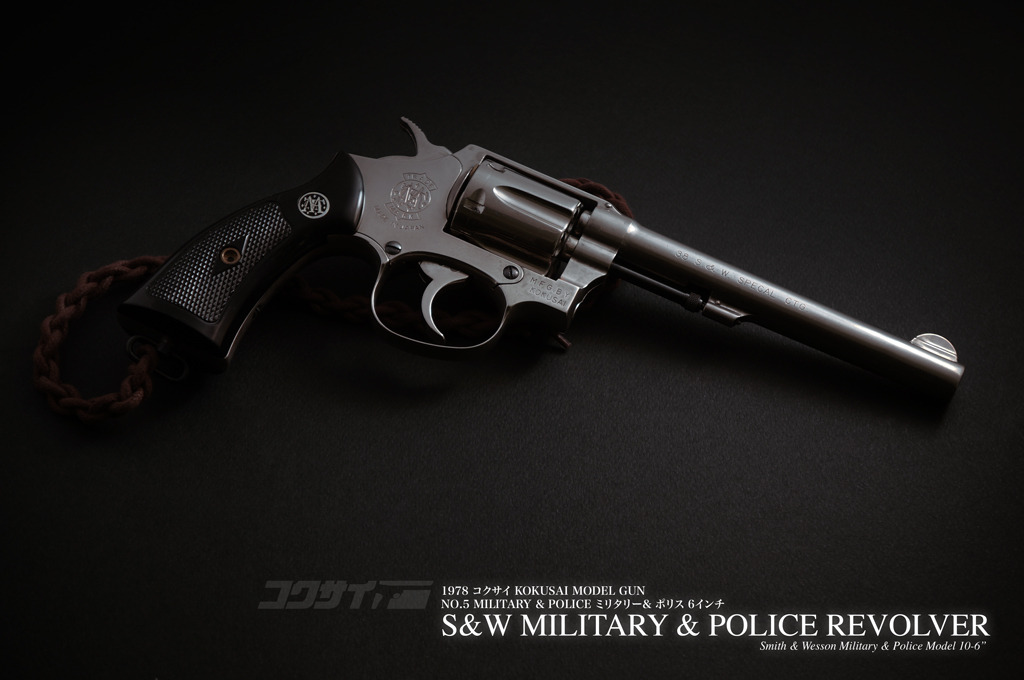
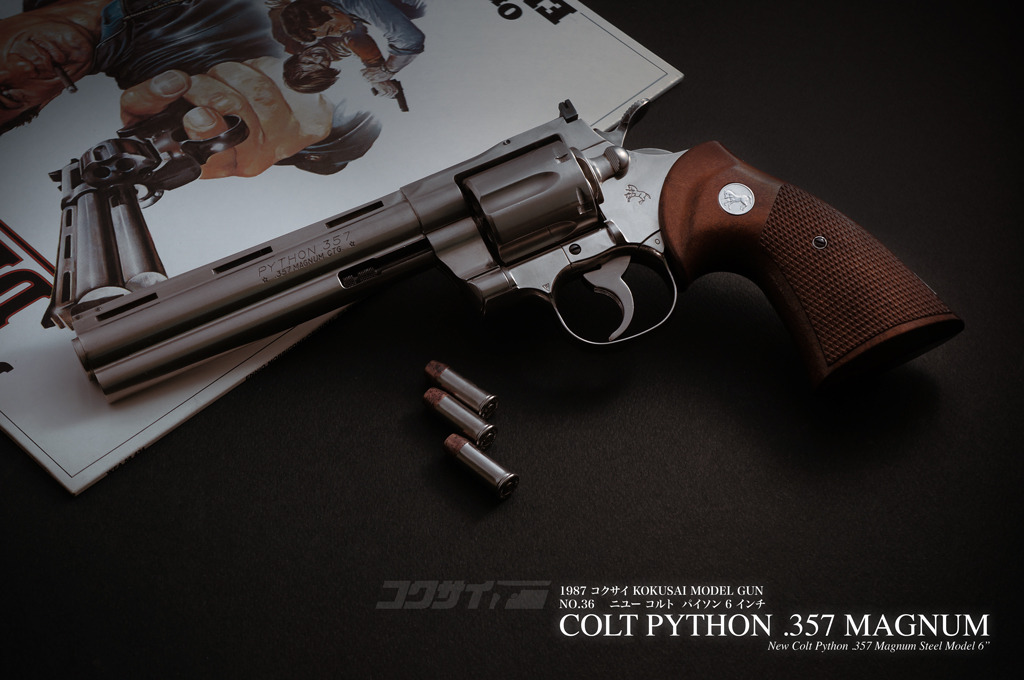
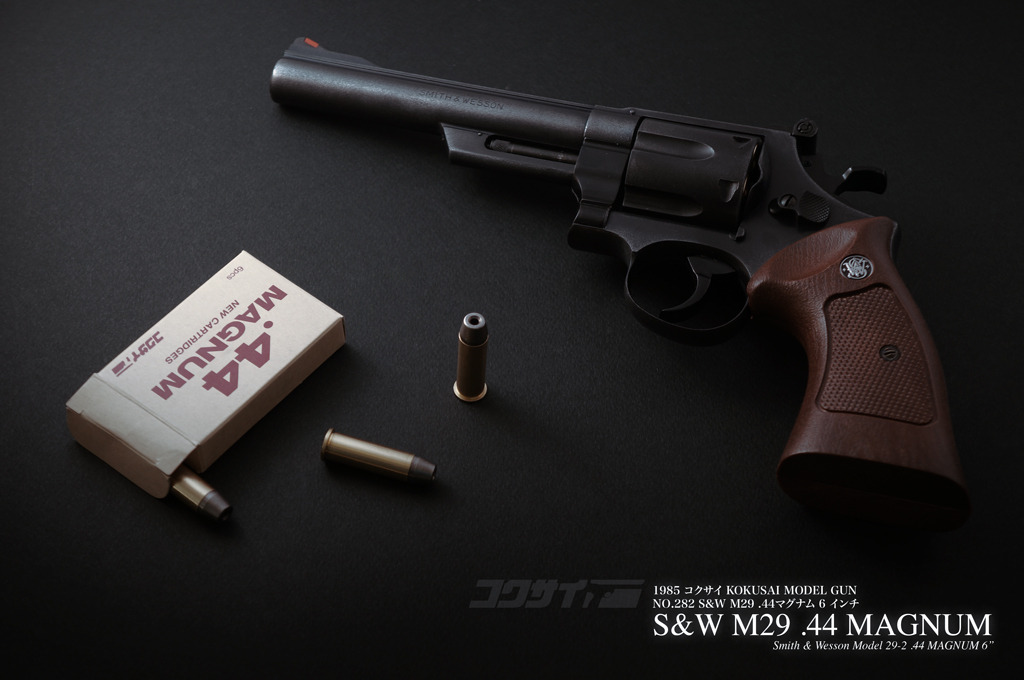
Also, if you are interested in collecting Kokusai zinc revolver, I suggest to get one when you find if it were in good condition. Kokusai is now making very limited model in zinc, do not know how long they keep producing a zinc model.
S
cosmitron Modelgun Enthusiast
Number of posts : 175 Age : 49 Location / Country : Germany Registration date : 2013-08-30
HA! Shazhib! Don't worry about my side stuff, I wouldn't put it on internet if it had to remain private. I actually buy all the metal built Kokusai that are still available that match my collection! So obviously, what you say interests me a lot. But I guess those limited Kokusai are not shipped overseas right?
(the Star Wars warrior is actually a Sandtrooper from last Hasbro "black serie" toy line. They're 6" high which is pretty awesome)
Dronne Modelgun Enthusiast
Number of posts : 215 Age : 58 Location / Country : France Paris Registration date : 2012-01-05

")