 | MP40's Modelguns Forum
International Forum for Modelgun enthusiasts
|
|
| | Marushin XM177E2 kit - first time assembly |  |
| | |
| Author | Message |
|---|
smootik
Modelgun Perfectionist


Number of posts : 1823
Location / Country : Poland
Registration date : 2009-03-03
 |  Subject: Marushin XM177E2 kit - first time assembly Subject: Marushin XM177E2 kit - first time assembly  Mon Apr 11, 2011 3:15 pm Mon Apr 11, 2011 3:15 pm | |
| Before I got this kit I looked at reviews and manual scans and list of problems and did not really know what to think about it. M-series rifles are not my favourites, yet I was attracted by "metalness" of this kit and relatively low price. In this thread you can find an account of my work on assembling this kit. From start to end it took me probably over 12 hours of work so far - including labeling and sorting the parts, assembly itself, bits of troubleshooting up to taking photos and writing what you see down. I expect at least a few more hours of work to complete this description (only half is done), and even more to get this model to work correctly. Jump directly to a step: Lower receiverStep 01 - magazine catch Step 02 - bolt stop Step 03 - trigger Step 04 - trigger guard Step 05 - attach trigger guard Step 06 - fire selector and grip Step 07 - hammer Step 08 - trigger tab Step 09 - receiver tube 1 Step 10 - receiver tube 2 Step 11 - stock assembly Step 12 - installing stock Step 13 - bolt buffer Upper receiverStep 14 - front receiver pin Step 15 - rear sight Step 16 - forward assist Step 17 - install forward assist Step 18 - ejector Step 19 - port cover Step 20 - foregrip catch Step 21 - chamber Step 22 - front sight Step 23 - barrel Step 24 - install barrel Step 25 - bolt head Step 26 - charging handle Step 27 - install bolt Step 28 - put receiver together Step 29 - foregrip Step 30 - magazine 00 - before you startWhen I received the package containing Marushin XM177E2 self-assembly kit, I was surprised by its size. It was large! Total package weight is about 3.3kg, with model alone over 2.5kg, making it more expensive to ship, yet more fun to handle. Inside the box I found: - assembly instructions, in Japanese, but with pictures - Marushin catalogue - two levels of styrofoam, containing large model parts in slots - a large bag of bags of parts on the lower level of styrofoam. DONT'T MAKE A MISTAKE! Upper/lower/grip are not assembled, they are just laid down in the box. If you try to pick them up, receiver halves will fall apart and potentially get scratched or damaged. Before you start assembly you should open the large bag of parts. Inside there are seven smaller bags. Identify each bag by a letter, according to page 3 of the manual, and label it - this will make work easier later. Short guide to recognising bags is by looking for large, characteristic pieces inside them: A: two large pieces of barrel (#9, #174) B: flat tab (#17), forward assist (#145) C: bolt head (#169) D: trigger (#154) E: trigger guard (#162) F: bolt buffer (#77) X: loading tool (#167), long thin rod (#171) Do not take parts out of the bags until they are needed. Many parts are small, round, springy, they roll and disappear into inaccessible places faster than you can say Llanfairpwllgwyngyllgogerychwyrndrobwllllantysiliogogogoch. Useful hint small parts are drawn in manual in appropriate boxes. These are real-life sized! Instead of taking out your caliper you can simply put a part on the drawing to verify you picked the correct one.      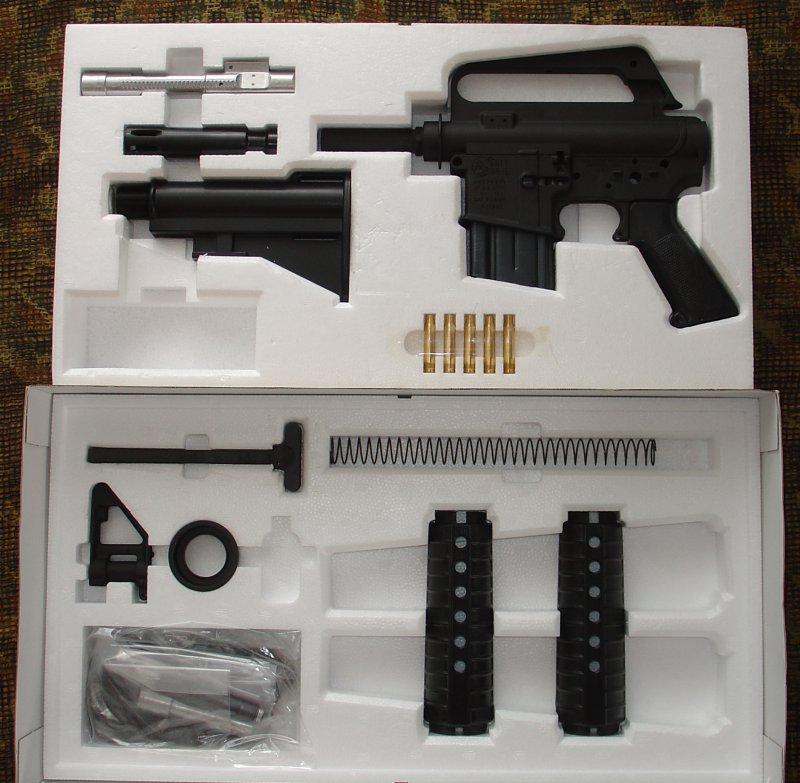 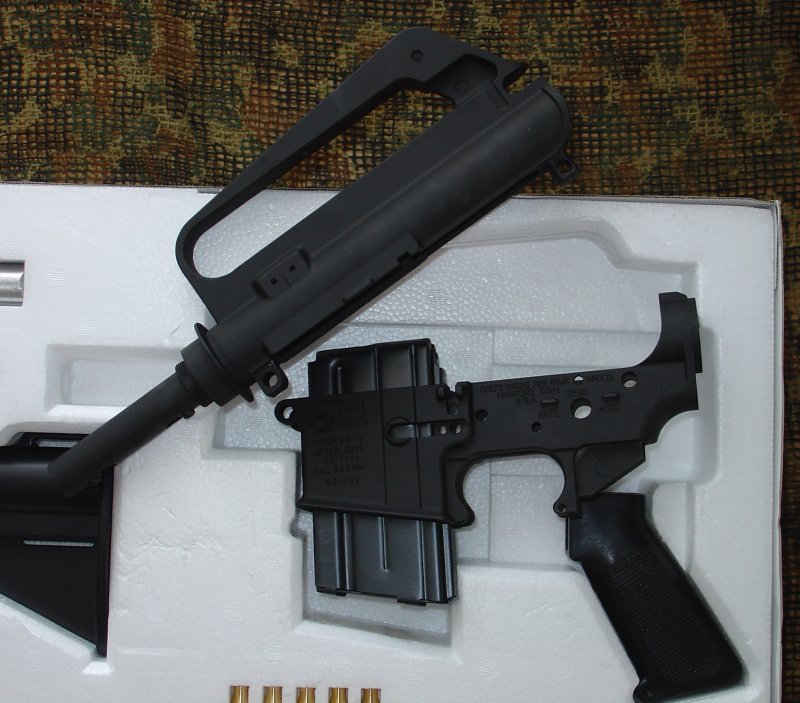 Note: DVD used as a scale reference is an excellent modern Bulgarian movie "Letter to America" ("Pismo do Amerika"). Take your time to see countryside that makes you think about a slower pace of life, traditional values, things that are often lost and forgotten in a city.
Last edited by smootik on Thu Apr 14, 2011 12:34 pm; edited 2 times in total | |
|   | | smootik
Modelgun Perfectionist


Number of posts : 1823
Location / Country : Poland
Registration date : 2009-03-03
 |  Subject: Re: Marushin XM177E2 kit - first time assembly Subject: Re: Marushin XM177E2 kit - first time assembly  Mon Apr 11, 2011 3:18 pm Mon Apr 11, 2011 3:18 pm | |
| 01 - magazine catchYou start by assembling magazine catch.  Parts: Parts: #180 - lower receiver E#109 - mag release button E#151 - spring E#163 - the other side of mag release button 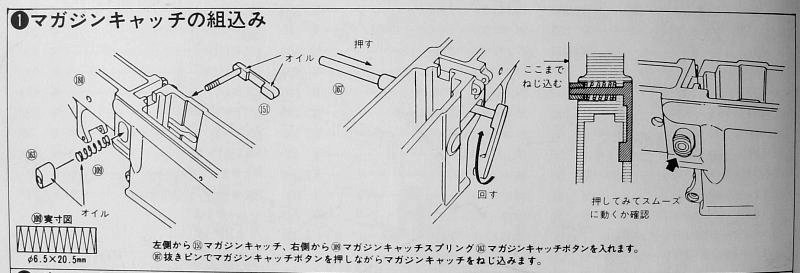 Work: Work:Carefully pick up lower receiver, separating it from the upper and the grip. Drop the spring (E#151) inside a hole in the receiver from the LEFT side. Insert button (E#109) from the left side. Push it all the way inside using either plastic loading tool (X#167) as the instruction says, or just a piece of soft wood. Make sure you hold it firmly, as it really wants to fly back. Now with your other hand take the remaining part (E#163), slide it into the hole from the RIGHT side and screw it in carefully. Make sure not to scratch receiver surface! This process should end with part aligning with its socket on the right side, facing backwards. Release pressure from the button, lowering right-side part into correct place. Make sure it all operates smoothly. If there is some interference, unscrew parts, find and correct the problem. Verify:Insert magazine into the receiver and verify that mag catch and release button operate correctly.  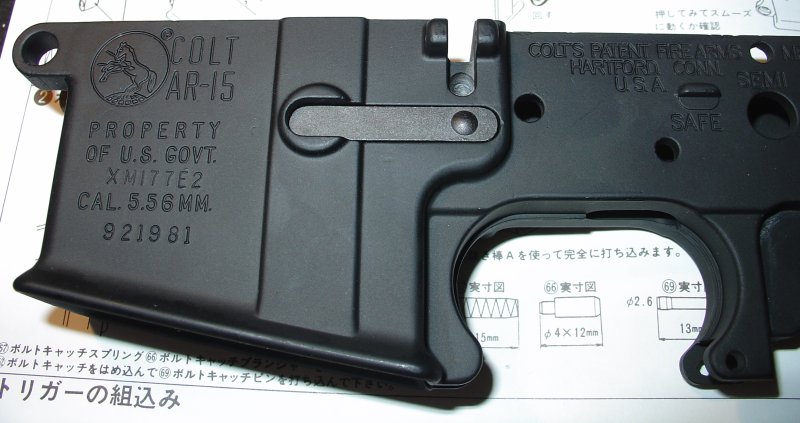
Last edited by smootik on Thu Apr 14, 2011 11:43 am; edited 1 time in total | |
|   | | smootik
Modelgun Perfectionist


Number of posts : 1823
Location / Country : Poland
Registration date : 2009-03-03
 |  Subject: Re: Marushin XM177E2 kit - first time assembly Subject: Re: Marushin XM177E2 kit - first time assembly  Mon Apr 11, 2011 3:48 pm Mon Apr 11, 2011 3:48 pm | |
| 02 - bolt stopThe next step is bolt stop assembly.  Parts: D#67 - spring D#66 - plunger D#69 - pin D#152 - bolt stop lever X#171 - rod (for hammering) Check:- that both holes in receiver "ears" are free from casting artifacts. Use pin (D#69) to see that its thinner end can easily go through the holes. Wider end will not - this is correct.  Work: Work:Assemble spring (D#67) with the plunger (D#66), making sure that the THINNER end of spring gets on plunger. This is shown in manual on a small drawing. Insert both, spring first, into the hole from the right. Insert bolt stop lever (D#152) from the top, making sure it pushes on the spring correctly. Now insert the pin (D#69) from the front. Thin end should go in first. When pin stops due to its wider end blocking on the hole, it's time to use rod (X#171), hammer and enough force to push it further and to friction-block in the right position. You do not need to install it flush with receiver, as sometimes bolt stop lever breaks and has to be replaced - if pin is fully pushed in, it will be much harder to remove, and it may break off one of the "ears". Verify:When empty magazine is inserted, follower should raise bolt stop and move lever further from the receiver. You should be able to push bolt release button back towards the receiver, against mag spring tension. Note: Marushin's magazine design makes it work in errant way, because magazine follower "floats" slightly, and its end is sometimes to low to push bolt stop. This can be corrected by replacing mag follower, or modifying it. I have not done it yet, but I can confirm that my mag has this problem and bolt doesn't lock on empty. 
Last edited by smootik on Thu Apr 14, 2011 11:44 am; edited 2 times in total | |
|   | | smootik
Modelgun Perfectionist


Number of posts : 1823
Location / Country : Poland
Registration date : 2009-03-03
 |  Subject: Re: Marushin XM177E2 kit - first time assembly Subject: Re: Marushin XM177E2 kit - first time assembly  Tue Apr 12, 2011 8:31 am Tue Apr 12, 2011 8:31 am | |
| 03 - triggerTrigger is the next part to be assembled.  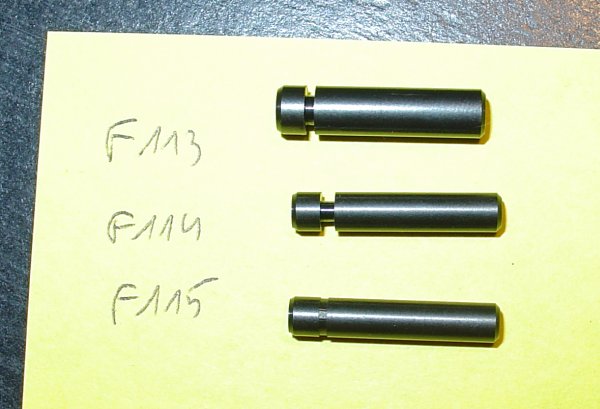 Parts: Parts:D#64 - trigger spring (with bent ends, not the other!) D#73 - spring F#114 - trigger pin (see note below) D#154 - trigger D#155 - trigger bar Note: "F" bag has three similar pins: fat one is F#113, one almost without groove is F#115, the remaining one is F#114.  Check: Check:Before you start assembling, polish the parts, especially top of the trigger bar and "hook". See pictures 1-7 here: https://mp40modelguns.forumotion.net/t1148-marushin-m16-xm177e2building-kits-additional-help-in-picturesMake sure that holes in both parts of the trigger, as well as these in the receiver are free from casting artifacts. Trigger pin (F#114) should go easily through them. If it blocks, use a tool to delicately (so it does not slide off and scratch surface) clear holes.  Work: Work:Put trigger spring (D#64) on the assembly, as pictured in manual. Small spring (D#73) can only go inside trigger part in one specific place - right where there is a bit more space. It is well marked in the manual. If the spring does not enter easily, do not push it! It should slide in without effort when in the right place. Put trigger bar(D#155) on top of the trigger. Hold parts together so they don't jump out. Insert whole trigger assembly into the lower receiver. When it stops due to main spring hitting bottom of the lower receiver, carefully push it further down, adjusting spring ends with a small screwdriver or a rod, making sure spring stays inside receiver and doesn't go through the bottom hole in receiver. Use a thin rod (such as X#171) to hold whole assembly in place. Now use trigger pin (F#114) and push it from the RIGHT side while retracting the thin rod. End without a groove goes in first. This process takes some wiggling and aligning, but should be fairly easy. Verify:That pin sits securely in its place, and that the trigger can be moved. Don't be alarmed - it moves only very slightly, it is enough to operate hammer. 
Last edited by smootik on Thu Apr 14, 2011 11:47 am; edited 1 time in total | |
|   | | smootik
Modelgun Perfectionist


Number of posts : 1823
Location / Country : Poland
Registration date : 2009-03-03
 |  Subject: Re: Marushin XM177E2 kit - first time assembly Subject: Re: Marushin XM177E2 kit - first time assembly  Tue Apr 12, 2011 9:51 am Tue Apr 12, 2011 9:51 am | |
| 04 - trigger guardTrigger guard comes next. 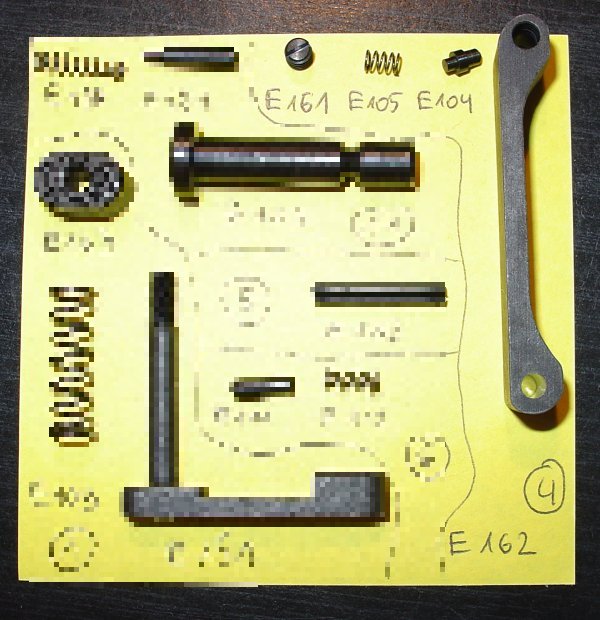 Parts: Parts:E#104 - plunger E#105 - spring E#161 - screw E#162 - trigger guard  Work: Work:Trigger guard (E#162) has holes on two ends - observe carefully which one of them has threads on the LEFT side (flat side facing down). Insert plunger (E#104) into the hole, fat side first, it should stick out to the right. Insert spring (E#105), then screw in the screw (E#161). Make sure the screw does not stick out! Verify:Check that plunger goes in/out against the spring and doesn't interfere with anything. 
Last edited by smootik on Thu Apr 14, 2011 11:48 am; edited 1 time in total | |
|   | | smootik
Modelgun Perfectionist


Number of posts : 1823
Location / Country : Poland
Registration date : 2009-03-03
 |  Subject: Re: Marushin XM177E2 kit - first time assembly Subject: Re: Marushin XM177E2 kit - first time assembly  Tue Apr 12, 2011 10:08 am Tue Apr 12, 2011 10:08 am | |
| 05 - attach trigger guardAttach trigger guard to the receiver.  Parts: Parts:E#108 - pin Check:Before you install trigger guard in the receiver you need to clear the holes in guard and receiver from casting artifacts. Make sure they are clean, polish inside and near edges, otherwise the pin will block!  Work: Work:I installed the back end (one with plunger) first, locking it in receiver. Then I proceeded to put the other end aligned with holes in the receiver. I put whole receiver on soft wood, then inserted a pin (E#108) into the top. I put a piece of soft wood (instead of metal rod) on top of the pin, then hammered it into place. Make sure that trigger guard is aligned correctly, otherwise pin can cause damage! Verify:Check that the guard is held in place. Also that it can be opened by pushing the plunger and swinging the guard downwards. (note: I did this step before installing trigger, that's why you don't see it on this photo) 
Last edited by smootik on Thu Apr 14, 2011 11:48 am; edited 2 times in total | |
|   | | smootik
Modelgun Perfectionist


Number of posts : 1823
Location / Country : Poland
Registration date : 2009-03-03
 |  Subject: Re: Marushin XM177E2 kit - first time assembly Subject: Re: Marushin XM177E2 kit - first time assembly  Tue Apr 12, 2011 10:17 am Tue Apr 12, 2011 10:17 am | |
| 06 - fire selector and gripFire selector and pistol grip come next.  Parts: Parts: #101 - pistol grip F#102 - grip screw E#111 - plunger E#112 - spring D#153 - fire selector lever 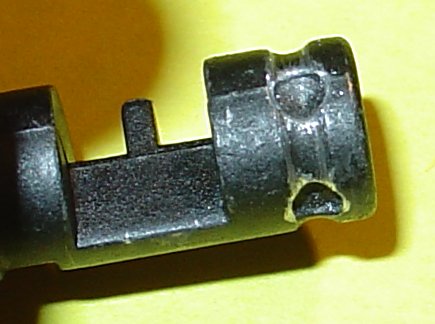 Check: Check:Problem with my setup was that fire selector did not really latch into distinct positions. I discovered that holes in the lever where plunger should enter to latch were too small and plunger barely caught on them. I used dremel tool to open them up very, very lightly, then polished sides of the holes to make sure hard edge will not interfere with plunger. I moved plunger by hand to check it works smoothly. It took several more tries (assemble, check, remove, work on holes) to make it work better. Still not ideal, but overdoing the holes will mean it's impossible to move the lever at all.  Work: Work:Push trigger assembly that is already inside receiver so it clears holes where fire selector will go through. Insert fire selector lever (D#153) from the left side, wiggling it slightly to get through to the other side. Turn receiver upside down, drop plunger (E#111) making sure the pointy end goes first in, then put in the spring (E#112). Hold spring with your finger so it doesn't spring out. Now (still keeping the spring in) turn fire selector lever to all three positions checking if it works correctly. Remember not to remove finger from the spring by accident. If it doesn't move as it should, see previous section and try to fix the problem, or just live with it ;-) After you are satisfied with operation, install pistol grip (#101) making sure spring does not fly out. Keep grip in place, insert grip screw (F#102) and screw it in tightly. Verify:Make sure that grip is firmly held in place. Fire selector should operate correctly.  
Last edited by smootik on Thu Apr 14, 2011 11:49 am; edited 1 time in total | |
|   | | smootik
Modelgun Perfectionist


Number of posts : 1823
Location / Country : Poland
Registration date : 2009-03-03
 |  Subject: Re: Marushin XM177E2 kit - first time assembly Subject: Re: Marushin XM177E2 kit - first time assembly  Tue Apr 12, 2011 10:20 am Tue Apr 12, 2011 10:20 am | |
| 07 - hammerHammer gets installed in this step.  Parts: Parts:D#63 - hammer spring F#113 - hammer pin (the fat one, see photo in step 03) D#150 - hammer  Check: Check:Polish surface of the hammer. See pictures 11-12 here: https://mp40modelguns.forumotion.net/t1148-marushin-m16-xm177e2building-kits-additional-help-in-pictures Work: Work:Put spring (D#63) on hammer (D#150). Insert hammer assembly into lower receiver as shown on pictures. Note that spring leaves should go on the outside of trigger spring, close to receiver walls. Align hammer with hole in the receiver, install hammer pin from the right side, end with grove goes in first. Verify:Switch fire selector to semi, lock hammer back, press trigger to see if it is released correctly. Keep trigger pressed, see if hammer can be locked back. Switch fire selector to auto, lock hammer back, press trigger to see if it is release correctly. Keep trigger pressed, see that hammer does NOT lock back. You should NOT be able to switch to safe when hammer is not locked. You SHOULD be able to switch to safe when hammer is locked back. 
Last edited by smootik on Thu Apr 14, 2011 11:56 am; edited 2 times in total | |
|   | | smootik
Modelgun Perfectionist


Number of posts : 1823
Location / Country : Poland
Registration date : 2009-03-03
 |  Subject: Re: Marushin XM177E2 kit - first time assembly Subject: Re: Marushin XM177E2 kit - first time assembly  Tue Apr 12, 2011 10:23 am Tue Apr 12, 2011 10:23 am | |
| 08 - trigger tabThe last piece of trigger mechanism.  Parts: Parts:D#59 - long spring D#60 - tab D#61 - tube D#71 - c-clip F#115 - pin (one almost without a groove) Check:Polish the tab (D#60), especially the top and bottom edges. See pictures 13-14 here: https://mp40modelguns.forumotion.net/t1148-marushin-m16-xm177e2building-kits-additional-help-in-pictures Work: Work:Insert spring (D#59) into tab (D#60), push tube (D#61) through the hole. Keep it all together with your fingers. Turn the long leaf of the spring by almost 180 degrees, as pictured in the manual. Insert assembly into the lower receiver. Long leaf should rest on hammer pin, outside hammer spring, close to receiver side. Start insertion by aligning the spring, then push in rest of the assembly. Align assembly with holes in the receiver, push pin (F#115) from the right side, end with groove first. Verify:Pin should sit firmly in the receiver. Tab should rock slightly back and forth. 
Last edited by smootik on Thu Apr 14, 2011 12:09 pm; edited 1 time in total | |
|   | | Cerwyn
Cerwyn (Site Admin)


Number of posts : 11092
Age : 65
Location / Country : North Wales
Registration date : 2008-07-20
 |  Subject: Re: Marushin XM177E2 kit - first time assembly Subject: Re: Marushin XM177E2 kit - first time assembly  Tue Apr 12, 2011 10:56 am Tue Apr 12, 2011 10:56 am | |
| | |
|   | | smootik
Modelgun Perfectionist


Number of posts : 1823
Location / Country : Poland
Registration date : 2009-03-03
 |  Subject: Re: Marushin XM177E2 kit - first time assembly Subject: Re: Marushin XM177E2 kit - first time assembly  Tue Apr 12, 2011 11:03 am Tue Apr 12, 2011 11:03 am | |
| 09 - receiver tube 1Receiver tube.  Parts: Parts:D#75 - plunger D#76 - spring #177 - tube F#178 - threaded ring F#179 - ring with a flap  Work: Work:Screw ring (F#178) onto the tube (#177), all the way. Put the other ring (F#179) on the tube. Note: the first picture is wrong, correct position is in the second picture. If you put it wrong, flap will not cover hole in the receiver. Screw the tube into receiver, partially. Insert spring (D#76) and then plunger (D#75) with the pointy end up. Hold it in with a finger. Screw the tube in most of the way, stopping just short of full. "Flap" should be at a right angle to the side, not in final position.
Last edited by smootik on Thu Apr 14, 2011 12:10 pm; edited 2 times in total | |
|   | | smootik
Modelgun Perfectionist


Number of posts : 1823
Location / Country : Poland
Registration date : 2009-03-03
 |  Subject: Re: Marushin XM177E2 kit - first time assembly Subject: Re: Marushin XM177E2 kit - first time assembly  Tue Apr 12, 2011 11:05 am Tue Apr 12, 2011 11:05 am | |
| 10 - receiver tube 2Finalising receiver tube.  Parts: Parts:F#116 - back receiver pin F#117 - plunger F#118 - spring  Work: Work:Insert back receiver pin (F#116) into the receiver from the right side, thin end first. Insert plunger (F#117) rounded end first from the back of the receiver, followed by a spring (F#118). Unscrew ring (F#178) back a little, just enough that you can unscrew the tube a bit so that the ring with the flap (F#179) is aligned downwards. Make sure it does not entangle with the spring - hold it with a thin screwdriver or another tool. Slide ring with a flap towards the receiver, so that it covers the hole and spring. Screw threaded ring towards the front, so that it secures ring with flap in the right position. Note: this is tricky to describe, but when you know how parts should end up, it makes it a bit easier to do. Verify:Whole assembly is firmly attached to the receiver.  
Last edited by smootik on Thu Apr 14, 2011 12:11 pm; edited 2 times in total | |
|   | | smootik
Modelgun Perfectionist


Number of posts : 1823
Location / Country : Poland
Registration date : 2009-03-03
 |  Subject: Re: Marushin XM177E2 kit - first time assembly Subject: Re: Marushin XM177E2 kit - first time assembly  Tue Apr 12, 2011 11:07 am Tue Apr 12, 2011 11:07 am | |
| 11 - stock assemblyAssembling stock together.  Parts: Parts:F#95 - small lock screw F#96 - threaded tube F#97 - handle #98 - stock F#99 - long lock screw F#100 - lock spring  Work: Work:Screw small lock screw (F#95) into the tube (F#96) enough to make it just flush. Align handle (F#97) with its place on the stock (#98). Insert spring (F#100) into stock. Note: you do not need to do it through the top (it will most likely fly around). You can peer inside from the front of the stock, notice hole in the bottom and guide spring into it. Insert long lock screw (F#99) into stock. Note: same trick as for spring. Insert screwdriver from the top, push long screw against the spring so it peers out from the bottom. Screw the tube onto the long screw. Verify:Parts are firmly screwed together. Pull the handle down and see that the lock (top of the long screw) hides inside the stock. This will allow to install the stock on receiver tube, and also lock it in two positions. 
Last edited by smootik on Thu Apr 14, 2011 12:13 pm; edited 1 time in total | |
|   | | smootik
Modelgun Perfectionist


Number of posts : 1823
Location / Country : Poland
Registration date : 2009-03-03
 |  Subject: Re: Marushin XM177E2 kit - first time assembly Subject: Re: Marushin XM177E2 kit - first time assembly  Tue Apr 12, 2011 11:09 am Tue Apr 12, 2011 11:09 am | |
| 12 - installing stockPut stock in its proper place. Parts:none, use stock assembly from the previous step  Work: Work:Insert stock onto receiver tube. When it stops, pull the whole handle down. It should retract lock and allow you to push stock further, all the way on the tube. Release handle. Verify:Stock should be firmly locked in a closed position. Pull one end of the handle, extend stock, release handle and make sure it locks in extended position. 
Last edited by smootik on Thu Apr 14, 2011 12:14 pm; edited 1 time in total | |
|   | | smootik
Modelgun Perfectionist


Number of posts : 1823
Location / Country : Poland
Registration date : 2009-03-03
 |  Subject: Re: Marushin XM177E2 kit - first time assembly Subject: Re: Marushin XM177E2 kit - first time assembly  Tue Apr 12, 2011 11:25 am Tue Apr 12, 2011 11:25 am | |
| 13 - bolt buffer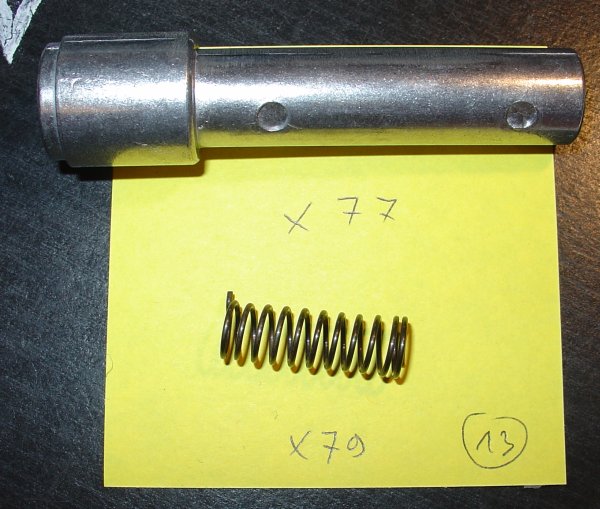 Parts: Parts:X#77 - bolt buffer #78 - return spring X#79 - small buffer spring Check:Bolt buffer (X#77) needs polishing of all surfaces, including the front (where bolt will hit). 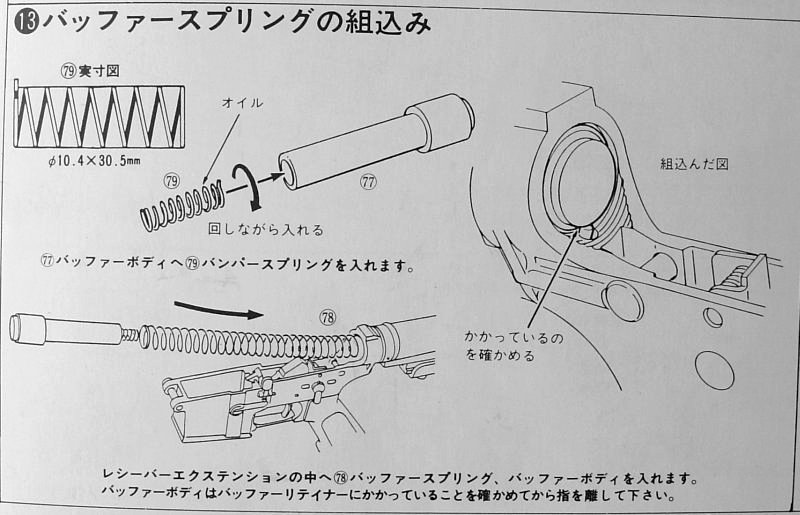 Work: Work:Screw in small buffer spring (X#79) into the buffer (X#77). The end that is visibly sticking out goes in first, then rotate spring to the right against tension, all the way in. Insert return spring (#78) into receiver tube. Insert bolt buffer into receiver tube, end with small spring goes in first. Extension should lock against plunger (D#75 installed in step 09) and NOT jump back out. Verify:Extension should not come out of the tube by itself. It should be possible to freely push it inside. 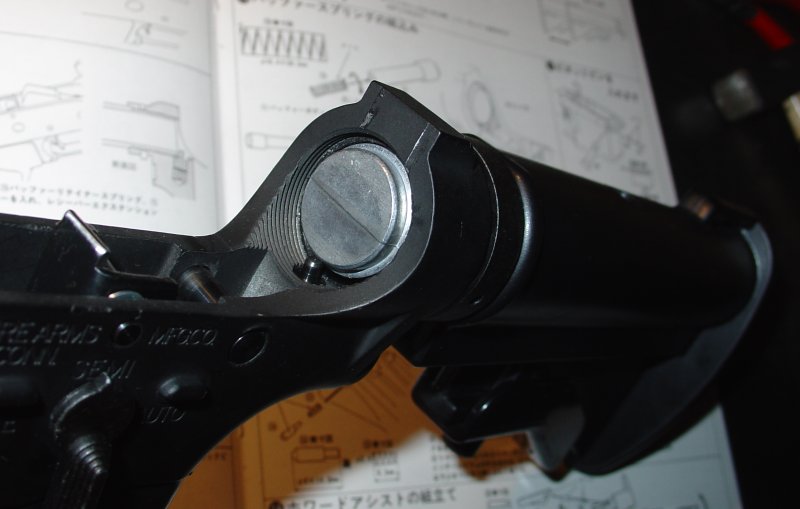
Last edited by smootik on Thu Apr 14, 2011 12:16 pm; edited 1 time in total | |
|   | | smootik
Modelgun Perfectionist


Number of posts : 1823
Location / Country : Poland
Registration date : 2009-03-03
 |  Subject: Re: Marushin XM177E2 kit - first time assembly Subject: Re: Marushin XM177E2 kit - first time assembly  Tue Apr 12, 2011 11:37 am Tue Apr 12, 2011 11:37 am | |
| 14 - front receiver pinThe last piece of the lower receiver.  Parts: Parts:E#103 - front receiver pin E#120 - spring E#121 - plunger  Work: Work:Combine plunger (E#121) with spring (E#120), making sure the thin end of the spring goes on the pointy end of the plunger. Insert both parts into receiver from the front. Insert front receiver pin (E#103) into receiver from the right side, thin end goes in first. Make sure head is aligned correctly (anti-rotation feature). Verify:Pin should firmly lock when fully pushed - plunger enters a hole in the pin. It should be possible to push the pin in from the left and almost remove it, yet it locks on the plunger instead of falling out of the receiver. You have now completed lower receiver assembly.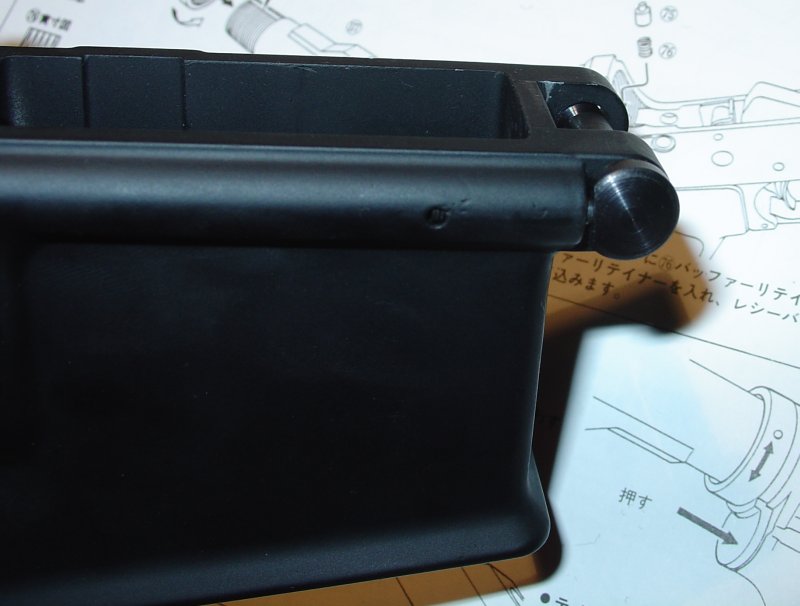 
Last edited by smootik on Thu Apr 14, 2011 12:17 pm; edited 2 times in total | |
|   | | smootik
Modelgun Perfectionist


Number of posts : 1823
Location / Country : Poland
Registration date : 2009-03-03
 |  Subject: Re: Marushin XM177E2 kit - first time assembly Subject: Re: Marushin XM177E2 kit - first time assembly  Tue Apr 12, 2011 11:41 am Tue Apr 12, 2011 11:41 am | |
| Glad you find it useful Cerwyn :-)
I'm afraid my Welsh is of copy&paste variety, surely you will lend a helping hand if more advanced skills are required ;-D
This post completes build of the lower receiver contained in steps 01-14.
Upper receiver build is done, it needs time to be written down now. Watch this space for updates.
I will also update all steps with a corresponding picture from the manual, so all information is in one place.
The final post will be a summary of observations (which means problems, of course) after assembly was completed. | |
|   | | Browning
Modelgun Enthusiast

Number of posts : 119
Location / Country : Cambs, UK
Registration date : 2009-03-12
 |  Subject: Re: Marushin XM177E2 kit - first time assembly Subject: Re: Marushin XM177E2 kit - first time assembly  Tue Apr 12, 2011 10:05 pm Tue Apr 12, 2011 10:05 pm | |
| Excellent stuff!  | |
|   | | smootik
Modelgun Perfectionist


Number of posts : 1823
Location / Country : Poland
Registration date : 2009-03-03
 |  Subject: Re: Marushin XM177E2 kit - first time assembly Subject: Re: Marushin XM177E2 kit - first time assembly  Wed Apr 13, 2011 8:54 pm Wed Apr 13, 2011 8:54 pm | |
| 15 - rear sightPut the rear sight on upper receiver. 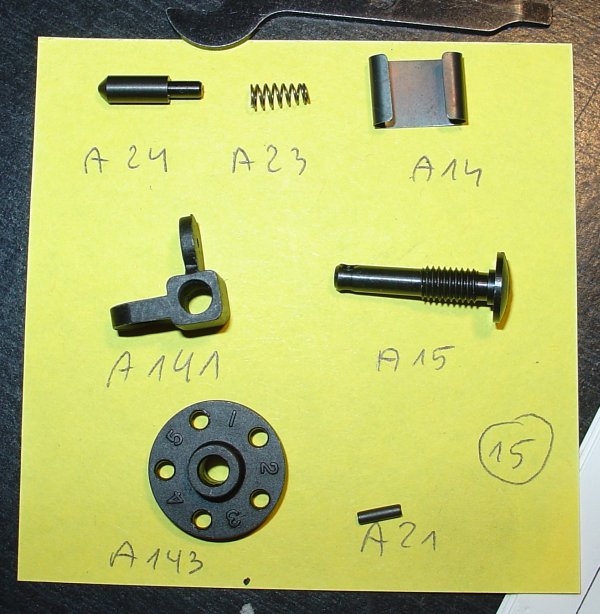 Parts: Parts:A#14 - flat spring A#15 - screw A#21 - pin A#23 - spring A#24 - plunger A#141 - rear sight A#143 - adjust plate #144 - upper receiver (not shown above)  Work: Work:Put flat spring (A#14) onto its place in upper receiver (#144), ears down. Combine spring (A#23) with plunger (A#21), making sure that plunger goes into the thiner end of spring. Insert spring with plunger into the small hole below the main hole from the right side, spring first. Put rear sight (A#141) on top of the flat spring. Align sight with holes in receiver, perhaps pushing it slightly down, then insert screw (A#15) through the hole, screwing it in as needed. Insert adjust plate (A#143) onto the screw from the right sight. Align plate holes with holes in the screw. Secure plate using pin (A#21). This is not as easy as it seems, because alignement of all parts is not that easy. Push pin fully in using pliers (or hammer, if you feel adventurous). Verify:Rear sight itself should flip backward/forward to select two shooting distances. Adjust plate should NOT move when sight is flipped. I guess it should be possible to rotate adjust plate against plunger, rotating the screw and adjusting rear sight to the left/right. On my model this just doesn't work reliably.  
Last edited by smootik on Thu Apr 14, 2011 12:19 pm; edited 1 time in total | |
|   | | smootik
Modelgun Perfectionist


Number of posts : 1823
Location / Country : Poland
Registration date : 2009-03-03
 |  Subject: Re: Marushin XM177E2 kit - first time assembly Subject: Re: Marushin XM177E2 kit - first time assembly  Wed Apr 13, 2011 8:58 pm Wed Apr 13, 2011 8:58 pm | |
| 16 - forward assistAssemble forward assist together.  Parts: Parts:B#18 - longer plunger B#20 - shorter pin B#27 - assist pusher B#28 - shorter plunger B#29 - spring B#30 - longer pin B#130 - assist body B#131 - wide pin B#145 - assist button Check:Make sure that the wide pin (B#131) thinner end can be freely inserted into assist body (B#130) and assist button (B#145). Clear and polish holes to remove casting artifacts. Make sure that assist body can be freely inserted into assist button so that holes align correctly. Check that wide pin can be now inserted through both parts until its wider head blocks on the hole.  Work: Work:Insert assist body (B#130) fully into assist button (B#145), align holes. Note: make sure it faces in the right direction! If button extends down, claws should be to the left. Double-check. Insert wide pin (B#131) from the top, put parts on soft wood and hammer pin deep into the assist button. It will stop if holes are not aligned, or if you did not clear them. Insert spring (B#29) into hole in assist body, followed by assist plunger (B#28). Insert assist pusher (B#27) into its place in assist body, pushing it against plunger spring. Note: make sure it faces correct way! Button extends righ, claws on body face down, "fin" on pusher should also face down. Double-check! Insert shorter pin (B#30) into hole, securing assembly. Verify:Assist pusher should pivot slightly against spring pressure. (note: pin B#30 is not fully inserted here) 
Last edited by smootik on Thu Apr 14, 2011 12:20 pm; edited 1 time in total | |
|   | | smootik
Modelgun Perfectionist


Number of posts : 1823
Location / Country : Poland
Registration date : 2009-03-03
 |  Subject: Re: Marushin XM177E2 kit - first time assembly Subject: Re: Marushin XM177E2 kit - first time assembly  Wed Apr 13, 2011 9:04 pm Wed Apr 13, 2011 9:04 pm | |
| 17 - install forward assistPut forward assist into its place. Parts:B#35 - wide pin B#26 - spring Check:Make sure that holes on assist tunnel in upper receiver are clear of casting artifacts and wide pin (B#35) can enter them freely (thin end first).  Work: Work:Hold upper receiver upside down, insert spring (B#26). Insert forward assist into its tunnel, with button extending to the top. Insert wide pin (B#35) into the hole from the bottom of the receiver (this should be actually top in current position). Push forward assist inside the tunnel, make sure that it moves freely in and out. Also check that pusher sticks out inside the receiver, but it can fold into the channel to leave space for moving bolt. You can actually insert bolt and ensure that it moves freely forward/backward, that assist can push bolt slightly forward, and that it will not prevent pulling bolt backward. When satisfied, hammer the wide pin fully into the hole. Verify:See verification step in "Work" before hammering in the wide pin.  
Last edited by smootik on Thu Apr 14, 2011 12:21 pm; edited 1 time in total | |
|   | | smootik
Modelgun Perfectionist


Number of posts : 1823
Location / Country : Poland
Registration date : 2009-03-03
 |  Subject: Re: Marushin XM177E2 kit - first time assembly Subject: Re: Marushin XM177E2 kit - first time assembly  Wed Apr 13, 2011 9:11 pm Wed Apr 13, 2011 9:11 pm | |
| 18 - ejectorInstall ejector.  Parts: Parts:C#40 - two screws C#41 - ejector C#128 - two washers  Check: Check:Try to align ejector (C#41) in its place inside upper receiver. I found that mine was too big to fit, and I had to shave off three sides. Note: do not overdue, shave or polish just enough to make it enter its space. With ejector in place check that both screws (C#41) can freely screw into the holes from the inside. In my model one of the holes was a bit too small, and prevented ejector from being installed. It had to be drilled slightly (!) wider.  Work: Work:Insert ejector (C#41) in its place inside receiver. Put washers (C#128) on screws (#C40), insert both screws from inside into their places, screw them in. Make sure ejector is level. Verify:Insert bolt into upper receiver and make initial check that it moves freely. If ejector is not level, bolt will block or scratch against it. Final adjustments of ejector will still need to be done after bolt is fully installed. You might need to unscrew it, slightly shift, hold in place and screw in again to make sure it's level. It might also be needed to slightly bend ejector if it sits too low or too high. 
Last edited by smootik on Thu Apr 14, 2011 12:22 pm; edited 1 time in total | |
|   | | smootik
Modelgun Perfectionist


Number of posts : 1823
Location / Country : Poland
Registration date : 2009-03-03
 |  Subject: Re: Marushin XM177E2 kit - first time assembly Subject: Re: Marushin XM177E2 kit - first time assembly  Wed Apr 13, 2011 9:12 pm Wed Apr 13, 2011 9:12 pm | |
| 19 - port coverInstall ejection port cover.  Parts: Parts:C#38 - cover C#39 - spring C#50 - rod C#51 - c-clip Note: I have so far skipped this part to have easy access to ejector and bolt. If you complete step 20, it will no longer be possible to install this cover - you will need to disassemble whole barrel assembly to get back here! Work: Work:Put cover (C#38) in place under ejection port. Start sliding rod (C#50) into the hole in front ear, end without a groove first. Put spring (C#39) in right place - it should make cover kept open. Slide rod through spring, remainder of the cover and the back ear. Insert c-clip (C#51) to secure cover in place. Verify:Flap should close and be kept closed by the latch. It should also open against latch pressure.
Last edited by smootik on Thu Apr 14, 2011 12:23 pm; edited 2 times in total | |
|   | | smootik
Modelgun Perfectionist


Number of posts : 1823
Location / Country : Poland
Registration date : 2009-03-03
 |  Subject: Re: Marushin XM177E2 kit - first time assembly Subject: Re: Marushin XM177E2 kit - first time assembly  Wed Apr 13, 2011 9:13 pm Wed Apr 13, 2011 9:13 pm | |
| 20 - foregrip catchPart that keeps rear of the foregrip. 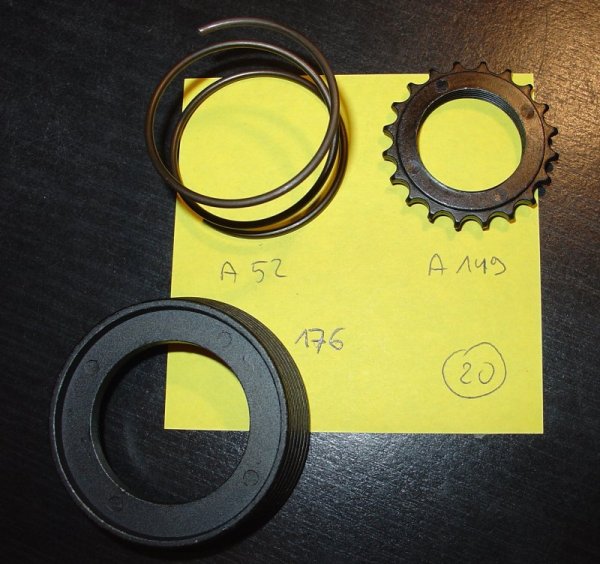 Parts: Parts:A#52 - spring A#149 - foregrip support #176 - foregrip catch  Work: Work:Put spring (A#52) onto barrel stub on upper receiver. Put foregrip catch (#176) onto the stub, against the spring. Screw in foregrip support (A#149) to keep catch and spring in place. Verify:Foregrip catch should move back and forth against spring pressure. 
Last edited by smootik on Thu Apr 14, 2011 12:24 pm; edited 1 time in total | |
|   | | smootik
Modelgun Perfectionist


Number of posts : 1823
Location / Country : Poland
Registration date : 2009-03-03
 |  Subject: Re: Marushin XM177E2 kit - first time assembly Subject: Re: Marushin XM177E2 kit - first time assembly  Wed Apr 13, 2011 9:17 pm Wed Apr 13, 2011 9:17 pm | |
| 21 - chamberChamber for cartridges.   Parts: Parts:C#42 - detonator pin C#47 - detonator screw C#129 - washer C#146 - chamber C#48 - two bypass screws C#147 - bypass  Work: Work:Insert detonator pin (C#42) into the chamber. Use empty cartridge (#165) into chamber to hold detonator pin in place. Put washer (C#129) on screw (C#47) and screw them into the chamber, securing detonator pin in place. Remove cartridge. Put bypass in place. Use one screw (C#48) in hole further from the receiver. Do not install the other screw - it will hold both bypass and chamber (which is not in place yet) Note: you may want to use a sealant between bypass and barrel stub to prevent smoke seeping out into the foregrip. Insert chamber into the receiver, aligning it correctly (cartridge ramp and hole for screw facing outwards). Use the other bypass screw (C#48) to secure both bypass and chamber. Verify:Chamber does not fall out of receiver. Detonator pin does not fall out of chamber. 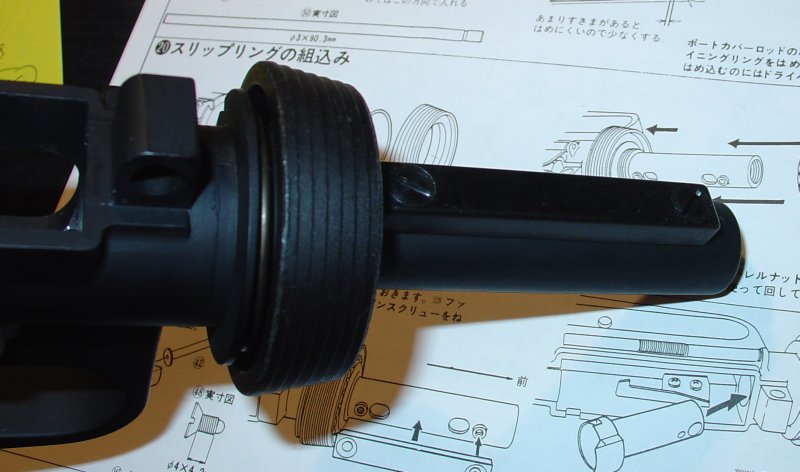
Last edited by smootik on Thu Apr 14, 2011 12:25 pm; edited 1 time in total | |
|   | | Sponsored content
 |  Subject: Re: Marushin XM177E2 kit - first time assembly Subject: Re: Marushin XM177E2 kit - first time assembly  | |
| |
|   | | | | Marushin XM177E2 kit - first time assembly |  |
|
Similar topics |  |
|
| | Permissions in this forum: | You cannot reply to topics in this forum
| |
| |
| |
|
