1. IntroSitting in the comfortable seats of the cinema back in 2012 watching the 23rd bond movie, celebrating 50 years of James Bond movies: Skyfall it became obvious to me that I had to have a modelgun like that. OK easy to decide but how do you get there ?

23rd bond movie, celebrating 50 years of James Bond movies
Well I did not contact MI6 and Q, but I did seek help from K. So I got hold of a Marushin kit for the Walther PPK/S.
I spend HOURS searching material on 007 props, palm safety and the Walther guns.
This way I ended up with a pile of printed pictures, a Marushin kit, a roll of anti skid tape, a sheet of aluminum, some ABS plastic sheet, a small battery and some LED’s.
So lets get started.
2. Basic assemblyFirst I simply assembled the Marushin kit as per instructions.

Since I knew I just needed to see the basic functions and would be taking it partially or full apart later I deliberately avoided to use grease or oils to tune the function. This will come after having finished painting. Testfiring (without greasing revealed I had to
o tune the trigger – I didn’t always fire on first pull
o have a look at the slide stop (for empty magazine)
o look at the magazine catch, magazine needs to be as high as possible to facilitate secure feeding.
After spending VERY long time on figuring out how I was going to make the grip + plus some trials, described in section 4 I disassembled the model enough to change or add marking and to paint frame and slide.
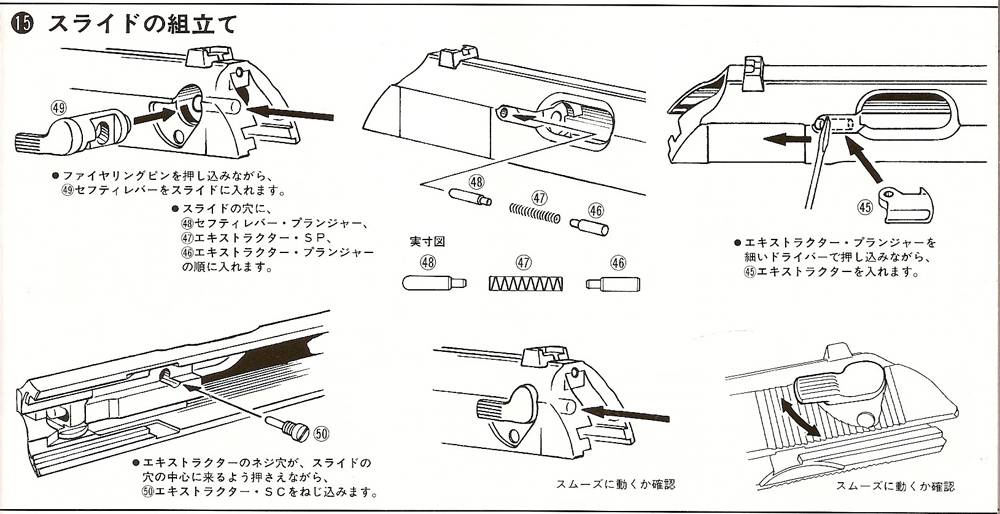
One relevant point here was removing the slide safety lever to have a proper paint job done on the slide. The slide was fully assembled, from Marushin, when I got it. For this I checked the instruction of the kit – and just went into improvise and adapt mode. I found it easiest just to:
• unscrew the extractor fixing bolt
• take out pins and spring – taking care of 2 different pins
• push the firing pin with a screwdriver and carefully take out the safety selector.
The frame and slide was carefully masked with tape and painted a coat of Humbrol metalizer gun metal. For those familiar with these normal scale modeling paints you might also have discovered their annoying stickiness. So after thorough drying I coated the surfaces in semi gloss varnish. Last part is removal of the masking tape and applying some red paint on the slide (visible when gun safety is off)
Finally after having finished the engraving, painting and the custom grip I could apply a little lubrication and assemble the finished modelgun.
3. MarkingsWith the research I had done it became very obvious that I had to take some decisions, where references were weak or unclear.
I found some reasonable pictures of the left side, so I filled some of the nice Marushin engravings (ouch it hurt).
For the right side I decided to go for reduced marking in line with the left side.
I ended up modifying the serial number, including 007 in the sequence (for my amusement. I’d never get one from United artist or MI6 anyway !


All removal of engravings were made with a normal plastic modeler putty and all the added engravings are made by hand with a fine tip in a Dremmel.
4. Grip for palm codingThe new grip was the real challenge. It was clear from the beginning that I was going to laminate and/or vacumform the smooth parts of the grip. For the textured parts i was not really sure. The anti skid tape is great but will not settle on a double curved surface – hmm.
So both with to kit grip on and off I made numerous trials folding and cutting ordinary printer paper to get a feeling on how I could best cover the rough textures surfaces. After 5 or 6 variants I was happy to decide to keep the kit weights on (keeping the weight up and adding comfortable curvature to the new grip)

I now moved to a couple of cardboard wraps, that in the end acted as template for the thin aluminum wrap I ended making.

The wrap was cut from 0,8mm aluminum sheet and bend to fit around the grip. This part evolved in the process of finishing the grip and the installation of th simple electronics.
In the process of getting the best possible coverage of the rough texture I had to partially trade off the removable grip. This means that the textures tape will be applied to the aluminum wrap and the tape will hold weights and aluminum wrap in place.

Sections 4 and 5 are in reality a concurrent developments trying to make sure the end result would have appearance and function wanted. So during the trial and error process in deciding how the do the wrap I also had to make sure I has space and access to battery, switch and LED’s – and if that the smooth party of the grip could switch on and off the LED’s.
On the smooth part. I Had the LED’s – made sketches but in the end what brought advances was finding a block of ABS, drilling some holes and starting over again a trial and error process.


The smooth part of the grip is made from 5 basic parts
• sides
• bottom
• back
• “block” for LED’s
• Front “lock”
All of them glued together, carefully grinded with a Dremmel and filled with small drops of putty where needed. The “buttons on the sides (assumed to be for ejecting the palm safety device) ware made from small blocks of plastic and mated with pits cut in the larger sides.


To end this the “buttons” ware painted black and the smooth grip part panzer grey. Both finished off with a thin coat of varnish.

 5. Palm safety coding
OK no more smoke covers. There is no palm coded safety it’s a hoax. It’s just 3 LED’s I can switch on and off.
3 small (3mm) LED’s emitting green light was easy, a bit more tricky was a switch small enough to hide inside the grip, but both this and a battery was found.

Yes OK I got my LED’s connected in parallel – assume that’s why I have to supply 3V to get proper “power” in the LED’s, this resulted in a larger than nessesary battery and the fact that I had to mill away a bit of the grip weights. Bugger – bu I guess this is what can happen when a mechanical engineer starts playing around with electronics.
LED’s were soldered in a small “tool” and the legs trimmed away. And oh yeah if there are more mechanical guys reading . be aware these LED’s have different length legs, for plus and minus, pay attention an LED will only light up when correct connected !
As the grip was taking its final shape I soldered the switch and battery to the LED circuit and fastened the switch & battery with a small patch of Gaffa.

I have to admit that Sitcky Tac actually works better here, but I did start out with the Gaffa solution.
 6. Caliber
I really would have liked the model to use .380. A fast test with the Marushin -380 from my Beretta m84, however convinced me that widening the magazine and potential modification the frame to make room for the wider magazine, would not make a difference on the visual appearance nor the firing of the model. So to be honest I dumped it and in the end also dumped engraving cal.380 in the chamber part of the barrel. It will not be visible in the movie clip and should I want it badly I can do it later on.
7. BoxDuring research I fell across comment like “wonder if they just used a Bulldog case”. So I made a quick decision, found the Bulldog website and ordered a “personal vault”.
I could have made a major thing out of smoothening the top but decided that I could cover up for this in choosing good camera angles for the teaser.
8. Movie clipThe teaser was in fact a small project in it self.
Making the grip was my competence, but I knew I was going to need support on the movie clip, so I made a partnership with my teenage son. We teamed up making the recordings and he placed an effort in cutting and adding the individual clips. The very sharp eyed will also notice different arms shooting, during the short clips.
Light conditions, focus and more do leave room for improvement – but we had plenty of fun and should I enter in such a project again I would start off getting a better camera.
9. ConclusionMy primary drive here was to apply my experiences from scale modeling and engineering into creating a 1-off unique modelgun. I mean there is no one like James Bond and there is no gun like his PPK/S from the Skyfall movie. OK I am clear it’s no more than a pfc WORKING STAGE PROP, BUT THAT’S WHAT I wanted.


I hope I will be forgiven for posting this a “little backwards” ie. the clip, followed by a review and now last the “how to”.


")