This disassembly guide continues from the basic guide posted in this review:
https://mp40modelguns.forumotion.net/modelgun-reviews-f4/marushin-p38-military-abs-t1568.htmSlide disassemblyAfter you have removed barrel (and cleaned it), from time to time you should also remove slide and clean it, too.
Moving parts inside slide are responsible for firing and reloading your replica.
They should be kept cleaned and oiled.

With barrel removed, the next step is to remove slide from the frame.
Pull slide forward a bit, to expose return springs mounted in grooves at the bottom sides of the slide.
Remove back end of the spring from frame and pull out springs with their pistons out.
Be careful - if you move slide too much forward, or do not hold springs, they will fly out!
Once slide is removed you can look into the frame.
Frame disassembly is not covered in this guide.
Clean the mechanism and spray some silicone oil into it.

Those photos show removed grips - just unscrew the single screw holding them together (take care not to lose nut on the opposite side) and remove them from replica.
Grips are plastic, but they contain metal inserts to make them heavier.
Inserts are held inside grips by two plastic pins that like to fall out.
At the bottom of the grip you will magazine catch, connected via single spring to hammer system.
Put there some oil, too.
Near magazine catch you can also find mark "SPG" = Safe Plastic Gun, which is put on replicas by association of modelgun manufacturers to distinguish it from real weapon (duh!).
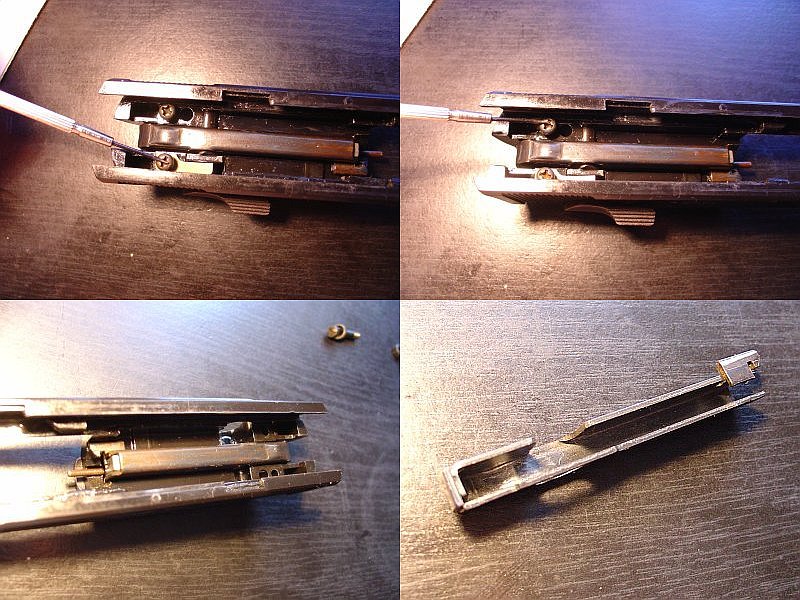
Now back to the slide. Flip it over. Near the back you will find two screws holding all parts together. One of the screws also holds a small metal tab that holds safety switch.
Unscrew both screws. Take note how to put back the metal tab in proper position!
Remove safety by sliding it out to the side. If it doesn't go out, rotate it to find correct position.
Without safety switch and screws, all the rest can be taken apart without tools.
Remove firing bar by lifting the back end and sliding it to the front.
Firing bar is made of a single piece of metal. It moves freely within the slide.
When hammer strikes, it pushes this bar forward, and bar pushes whole cartridge onto the firing pin.
Safety switch blocks this bar in "safe" position.
Front par of the bar has an extractor bent from the same piece of metal.
Inspect extractor to see if it is not damaged.
Firing bar accumulates a lot of residue from the caps - on the photos you can see that it is already brown from those deposits. Clean it.
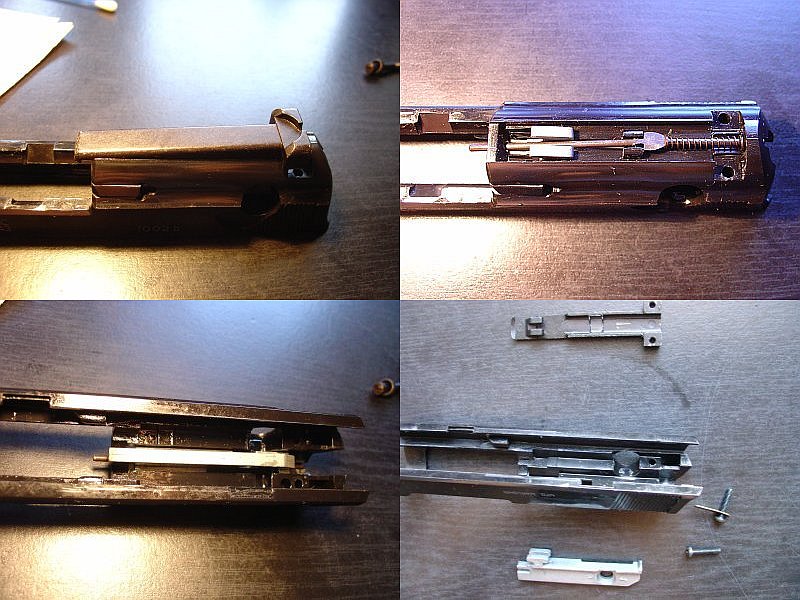
The next step is to remove metal bar with rear sights from the top of the slide.
Lift back (near sights), then slide it forward and remove from the slide.
Underneath you will find a spring-loaded pin that serves as "chamber loaded" indicator.
This pin has a lot of play, so it does not reliably show the status. Sometimes it shows "loaded" when chamber is empty.
To remove the pin, first pull it all the way to the back, so the front clears it's hole.
Then lift the front and remove pin with the spring.
Careful! If you let it go or just do not hold it properly, pin will fly away!
Flip over the slide.
You should clean the pin and make sure it is not damaged, however this pin is not essential to functioning of your replica.
The last step now is to remove the remaining metal shiny bar from the slide.
Just move is slightly to the front and lift out.

Congratulations!
Now you have disassembled the slide, and you can clean it :-)
Remember to oil the parts - good movement of firing bar is essential for your replica.
To put everything back together, go through steps in reverse order:
- put back metal, shiny block inside slide. Note that at the top it has a "hook" attachment.
- install "loaded chamber" pin with it's spring.
- put oil on those parts, if you didn't yet.
- insert front of rear sight bar into the slide, move backward (note the "hooks" at the front), pull "loaded chamber" pin slightly backwards and at the same time push the rear into the slide. That pin will block rear sight bar if not pulled, do not force anything!
- install firing bar by sliding front part first, then pushing the back in.
- did you remember to oil inside of the firing bar?
- and outside?
- put in safety switch, make sure it goes in correctly, through holes in firing bar, metal block and slide itself.
- put back two screws and metal bar holding safety switch. Make sure you put it back in the same position as you did previously.
- screw everything back together.
- check if safety switch works properly
- check if "loaded chamber" pin moves freely.
- put the slide back on frame, leaving some gaps at the side grooves
- install return spring into the gaps, remember to hold the first one in place while you do the other one.
- push slide backwards to it's proper position.


")
