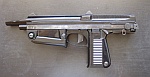
| | Marushin XM177E2 kit - first time assembly |  |
|
|
|
| Author | Message |
|---|
smootik
Modelgun Perfectionist

Number of posts : 1823
Location / Country : Poland
Registration date : 2009-03-03
 | Subject: Re: Marushin XM177E2 kit - first time assembly  Tue Apr 12, 2011 11:37 am Tue Apr 12, 2011 11:37 am | |
| 14 - front receiver pinThe last piece of the lower receiver.  Parts: Parts:E#103 - front receiver pin E#120 - spring E#121 - plunger  Work: Work:Combine plunger (E#121) with spring (E#120), making sure the thin end of the spring goes on the pointy end of the plunger. Insert both parts into receiver from the front. Insert front receiver pin (E#103) into receiver from the right side, thin end goes in first. Make sure head is aligned correctly (anti-rotation feature). Verify:Pin should firmly lock when fully pushed - plunger enters a hole in the pin. It should be possible to push the pin in from the left and almost remove it, yet it locks on the plunger instead of falling out of the receiver. You have now completed lower receiver assembly.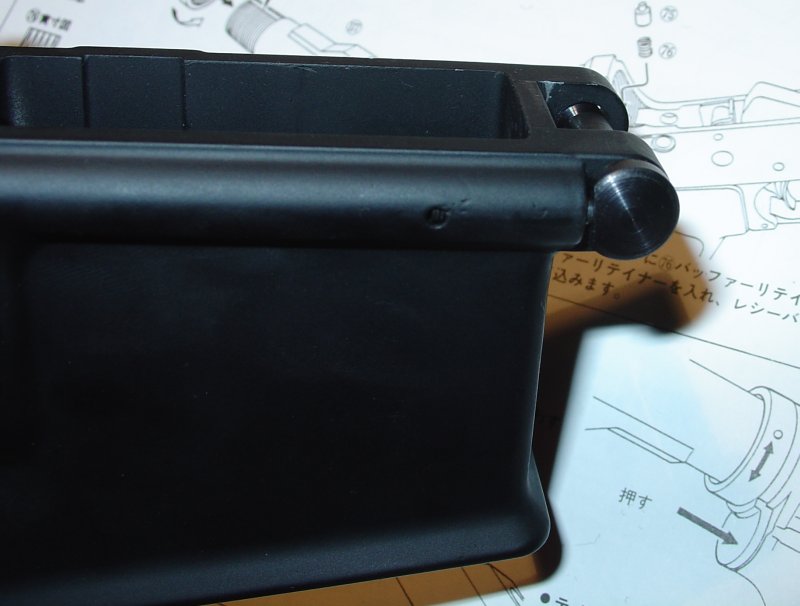 
Last edited by smootik on Thu Apr 14, 2011 12:17 pm; edited 2 times in total | |
|
 | |
smootik
Modelgun Perfectionist
Number of posts : 1823
Location / Country : Poland
Registration date : 2009-03-03
| | Subject: Re: Marushin XM177E2 kit - first time assembly Tue Apr 12, 2011 11:41 am | |
| Glad you find it useful Cerwyn :-)
I'm afraid my Welsh is of copy&paste variety, surely you will lend a helping hand if more advanced skills are required ;-D
This post completes build of the lower receiver contained in steps 01-14.
Upper receiver build is done, it needs time to be written down now. Watch this space for updates.
I will also update all steps with a corresponding picture from the manual, so all information is in one place.
The final post will be a summary of observations (which means problems, of course) after assembly was completed. | |
|
| | |
Browning
Modelgun Enthusiast

Number of posts : 118
Location / Country : Cambs, UK
Registration date : 2009-03-12
| | Subject: Re: Marushin XM177E2 kit - first time assembly Tue Apr 12, 2011 10:05 pm | |
| Excellent stuff!  | |
|
| | |
smootik
Modelgun Perfectionist
Number of posts : 1823
Location / Country : Poland
Registration date : 2009-03-03
| | Subject: Re: Marushin XM177E2 kit - first time assembly Wed Apr 13, 2011 8:54 pm | |
| 15 - rear sightPut the rear sight on upper receiver.  Parts: Parts:A#14 - flat spring A#15 - screw A#21 - pin A#23 - spring A#24 - plunger A#141 - rear sight A#143 - adjust plate #144 - upper receiver (not shown above)  Work: Work:Put flat spring (A#14) onto its place in upper receiver (#144), ears down. Combine spring (A#23) with plunger (A#21), making sure that plunger goes into the thiner end of spring. Insert spring with plunger into the small hole below the main hole from the right side, spring first. Put rear sight (A#141) on top of the flat spring. Align sight with holes in receiver, perhaps pushing it slightly down, then insert screw (A#15) through the hole, screwing it in as needed. Insert adjust plate (A#143) onto the screw from the right sight. Align plate holes with holes in the screw. Secure plate using pin (A#21). This is not as easy as it seems, because alignement of all parts is not that easy. Push pin fully in using pliers (or hammer, if you feel adventurous). Verify:Rear sight itself should flip backward/forward to select two shooting distances. Adjust plate should NOT move when sight is flipped. I guess it should be possible to rotate adjust plate against plunger, rotating the screw and adjusting rear sight to the left/right. On my model this just doesn't work reliably.  
Last edited by smootik on Thu Apr 14, 2011 12:19 pm; edited 1 time in total | |
|
| | |
smootik
Modelgun Perfectionist
Number of posts : 1823
Location / Country : Poland
Registration date : 2009-03-03
| | Subject: Re: Marushin XM177E2 kit - first time assembly Wed Apr 13, 2011 8:58 pm | |
| 16 - forward assistAssemble forward assist together.  Parts: Parts:B#18 - longer plunger B#20 - shorter pin B#27 - assist pusher B#28 - shorter plunger B#29 - spring B#30 - longer pin B#130 - assist body B#131 - wide pin B#145 - assist button Check:Make sure that the wide pin (B#131) thinner end can be freely inserted into assist body (B#130) and assist button (B#145). Clear and polish holes to remove casting artifacts. Make sure that assist body can be freely inserted into assist button so that holes align correctly. Check that wide pin can be now inserted through both parts until its wider head blocks on the hole.  Work: Work:Insert assist body (B#130) fully into assist button (B#145), align holes. Note: make sure it faces in the right direction! If button extends down, claws should be to the left. Double-check. Insert wide pin (B#131) from the top, put parts on soft wood and hammer pin deep into the assist button. It will stop if holes are not aligned, or if you did not clear them. Insert spring (B#29) into hole in assist body, followed by assist plunger (B#28). Insert assist pusher (B#27) into its place in assist body, pushing it against plunger spring. Note: make sure it faces correct way! Button extends righ, claws on body face down, "fin" on pusher should also face down. Double-check! Insert shorter pin (B#30) into hole, securing assembly. Verify:Assist pusher should pivot slightly against spring pressure. (note: pin B#30 is not fully inserted here) 
Last edited by smootik on Thu Apr 14, 2011 12:20 pm; edited 1 time in total | |
|
| | |
smootik
Modelgun Perfectionist
Number of posts : 1823
Location / Country : Poland
Registration date : 2009-03-03
| | Subject: Re: Marushin XM177E2 kit - first time assembly Wed Apr 13, 2011 9:04 pm | |
| 17 - install forward assistPut forward assist into its place. Parts:B#35 - wide pin B#26 - spring Check:Make sure that holes on assist tunnel in upper receiver are clear of casting artifacts and wide pin (B#35) can enter them freely (thin end first).  Work: Work:Hold upper receiver upside down, insert spring (B#26). Insert forward assist into its tunnel, with button extending to the top. Insert wide pin (B#35) into the hole from the bottom of the receiver (this should be actually top in current position). Push forward assist inside the tunnel, make sure that it moves freely in and out. Also check that pusher sticks out inside the receiver, but it can fold into the channel to leave space for moving bolt. You can actually insert bolt and ensure that it moves freely forward/backward, that assist can push bolt slightly forward, and that it will not prevent pulling bolt backward. When satisfied, hammer the wide pin fully into the hole. Verify:See verification step in "Work" before hammering in the wide pin.  
Last edited by smootik on Thu Apr 14, 2011 12:21 pm; edited 1 time in total | |
|
| | |
smootik
Modelgun Perfectionist
Number of posts : 1823
Location / Country : Poland
Registration date : 2009-03-03
| | Subject: Re: Marushin XM177E2 kit - first time assembly Wed Apr 13, 2011 9:11 pm | |
| 18 - ejectorInstall ejector.  Parts: Parts:C#40 - two screws C#41 - ejector C#128 - two washers  Check: Check:Try to align ejector (C#41) in its place inside upper receiver. I found that mine was too big to fit, and I had to shave off three sides. Note: do not overdue, shave or polish just enough to make it enter its space. With ejector in place check that both screws (C#41) can freely screw into the holes from the inside. In my model one of the holes was a bit too small, and prevented ejector from being installed. It had to be drilled slightly (!) wider.  Work: Work:Insert ejector (C#41) in its place inside receiver. Put washers (C#128) on screws (#C40), insert both screws from inside into their places, screw them in. Make sure ejector is level. Verify:Insert bolt into upper receiver and make initial check that it moves freely. If ejector is not level, bolt will block or scratch against it. Final adjustments of ejector will still need to be done after bolt is fully installed. You might need to unscrew it, slightly shift, hold in place and screw in again to make sure it's level. It might also be needed to slightly bend ejector if it sits too low or too high. 
Last edited by smootik on Thu Apr 14, 2011 12:22 pm; edited 1 time in total | |
|
| | |
smootik
Modelgun Perfectionist
Number of posts : 1823
Location / Country : Poland
Registration date : 2009-03-03
| | Subject: Re: Marushin XM177E2 kit - first time assembly Wed Apr 13, 2011 9:12 pm | |
| 19 - port coverInstall ejection port cover.  Parts: Parts:C#38 - cover C#39 - spring C#50 - rod C#51 - c-clip Note: I have so far skipped this part to have easy access to ejector and bolt. If you complete step 20, it will no longer be possible to install this cover - you will need to disassemble whole barrel assembly to get back here! Work: Work:Put cover (C#38) in place under ejection port. Start sliding rod (C#50) into the hole in front ear, end without a groove first. Put spring (C#39) in right place - it should make cover kept open. Slide rod through spring, remainder of the cover and the back ear. Insert c-clip (C#51) to secure cover in place. Verify:Flap should close and be kept closed by the latch. It should also open against latch pressure.
Last edited by smootik on Thu Apr 14, 2011 12:23 pm; edited 2 times in total | |
|
| | |
smootik
Modelgun Perfectionist
Number of posts : 1823
Location / Country : Poland
Registration date : 2009-03-03
| | Subject: Re: Marushin XM177E2 kit - first time assembly Wed Apr 13, 2011 9:13 pm | |
| 20 - foregrip catchPart that keeps rear of the foregrip. 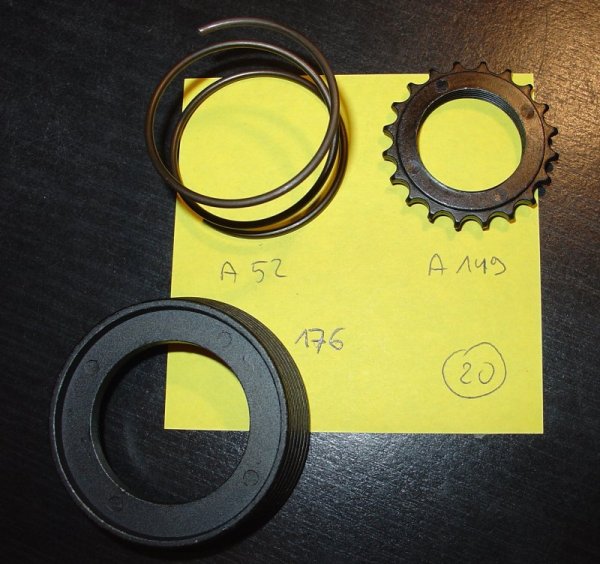 Parts: Parts:A#52 - spring A#149 - foregrip support #176 - foregrip catch  Work: Work:Put spring (A#52) onto barrel stub on upper receiver. Put foregrip catch (#176) onto the stub, against the spring. Screw in foregrip support (A#149) to keep catch and spring in place. Verify:Foregrip catch should move back and forth against spring pressure. 
Last edited by smootik on Thu Apr 14, 2011 12:24 pm; edited 1 time in total | |
|
| | |
smootik
Modelgun Perfectionist
Number of posts : 1823
Location / Country : Poland
Registration date : 2009-03-03
| | Subject: Re: Marushin XM177E2 kit - first time assembly Wed Apr 13, 2011 9:17 pm | |
| 21 - chamberChamber for cartridges.   Parts: Parts:C#42 - detonator pin C#47 - detonator screw C#129 - washer C#146 - chamber C#48 - two bypass screws C#147 - bypass  Work: Work:Insert detonator pin (C#42) into the chamber. Use empty cartridge (#165) into chamber to hold detonator pin in place. Put washer (C#129) on screw (C#47) and screw them into the chamber, securing detonator pin in place. Remove cartridge. Put bypass in place. Use one screw (C#48) in hole further from the receiver. Do not install the other screw - it will hold both bypass and chamber (which is not in place yet) Note: you may want to use a sealant between bypass and barrel stub to prevent smoke seeping out into the foregrip. Insert chamber into the receiver, aligning it correctly (cartridge ramp and hole for screw facing outwards). Use the other bypass screw (C#48) to secure both bypass and chamber. Verify:Chamber does not fall out of receiver. Detonator pin does not fall out of chamber. 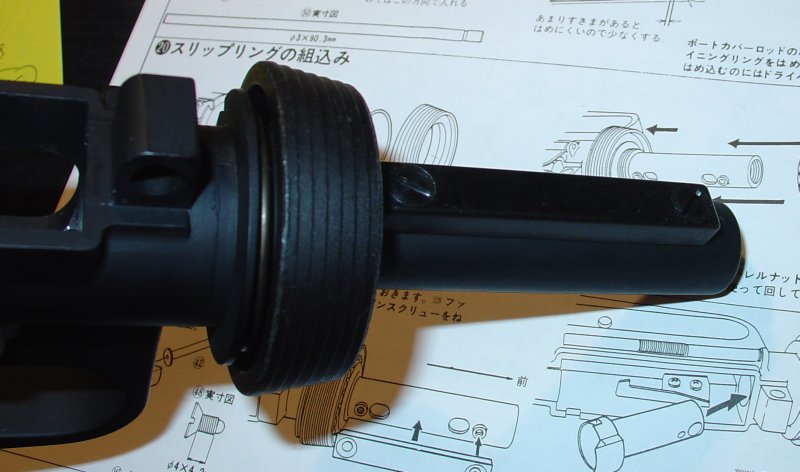
Last edited by smootik on Thu Apr 14, 2011 12:25 pm; edited 1 time in total | |
|
| | |
smootik
Modelgun Perfectionist
Number of posts : 1823
Location / Country : Poland
Registration date : 2009-03-03
| | Subject: Re: Marushin XM177E2 kit - first time assembly Wed Apr 13, 2011 9:18 pm | |
| 22 - front sightAssembling front sight with a piece of barrel 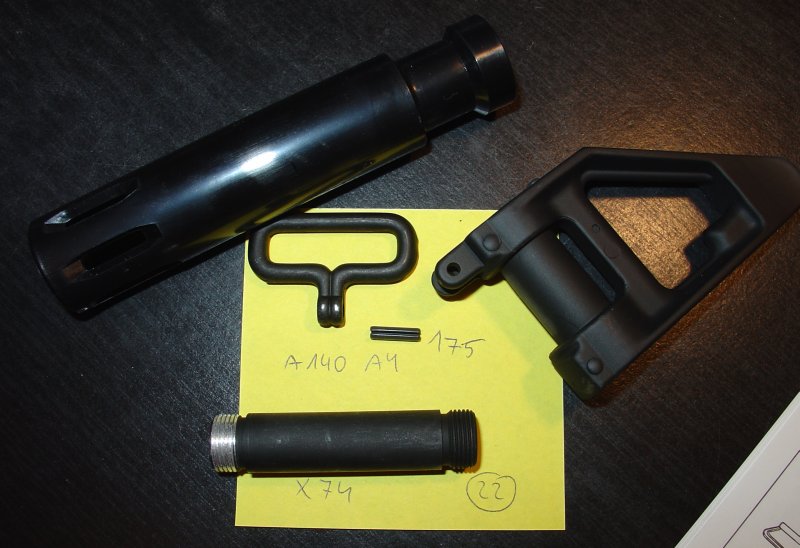 Parts: Parts:A#4 - pin X#74 - barrel section A#140 - sling loop #173 - flash hider #175 - front sight  Work: Work:Put front sight (#175) on piece of wood, insert sling loop (A#140) into its place. Insert pin (A#4) into the hole, hammer it in. Screw flash hider (#173) ono barrel section (X#74). Screw barrel section into front sight (near vertical side). Verify:Parts are held firmly. Use Loctite to make this more permanent.
Last edited by smootik on Thu Apr 14, 2011 12:26 pm; edited 1 time in total | |
|
| | |
smootik
Modelgun Perfectionist
Number of posts : 1823
Location / Country : Poland
Registration date : 2009-03-03
| | Subject: Re: Marushin XM177E2 kit - first time assembly Wed Apr 13, 2011 9:20 pm | |
| 23 - barrelRemaining barrel parts.  Parts: Parts:A#8 - front foregrip catch #9 - barrel section A#12 - barrel nut 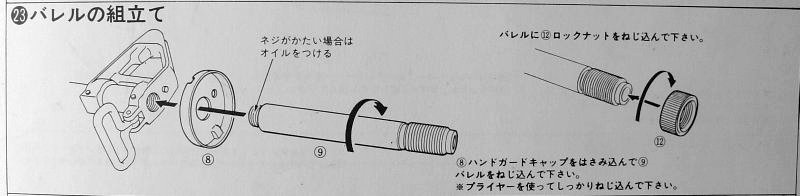 Work: Work:Put front foregrip catch (A#8 ) onto barrel section (#9). Screw barrel section into the front sight (near diagonal side). Align foregrip catch with holes on front sight, tighten barrel. Screw barrel nut (A#12) onto barrel. Verify:Parts are held firmly. Use Loctite to make this more permanent. 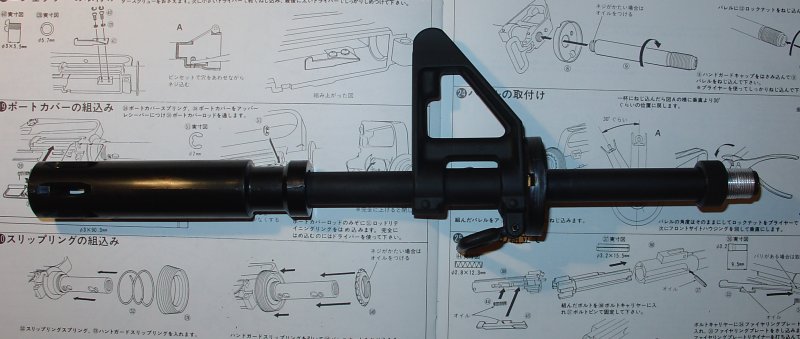
Last edited by smootik on Thu Apr 14, 2011 12:26 pm; edited 1 time in total | |
|
| | |
smootik
Modelgun Perfectionist
Number of posts : 1823
Location / Country : Poland
Registration date : 2009-03-03
| | Subject: Re: Marushin XM177E2 kit - first time assembly Wed Apr 13, 2011 9:21 pm | |
| 24 - install barrelAttach barrel to receiver. Parts:none, use assembly from the previous step. 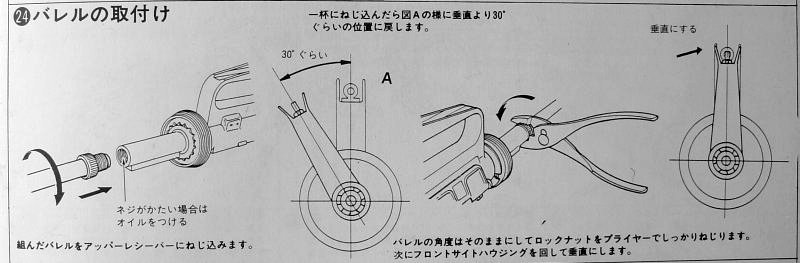 Work: Work:Screw barrel assembly (see previous step) onto barrel stub of the upper receiver. Align front sight in correct position. Barrel will have to be partially unscrewed for this to happen - do not overtighten the barrel trying to overcome it! "Unscrew" barrel nut against receiver to secure barrel assembly. Verify:This is actually a hard part. It is very easy to destroy threads on barrel due to overtightening or repetitive adjustments. At the moment I have not found the best way to do that. My barrel has lost threads almost completely - I need to use shims to hold it without wobbling. I had to adjust front sight many times, as it was just impossible to make everything work right. One of the sections always unscrewed or shifted ruining front sight alignement. Looking back I need to make barrel sections permanently attached to each other using Loctite or maybe superglue. Only the section that attaches to receiver should maybe be left unglued to facilitate later disassembly and cleaning. Another problem I noticed is that probably barrel does not screw in deep enough into receiver, as a result foregrip support has to be moved (by unscrewing) slightly to the front to fit into its hole in the foregrip. 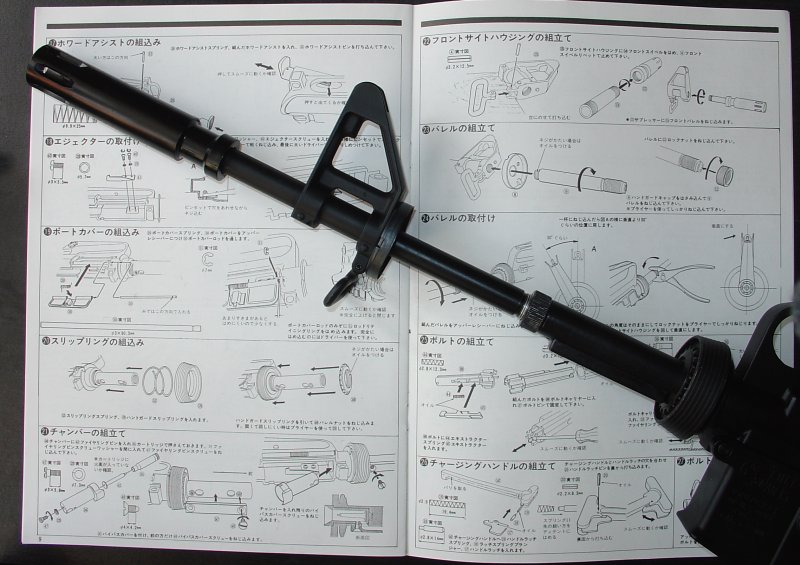
Last edited by smootik on Thu Apr 14, 2011 12:27 pm; edited 2 times in total | |
|
| | |
smootik
Modelgun Perfectionist
Number of posts : 1823
Location / Country : Poland
Registration date : 2009-03-03
| | Subject: Re: Marushin XM177E2 kit - first time assembly Wed Apr 13, 2011 9:24 pm | |
| 25 - bolt headConstructing the bolt. 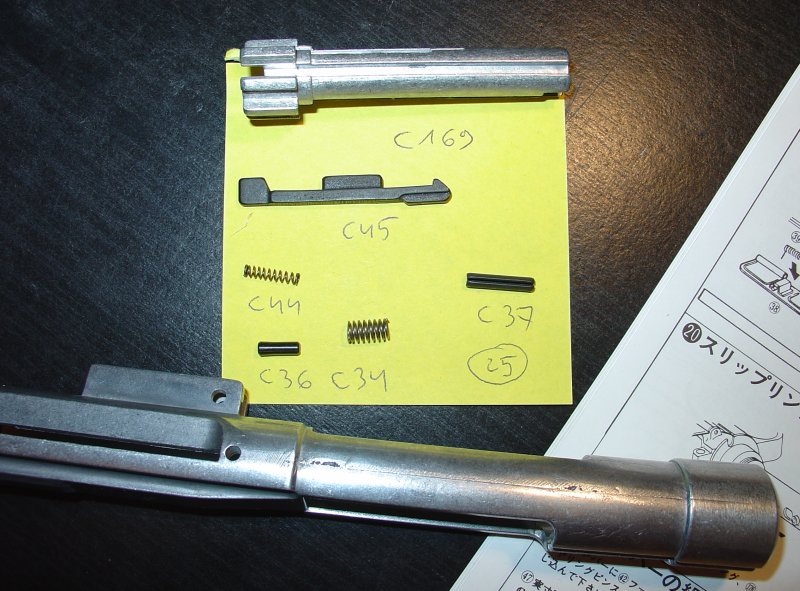 Parts: Parts:C#33 - firing pin C#34 - larger spring C#36 - pin wider at one end C#37 - pin C#44 - smaller spring C#45 - extractor #168 - bolt C#169 - bolt head Check:Polish whole surface of the bolt. Get rid of casting lines and other imperfections. Insert extractor and spring, check that a cartridge rim will fit under extractor claw! If it is too tight as on mine, you would need to add a thin (0.2mm for me) spacer to adjust extractor. 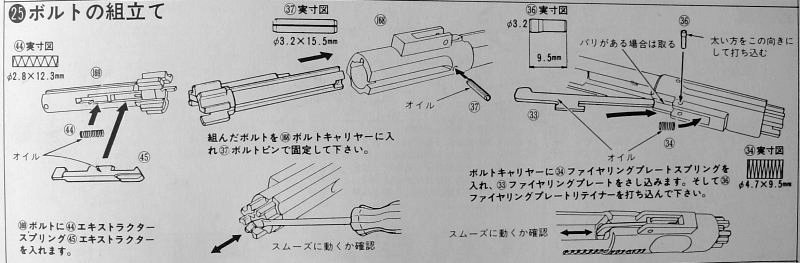 Work: Work:Insert spring (C#44) into bolt head (C#169), then insert extractor in its place. Slide bolt head onto bolt (#168) and secure it in place using pin (C#37) hammered into the hole. Check that extractor works correctly: it should slide out and go back in, NOT move outwards, and have enough clearance to grab cartridge rim when in fully retracted position. Insert spring (C#34) into bolt, then insert firing pin (C#33) and secure it in place using pin (C#36). Check that firing pin moves freely. Verify:See above. 
Last edited by smootik on Wed May 11, 2011 7:57 pm; edited 2 times in total (Reason for editing : updated "Work" section) | |
|
| | |
smootik
Modelgun Perfectionist
Number of posts : 1823
Location / Country : Poland
Registration date : 2009-03-03
| | Subject: Re: Marushin XM177E2 kit - first time assembly Wed Apr 13, 2011 9:27 pm | |
| 26 - charging handle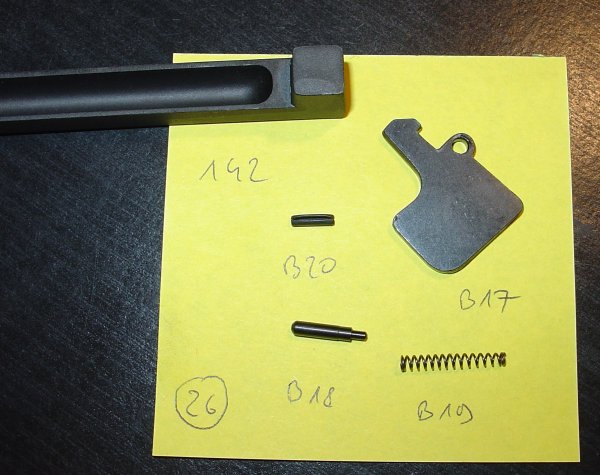 Parts: Parts:B#17 - tab B#18 - plunger B#19 - spring B#20 - pin #142 - charging handle Check:Polish all surfaces of the charging handle, except top and side of the "ears" that you will pull. My handle had too thin slot, and neither spring, plunger or tab would enter it. I have used a long thin screwdriver inserted into the slot to slightly open it. Make sure to open whole depth, not just near edge.  Work: Work:Insert spring (B#19) into hole in handle, followed by plunger (B#18). Insert tab (B#17) into the slot. Align tab holes with handle holes, insert pin (B#20), hammer it in after placing handle on soft wood. Verify:Tab should pivot freely against spring pressure, without interference with handle. Pin should not stick out of the handle 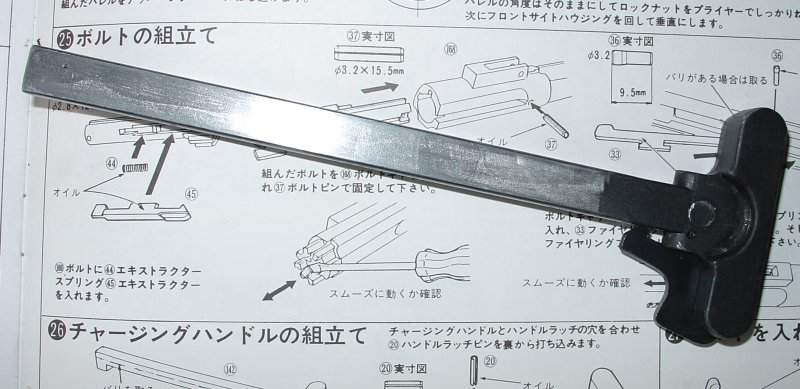 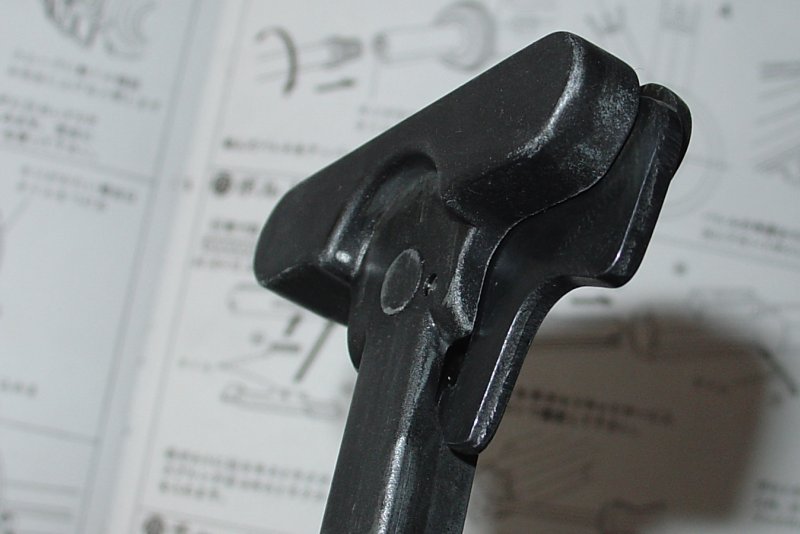
Last edited by smootik on Fri Apr 15, 2011 9:35 am; edited 2 times in total (Reason for editing : added info on improving slot) | |
|
| | |
smootik
Modelgun Perfectionist
Number of posts : 1823
Location / Country : Poland
Registration date : 2009-03-03
| | Subject: Re: Marushin XM177E2 kit - first time assembly Wed Apr 13, 2011 9:28 pm | |
| 27 - install boltPut bolt in the receiver. Parts:none, use assembled bolt and charging handle from the previous steps 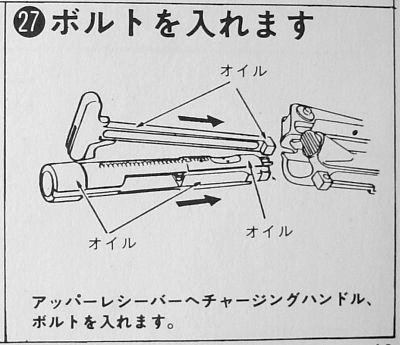 Work: Work:Insert charging handle into the upper receiver, locking tab to the left, claw to the bottom. Insert bolt into the upper receiver, bolt head first, lug upwards. Verify:It is necessary to check that bolt moves relatively freely at this stage. If something blocks the bolt, or it scratches against something, you'd better find and remove the problem before you move on to the next step. (note: photo taken at a later date, parts are now dirty from oil) 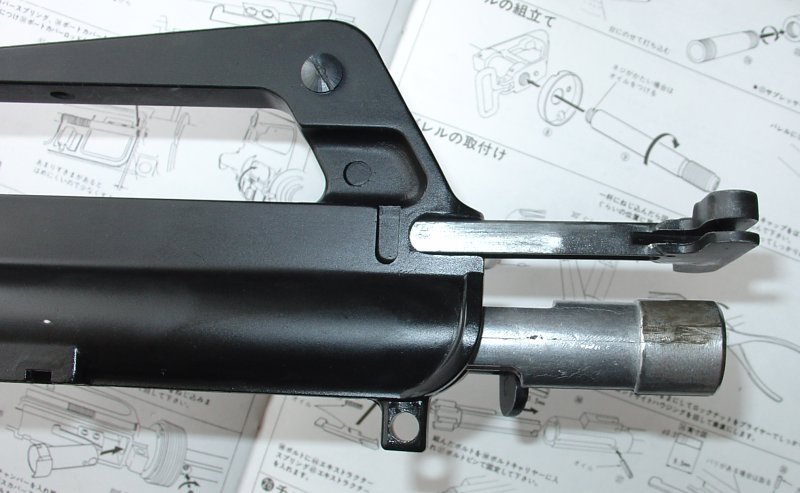 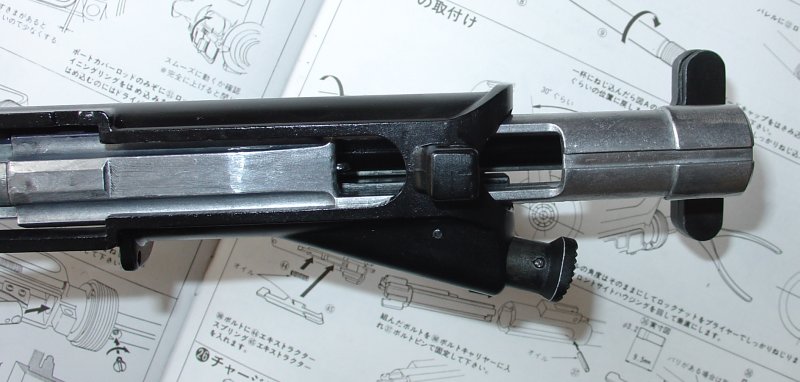
Last edited by smootik on Thu Apr 14, 2011 12:30 pm; edited 2 times in total | |
|
| | |
smootik
Modelgun Perfectionist
Number of posts : 1823
Location / Country : Poland
Registration date : 2009-03-03
| | Subject: Re: Marushin XM177E2 kit - first time assembly Wed Apr 13, 2011 9:30 pm | |
| 28 - put receiver togetherAs the title says Parts:none, use assembled upper and lower receiver. 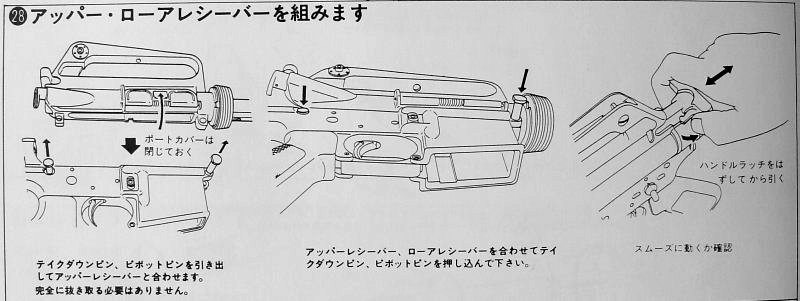 Work: Work:Almost remove front and rear receiver pins. They should lock on their plungers in fully extended position, just short of falling out. They should clear insides of the lower receiver. Align upper receiver with the front hole, close forward pin. Close upper receiver on lower receiver, close rear pin. Verify:Make sure pins do not fall out. Make sure upper receiver is held to the lower. Check that bolt moves freely backwards when charging handle is pulled back. You will certainly feel not only return spring, but mainly huge friction as bolt enters dire straights between hammer and upper... When charging handle is released, bolt should spring back to the front position. This is unlikely to happen right now, as bolt will probably get blocked by friction in its backwards position. Forward assist might help you to nudge bolt forward, eventually closing it. Making bolt move freely is the biggest assembly challenge so far, by FAR. This is THE stumbling block for many people, as can be read on the forum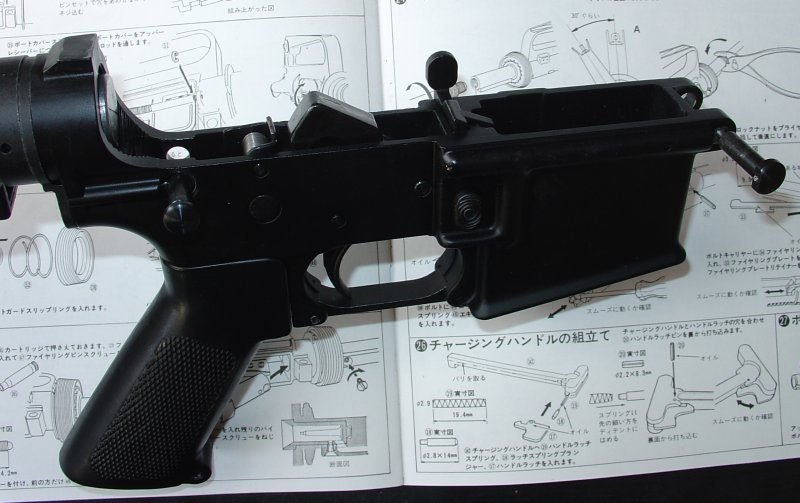 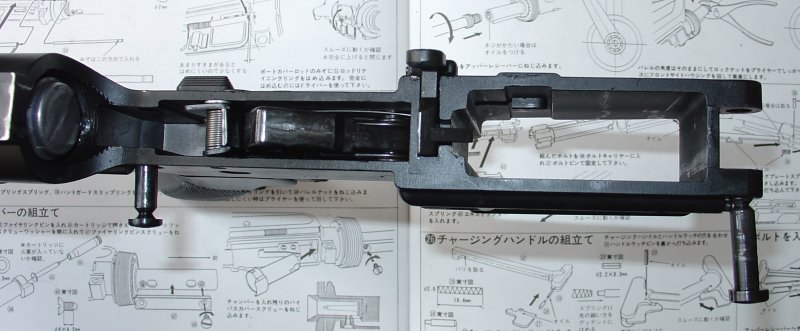 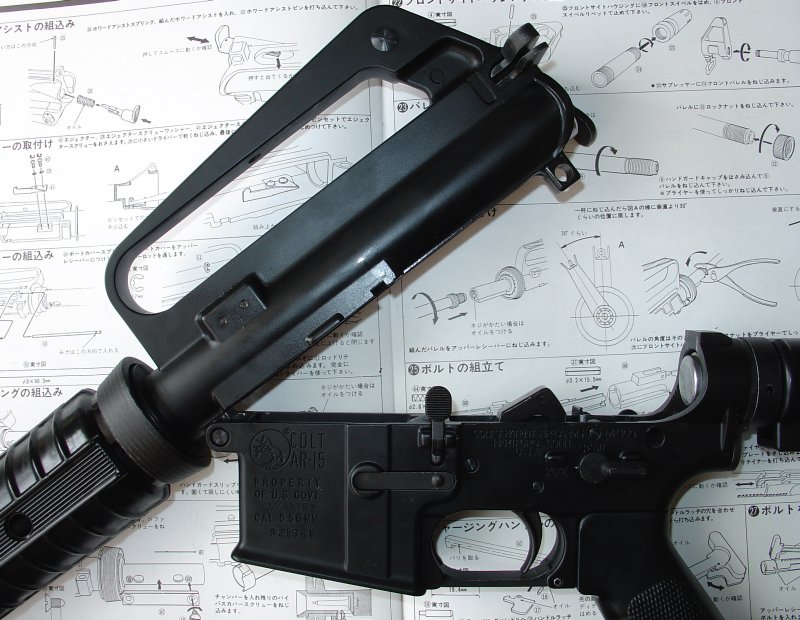
Last edited by smootik on Thu Apr 14, 2011 12:31 pm; edited 2 times in total | |
|
| | |
smootik
Modelgun Perfectionist
Number of posts : 1823
Location / Country : Poland
Registration date : 2009-03-03
| | Subject: Re: Marushin XM177E2 kit - first time assembly Wed Apr 13, 2011 9:30 pm | |
| 29 - foregripParts:#6 - two foregrip halves 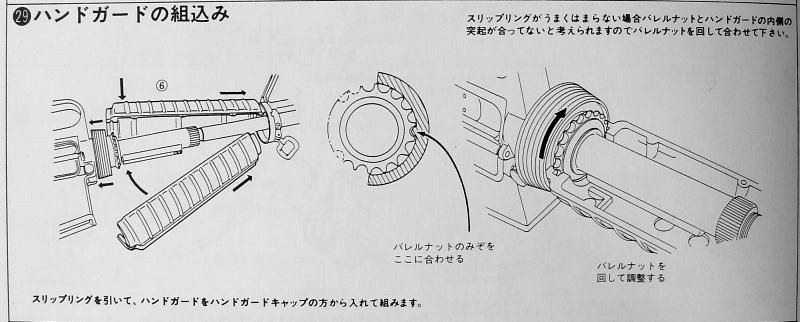 Work: Work:Pull back rear foregrip latch. Insert front end of a foregrip half (#6) onto model, from the top. Align back end of the foregrip half onto foregrip support. It has to clear rear foregrip latch. Foregrip has slots on the inside that have to enter foregrip support. If they don't you need to unscrew support to find the right position. Foregrip half also has two protrusions that should lock between teeth of grip support. As long as grip support is fixed in place (and does not rotate) this might help to avoid foregrip wobble. Repeat with the other foregrip half, this time from the bottom. Release rear foregrip latch. Verify:Foregrip should be held between front and rear latch, and do not fall out. Foregrip halves should be closesly together, parallel, without holes between them. Twisting foregrip should not cause barrel to unscrew (!). If you used Loctite or superglue this is an easy one ;-) Foregrips WILL twist slightly, as both support and forward catch have quite a bit of clearance. You can use your favourite method to secure them better.  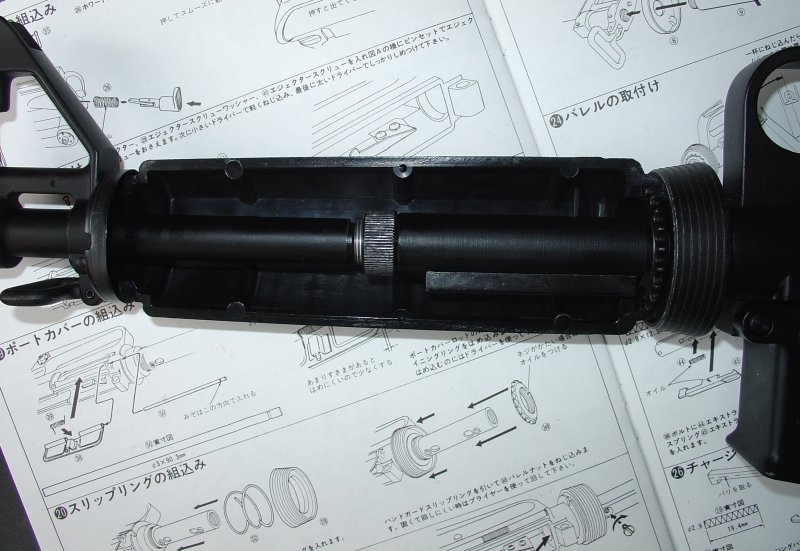
Last edited by smootik on Thu Apr 14, 2011 12:42 pm; edited 3 times in total | |
|
| | |
smootik
Modelgun Perfectionist
Number of posts : 1823
Location / Country : Poland
Registration date : 2009-03-03
| | Subject: Re: Marushin XM177E2 kit - first time assembly Wed Apr 13, 2011 9:32 pm | |
| 30 - magazine Parts: Parts:#166 - magazine (it comes pre-assembled) Check:Deburr lips of the magazine. They are extremely sharp, can cut your fingers, deeply scratch cartridges, cause too much friction and prevent proper feeding. 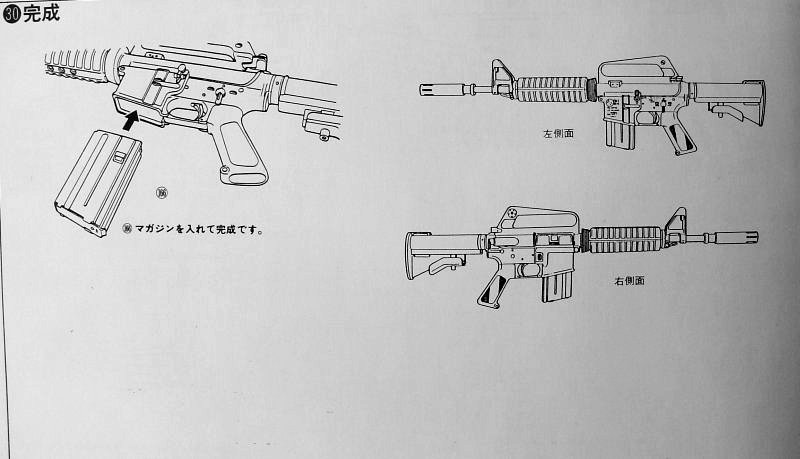 Work: Work:Just insert magazine into the model. Hole for the catch should be to the left. Verify:Magazine should not fall out by itself. Magazine should easily come out when mag relase button is used. Magazine should not cause interference with the bolt. Empty magazine should activate bolt stop. It usually doesn't, as follower plunges inside the magazine. This can be resolved by modifying the follower. Insert empty cartridges to the magazine. Move bolt handle back and forth to check that cartridges are fed and ejected correctly. 
Last edited by smootik on Thu Apr 14, 2011 12:34 pm; edited 2 times in total | |
|
| | |
smootik
Modelgun Perfectionist
Number of posts : 1823
Location / Country : Poland
Registration date : 2009-03-03
| | Subject: Re: Marushin XM177E2 kit - first time assembly Wed Apr 13, 2011 9:40 pm | |
| This completes Marushin XM177E1 kit assembly. In theory. In practice it is still a long way to obtain a working modelgun, mainly due to bolt friction, and several other problems found along the way. Remaining problems: - bolt gets stuck inside receiver (no solution yet, except of plenty oil and layer of shavings that act as cushion)
- extractor does not grab cartridges due to too small gap from bolt head (needs bolt disassembly and installing a spacer)
- hammer starts destructing soon (probably due to contact with firing bar, no solution)
- bolt buffer gets damaged by it's stop pin (not sure if it has serious impact)
- barrel is not securely screwed into the receiver, it unscrews and misaligns the sight (duh...)
- foregrip twists and moves around (just like in real ones :-) )
- rear sight adjustment does not seem to work (at least I can't figure it out)
- stock twists and wobbles a bit (this is not a major problem)
- upper and lower receiver wobble due to too large clearance of the pins and lugs (should be easily fixed)
This model will not fire unless at least the bolt problem is resolved. I am very satisfied by quality of parts and "niceness" of this model. It still needs some fixes for assembly quality to be a solid model, but these can be achieved fairly easily (all wobbles and barrel). Firing action still remains to be seen ;-) | |
|
| | |
kiwigunner
Modelgun Master


Number of posts : 556
Age : 73
Location / Country : Auckland/New Zealand
Registration date : 2010-03-10
| | Subject: Re: Marushin XM177E2 kit - first time assembly Thu Apr 14, 2011 10:34 am | |
|
One again you've posted an awesome and helpful guide!
Excellent mate!
Kiwigunner
| |
|
| | |
Cerwyn
Cerwyn (Site Admin)
")

Number of posts : 11073
Age : 65
Location / Country : North Wales
Registration date : 2008-07-20
| |
| | |
smootik
Modelgun Perfectionist
Number of posts : 1823
Location / Country : Poland
Registration date : 2009-03-03
| | Subject: Re: Marushin XM177E2 kit - first time assembly Thu Apr 14, 2011 12:40 pm | |
| Thanks guys :-) It did take time and effort to put it (text/photos, as well as the model) together. Initially I though of doing a video instruction like wolfecastle did here for MP40, however it would take much more time and skill than I had. https://mp40modelguns.forumotion.net/t2546-marushin-mp-40-instructional-video-on-assembly-in-2-partsPosts are now updated with pictures from manual to show original instructions. These are not high quality, as you would normally use your printed manual that came with the kit, just serve as a rough guideline. What remains now is a description of bolt assembly, and of course taking time to tune the model and make it fire. Please, please - add your comments and hints :-) Also correct my English, especially names of parts and verbs for actions. Without corrections I will never learn how to write properly ;-) | |
|
| | |
smootik
Modelgun Perfectionist
Number of posts : 1823
Location / Country : Poland
Registration date : 2009-03-03
| | Subject: Re: Marushin XM177E2 kit - first time assembly Fri Apr 15, 2011 9:56 am | |
| Here's a photo of a partially blued bolt: 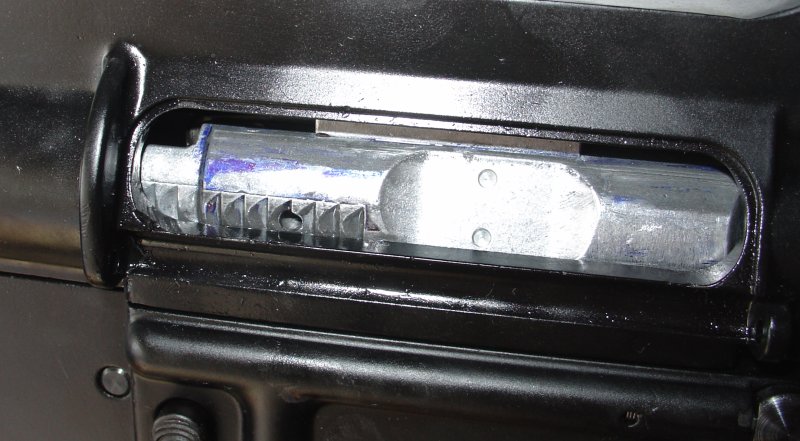 I used a blue felt-tip pen to blue  surface of the bolt. This helped to see where ink gets scratched off bolt and is left inside the receiver - these areas need to be made smoother than smooth and inspected for other problems. You can clearly see that the top surface of the bolt, above and to the right of blue marks, is what causes friction. Near right side you can even see two horizontal deep lines. This side of the bolt slides against sharp edges inside receiver, where large main bolt space changes into a smaller guide space (charging handle and protrusion on top of the bolt move inside it). Bolt has a lot of play inside its channel, making damage over larger surface than just a single line. Bolt is pressed against these edges by the hammer. Regardless of polishing and making edges round this still seems to be a problem. Only a large amount of silicone oil helps that, but even then aluminum still gets shaved off the parts - when you inspect bolt after cycling a few times oil becomes almost black. This oil/shavings mixture seems to work best as a lubricant. Regardless of that friction problem must also be something else - sometimes after opening receiver/removing/inserting bolt it does not stick at all, sometimes it does much harder than it should. | |
|
| | |
smootik
Modelgun Perfectionist
Number of posts : 1823
Location / Country : Poland
Registration date : 2009-03-03
| | Subject: Re: Marushin XM177E2 kit - first time assembly Thu May 12, 2011 8:40 pm | |
| Progress update. Resolved problems: - extractor does not grab cartridges due to too small gap from bolt head (needs bolt disassembly and installing a spacer)
- stock twists and wobbles a bit (this is not a major problem)
- bolt buffer gets damaged by it's stop pin (not sure if it has serious impact)
Problems that have a solution: - hammer starts destructing soon (a sunk screw will be installed to resolve that)
- foregrip twists and moves around (partially resolved, it merely creaks now)
- upper and lower receiver wobble due to too large clearance of the pins and lugs (looking for right size o-ring for the rear lug)
- smoke seeping out of grips (silicon seal can be used on bypass cover)
Remaining problems: - bolt gets stuck inside receiver. After more investigation it seems to happen due to receiver-stock tube alignement. When bolt sticks and stock tube is unscrewed and then tilted, bolt usually gets released)
- barrel is not securely screwed into the receiver, it unscrews and misaligns the sight (duh...)
- rear sight adjustment does not seem to work (at least I can't figure it out)
| |
|
| | |
Sponsored content
| | Subject: Re: Marushin XM177E2 kit - first time assembly | |
| |
|
| | |
| | Marushin XM177E2 kit - first time assembly | |
|
