MP40's Modelguns Forum
Would you like to react to this message? Create an account in a few clicks or log in to continue.
MP40's Modelguns Forum

International Forum for Modelgun enthusiasts
 
HomeLatest imagesRegisterLog in


 Winchester Restoration And Repair

Go down 
3 posters
AuthorMessage
stumpy_ned
Modelgun Enthusiast
Modelgun Enthusiast


Number of posts : 87
Location / Country : UK
Registration date : 2012-04-21

Winchester Restoration And Repair Empty
PostSubject: Winchester Restoration And Repair   Winchester Restoration And Repair Icon_minitimeMon Jan 07, 2013 3:26 pm

Hello all.

Wasn't sure if this belongs in this section or in the stripping/rebuild guides section.

I've decided to start restoring my Winchester and repairing some of the broken monkey metal parts. I think my Winchester is a limited production MGC M1866 Yellow Boy Saddle Carbine, based on comparing mine with the MGC Winchester M1866 Yellow Boy from this website here (note: I think you need to be logged in to see the link) and an old mp40modelguns thread from 2010 found here. However, mine is in a chrome finish and not brass finish and the barrel is different. Mine is circular whereas the other two are octagonal barrels and have barrel mounting brackets further down, whereas mine is near the muzzle end. It could be possible that my Winchester is a mish mash of other MGC Winchesters. Maybe someone can confirm this or identify the exact make and model of mine?


Right, pics.

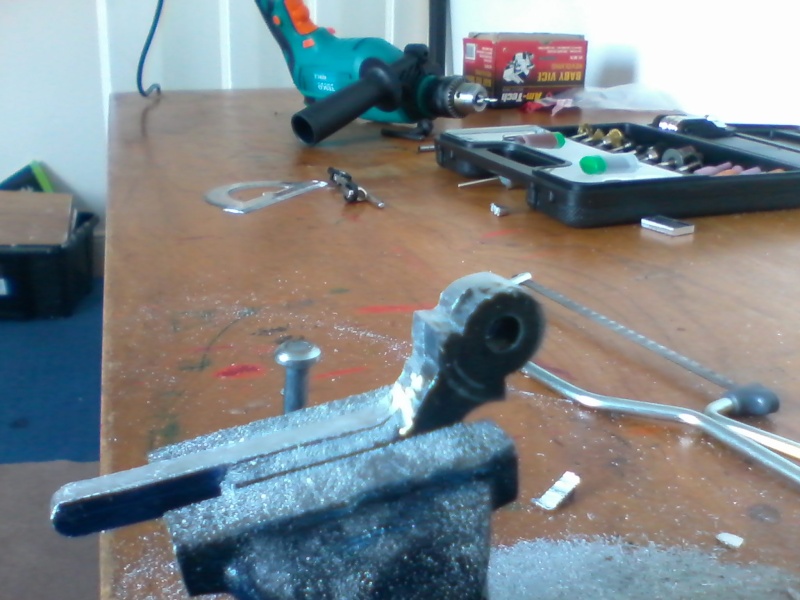
The Winchester stripped down and laid bare, minus the screws. The wooden buttstock and forward wooden handguard are still in very good condition. There are no chips, cracks or splits anywhere. The brass buttstock plate is in a bit of a manky state but nothing a good bit of brass polishing shouldn't be able to fix. Ignore the picture of the barrel in the first picture. It looks bent but it isn't. A trick of the light.
Winchester Restoration And Repair Img00215

Winchester Restoration And Repair Img00216

Winchester Restoration And Repair Img00217

Winchester Restoration And Repair Img00218


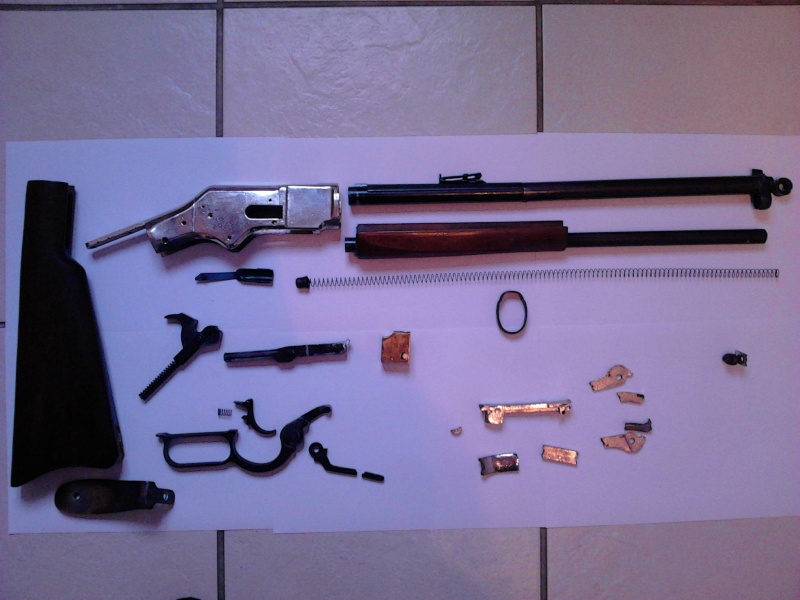
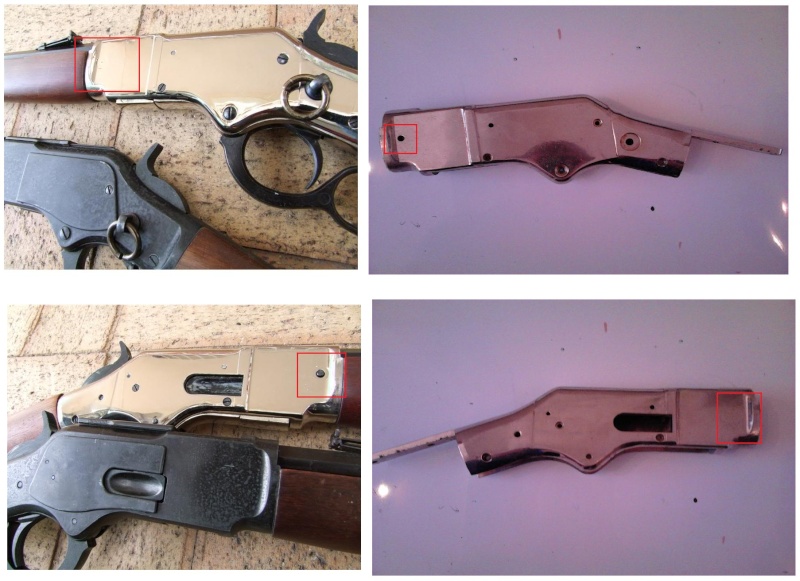
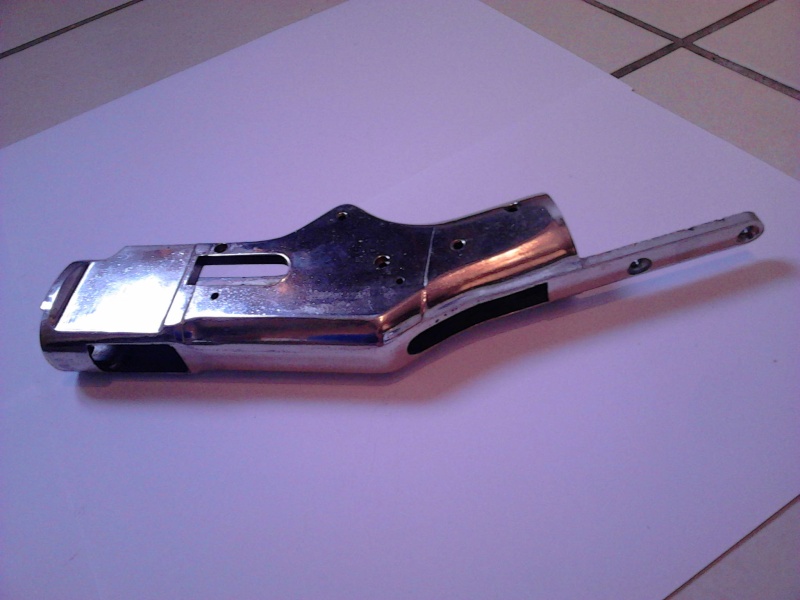
The main Winchester receiver. Still solid but a few too many pit and scratch marks all the same. It's in a chrome finish but I've got a feeling that it was originally in a brass type finish, as the inside of the receiver has a slight gold tinge to it and the picture showing the rear of the receiver where the buttstock pushes up against, is clearly some sort of brass finish.
Winchester Restoration And Repair Img00220

Winchester Restoration And Repair Img00221

Winchester Restoration And Repair Img00222

Winchester Restoration And Repair Img00228


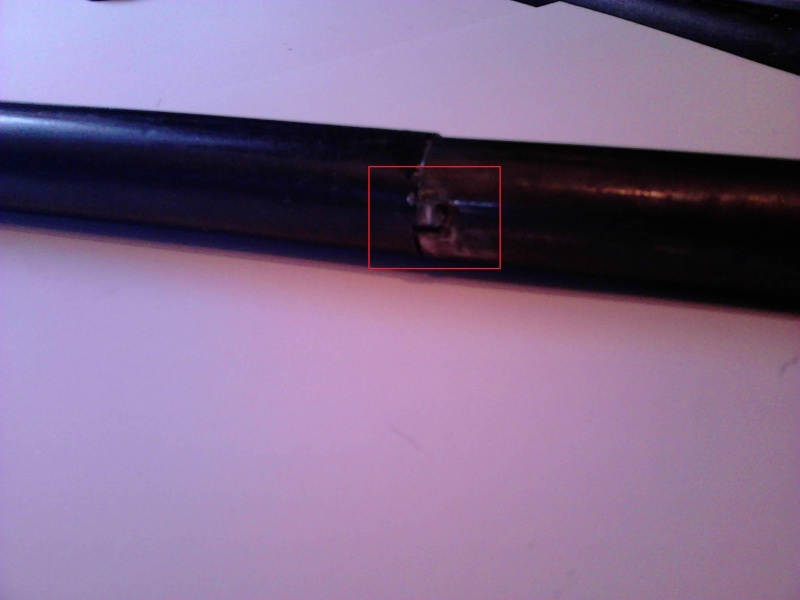
The barrel and magazine tube next to the receiver. Notice that the barrel is circular and not octagonal like the other Winchesters already mentioned and linked in this thread. Also my Winchester has a screw-on muzzle nut of some sorts, unlike the other Winchesters I've seen.
Winchester Restoration And Repair Img00223

Winchester Restoration And Repair Img00224

Winchester Restoration And Repair Img00225


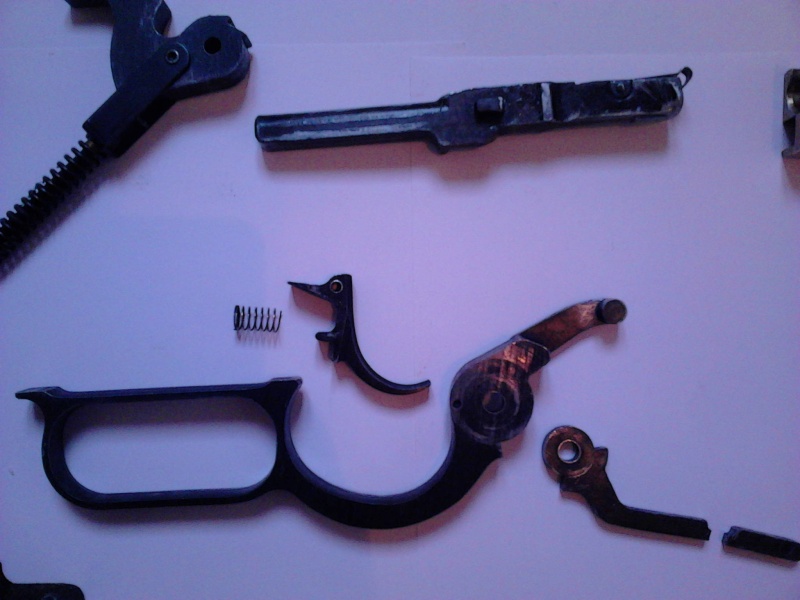
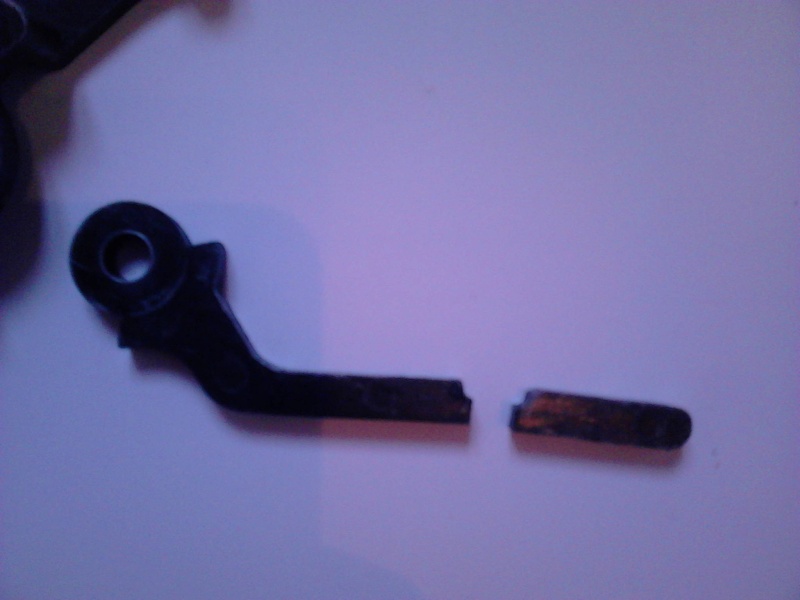
And now the broken parts. The first picture is the part that connects to the main lever action mechanism. Can be replaced easily enough by just cutting out an equivalent part from a flat piece of aluminium or steel by using the broken parts as a template. Unless of course someone can point me in the direction of someone who sells spare plug fire cartridge parts for this particular Winchester model.
Winchester Restoration And Repair Img00226

Winchester Restoration And Repair Img00227


This is the worst of the broken parts, and probably not something that I can make myself. Here it is next to the main receiver. I'm not sure what this particular broken part is called so for the purposes of this thread I will simply refer to it as a "bottom base plate" until such time someone can enlighten me as to it's real name. Worst case scenario I might try and use the broke bottom base plate as a crude template as a guide to make a wooden version, and then once the wooden version has been test fitted into the receiver, use that wooden version as a pattern to make a final metal casting piece. I would prefer though, to simply source a replacement part purely for simplicity reasons. I've googled real Winchester 1866's and so far it looks as though real Winchesters didn't have a part like that, at least not from what I can gather.
Winchester Restoration And Repair Img00230


There's actually not that much work to be done. Mainly just replacing the broken parts. One of the things I might do is strip the chrome effect finish completely off and either re-chrome finish it or re-brass finish it. I have an idea of how I might be able to replace the broken bottom base plate. Apart from PFC Winchesters, the only other semi functional 1866's I know of is the Denix 1866's. It might be possible to buy a complete Denix 1866, carefully dremil out the bottom of the Denix receiver and see if that fits into my Winchester. It might work. If not it's an expensive test.

Progress to follow in due course.
Back to top Go down
stumpy_ned
Modelgun Enthusiast
Modelgun Enthusiast


Number of posts : 87
Location / Country : UK
Registration date : 2012-04-21

Winchester Restoration And Repair Empty
PostSubject: Re: Winchester Restoration And Repair   Winchester Restoration And Repair Icon_minitimeMon Jan 07, 2013 5:29 pm

For some reason my post won't highlight the link to another modelgun history site showing the different Winchesters I have been referring to, so here is the link in full: http://homepage3.nifty.com/nkoinuma/Western.htm
Back to top Go down
stumpy_ned
Modelgun Enthusiast
Modelgun Enthusiast


Number of posts : 87
Location / Country : UK
Registration date : 2012-04-21

Winchester Restoration And Repair Empty
PostSubject: Re: Winchester Restoration And Repair   Winchester Restoration And Repair Icon_minitimeTue Jan 08, 2013 4:08 pm

Right, a bit more news. Remember I said that the barrel isn't bent, just a trick of the light? Yep, well, I was wrong. It is bent....because it's two separate parts tacked together. I had noticed the difference in thickness before but put it down to part of the manufacturing process. I noticed this morning that on closer inspection the barrel on my Winchester appears to have originally belonged to a different type of Winchester Saddle Carbine (it is stamped Winchester Saddle Carbine just behind the rear sight). Well, part if it anyway.

If you look at the picture of the barrel you'll clearly notice where two parts have been joined together. It might not be clearly obvious from the pictures but with the naked eye there is also tell tale signs of paint brush marks on the "fake" section of the barrel.
Winchester Restoration And Repair Img00231
Winchester Restoration And Repair Img00232
Winchester Restoration And Repair Img00233


The foresight seems to have had the muzzle end of it tapered so the muzzle itself could screw on and the barrel side of the foresight had simply been glued on to the barrel! As seen in the pictures, glue residue is clearly visible on the rear of the foresight. I've no idea why someone has done this. Very odd.
Winchester Restoration And Repair Img00234
Winchester Restoration And Repair Img00235
Winchester Restoration And Repair Img00236


And now a not so obvious difference. The receiver of my Winchester is virtually identical to the MGC Winchester Saddle Carbine (with octagonal barrel as posted by forum member Ozguns back in June 2010) but with the position of the barrel retaining pin being on the opposite side as shown in the picture here comparing my receiver to Ozguns receiver.
Winchester Restoration And Repair Winche10


So what I think I've got is an unknown Winchester comprised of multiple parts from at least two different types of model guns. Which ones though I still can't figure out as every time I find what looks like it's correct brand, I then find little differences that then put me in doubt.
Back to top Go down
lampwick
Modelgun Master
Modelgun Master
lampwick


Number of posts : 359
Location / Country : UK
Registration date : 2008-09-11

Winchester Restoration And Repair Empty
PostSubject: Re: Winchester Restoration And Repair   Winchester Restoration And Repair Icon_minitimeFri Jan 11, 2013 2:48 pm

Keep at it Ned.. it makes for fascinating reading. cheers
Back to top Go down
stumpy_ned
Modelgun Enthusiast
Modelgun Enthusiast


Number of posts : 87
Location / Country : UK
Registration date : 2012-04-21

Winchester Restoration And Repair Empty
PostSubject: Re: Winchester Restoration And Repair   Winchester Restoration And Repair Icon_minitimeSat Feb 02, 2013 3:59 pm

Update:

Almost finished making a replacement lifting lever for the Winchester.

Tools/materials used:
1. 100mm x 100mm x 5mm flat aluminium.
2. Small bench top vice.
3. Hand file (Ideally one of those flat curved files).
4. Pencil compass (minus pencil).
5. Some sort of thick marker pen (preferably not black).
6. Small hand held hack saw
7. Drill with grinding attachments to make a poor mans dremel (optional).


I bought a 100mm x 100mm piece of flat 5mm thick aluminium off ebay for a couple of quid posted. I deliberately bought that size so that if I messed anything up, I at least had plenty more spare aluminium to start again. Luckily as well, the broken MGC Winchester lifting lever is the exact same thickness as the aluminium. To make it as easy as possible, I first marked out an area and coloured it in with blue marker pen. I then lined up the longest flat part of the original broken lifting lever with one of the flat straight edges of the flat aluminium sheet as it means I would have a flat level surface to start from, and also means it's one less edge to cut/file.

Once the broken parts were lined up to the edge of the aluminium, I then used a standard kiddies pencil compass to score out the shape of the lifting lever using the broken parts as a template. That's the reason for the blue pen. The scored outline made by the compass shows the score lines very clearly.

Once everything was lined up as closely as possible, I then clamped both parts into the bench top vice. The broken part will be used as a live template. The first steps was to cut out with the hacksaw large parts as close as possible to the score lines. In some instances involving the curved circular section, I cut off small sections at a time in a sort of hexagonal fashion. Once this was done, the tedious work of filing away any excess began, again with the broken part clamped next to the aluminium piece as a template. When I started to see consistent file marks on the broken "template", I knew I was pretty much bang on with dimensional accuracy.

Job done. Well, almost. I still need to finish filing one of the curved sections.

Winchester Restoration And Repair Img_2010

Winchester Restoration And Repair Img_2011

Winchester Restoration And Repair Img_2012

Winchester Restoration And Repair Img_2013

Winchester Restoration And Repair Img_2014

Back to top Go down
kiwigunner
Modelgun Master
Modelgun Master
kiwigunner


Number of posts : 556
Age : 73
Location / Country : Auckland/New Zealand
Registration date : 2010-03-10

Winchester Restoration And Repair Empty
PostSubject: Re: Winchester Restoration And Repair   Winchester Restoration And Repair Icon_minitimeSun Jun 02, 2013 10:41 am


Great going stumpy-ned! Your repairs age going well - and as you will read in my post, my Winchester 73 had a few broken parts I needed to fix - it takes time and a bit of ingenuity - and that's part of the fun in restoring these old Modelguns.

Keep up your good work! And we'll look forward to seeing your completed project - whenever you do so!

Cheers.

Kiwigunner


Back to top Go down
http://anzaction.weebly.com/
Sponsored content


Winchester Restoration And Repair Empty
PostSubject: Re: Winchester Restoration And Repair   Winchester Restoration And Repair Icon_minitime

Back to top Go down
 
Winchester Restoration And Repair
Back to top 
Page 1 of 1
 Similar topics
-
» p38 restoration
» MGC MP40 Restoration... Info needed
» mgc 1921 restoration
» mgc68 restoration
» MGC 68 MP40 deactivated restoration

Permissions in this forum:You cannot reply to topics in this forum
MP40's Modelguns Forum :: Modelgun General Discussion-
Jump to: