HistoryAfter WWI it became clear that while Luger P08, standard pistol of German Army, is a great weapon, it is too expensive to manufacture.
In 1938 Walther has designed a 9mm pistol that was simpler and replaced P08 during WWII.
You can find more information about P38 here:
http://en.wikipedia.org/wiki/Walther_P38http://p38.50webs.com/contents.htmlNice animation how the mechanism works (Flash):
http://www.p38forum.com/anime7.swfWalther has initially produced P38 to a high quality finish, called "Commercial". Due to war requirements production had to be faster and cheaper, so starting in 1941 P38 had a more rough finish, resulting in "Military" version.
ModelgunMarushin has reproduced P38 as modelgun in many versions:
- slide marking: Commercial (with Walther logo) or Military (war-time markings P.38)
- barrel length: standard or short;
- grips: black, dark brown or brown-black pattern;
- material: ABS, HW and Nickel Finish;
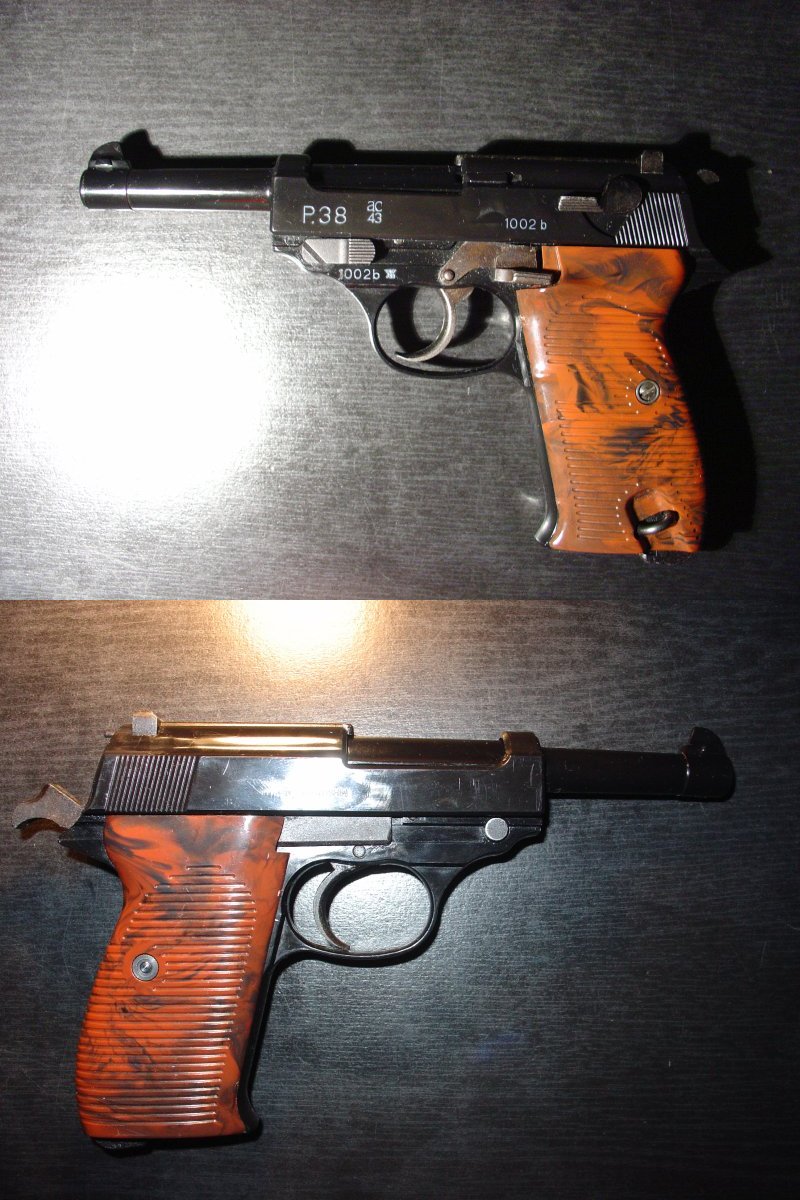
I have an ABS, brown-black grip, Military version.
There are also many airsoft versions of P38, manufactured by Marushin (probably from the same molds as modelgun) and Maruzen.
BoxI didn't receive a box, so I can't tell you what it looks like ;-) You can find examples on popular sites selling modelguns though.
Modelgun
Modelgun looks plastic-shiny, due to it's ABS externals.
Barrel, slide, frame and grips are plastic.
Rear sight, trigger, hammer, safety, slide catch, magazine, magazine catch and internals are metal.
ABS model is much lighter than the original (~400g vs ~800g).
It is also lighter than HW modelguns from MGC and other companies, but heavier than some other modelguns (like Marushin Browning).
After loading with cartridges it has enough weight to feel good.

Slide in Military version is marked in the following way:
- left side: "P.38" then "ac" (Walther factory code) over "43" (year of production) and near safety "1002b" (probably fake serial number)
- right side: "MFG. MARUSHIN"
Rear sight, as well as a bar on top of slide are made of metal.
At the back of the slide you will find a "loaded chamber" indicator, which is a metal pin sticking out of the slide above hammer.
When cartridge is loaded in chamber, it will push out this pin, and you can see&feel that the model is loaded.
Unfortunately in this (my?) model this pin has too much play near chamber and will sometimes show "loaded" while it is pushed out by wall of chamber/barrel itself, not a cartridge.
Slide has some grooves cut into it near the back, to make it easier to grip and reload.

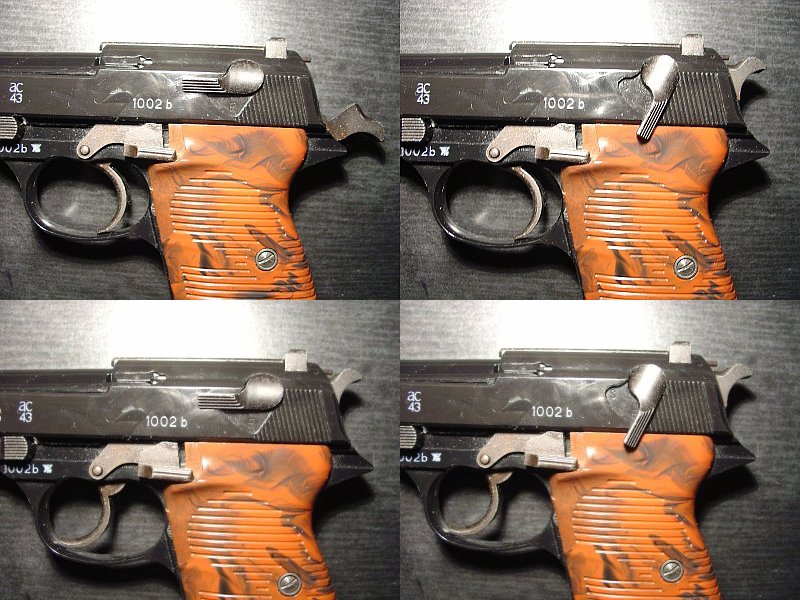
Safety switch is located on the left side of the slide, near the end of the model.
It has two positions, horizontal (Fire) and vertical (Safe). If hammer is cocked and you flip safety to "Safe", it will automatically decock the hammer. Sometimes this will provoke firing of the cap, as this "decocking" is forceful enough - take care!
Photos:
- top left: cocked, safety off, trigger in single action mode
- top right: dedocked, safety on, trigger blocked in SA
- bottom left: decocked, safety off, trigger in double action mode
- bottom right: decocked, safety on, trigger blocked in DA position

Inside slide you will find firing mechanism. It is very different from the original.
There is no firing pin, it is "side-fire" mechanism, where the cartridge is pushed forward by metal bars pushed from bolt sides.
Extractor is done differently, too. There is a fake extractor molded on the slide, but inside there is a real one hidden beneath.
Barrel sticks out in front of the slide as it's own block.
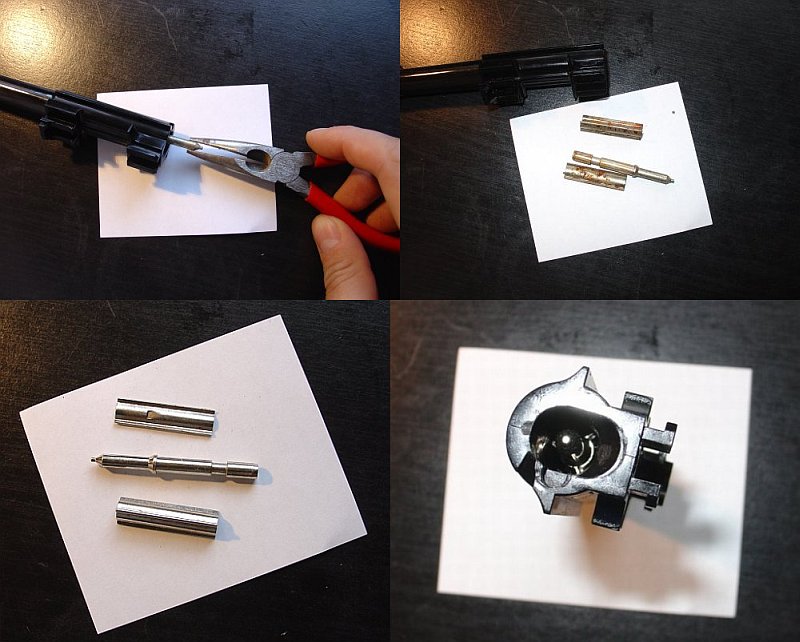
It is an open barrel, with a horizontal metal insert blocking it.
As in other modelguns, you will find a metal detonator pin inside the chamber.
Frame is ABS. At the front, on the left side, you will find take-down lever, with "1002b" serial underneath, and another marking (cannot see it properly).
Above the trigger on the left side there is a slide catch lever.
On the right side you will find a metal bar linkin trigger to the firing mechanism.
Grips are held to the frame by a screw.
Trigger works in double-action mode!
If the hammer is not cocked and you pull the trigger, it will cock the trigger and fire.
If hammer is already cocked, trigger has a different position (more backward) and a simple pull will release the hammer.
Magazine

Magazine is of typical construction. It holds 8 cartridges (only 6 on photo).
It is marked "P38 9mm" on side, near bottom.
You can disassemble the magazine to clean it:
- remove all cartridges
- with a soft-tipped "something" push through the hole at the bottom
- slide magazine bottom off
- find the spring and metal part that have just flown outside
- clean all parts throughly, especially mag follower, inside, feed lips and outside near feed lips.
- oil parts
- disassemble back (it is easier, as nothing should fly out this time ;-) )
Magazine is held in place a by magazine catch located at the bottom of magazine well.
It is different design than many modern pistols, where catch is on grip side, behind the trigger.
You need to push catch to the back and hold it to release magazine or make space put it in.
Note: brown colour on magazine lips is uncleaned deposit from detonated caps. It should (have) be(en) cleaned!
CartridgesCartridges that I had were "early" Marushin design.
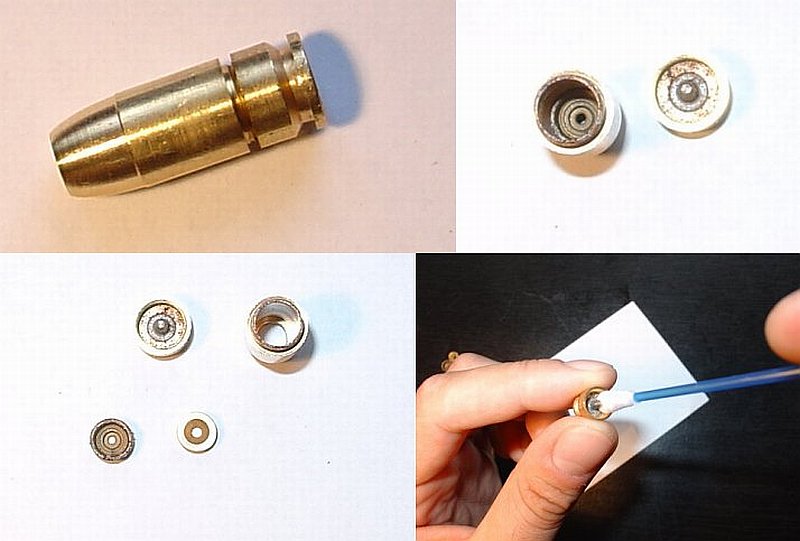
You unscrew the bottom of the cartridge.
Bottom has a fixed metal pin.
Inside the top there is a "floater" piston with a hole in the middle.
It also has a conical hole from one side.

You are supposed to put piston inside the top of cartridge with this conical part facing towards detonator pin, as this hole has the same shape, so it can enter cartridge and rest against the piston.
If you install it the other way round, piston (if not detonator pin!) will get damaged.

After installing the piston you push a cap inside the top of the cartridge, with the charge facing downwards, toward the pin.
You should push the cap inside with a tool, so it isn't touched by pin in bottom of the cartridge during reassembly.
Screw back the bottom, repeat loading for other cartridges, and you are ready to go.
P38 cartridges are
not readily available, but Francky and Shazhib can find you some more.
The cartridges come 5 in a pack, when originally packed.
FiringLoad cartridges to the magazine, magazine to the model.
Rack the slide to load the first cartridge, and you are ready to go.
Pull the trigger and watch cartridges flying away.
Repeat until magazine is empty.
Note: cartridges will
fly to the left, because extractor is on the left side.
This can surprise you, as most pistols eject to the right or upwards.
Firing is very quiet, making it very good model to shoot at home.
ProblemsI found these problems so far:
- sometimes when you rack the slide to load a cartridge, P38 will fire. I guess it has something to do with how cap is loaded. For me it happened a few times, enough to be careful.
- sometimes when you decock using safety, P38 will fire. Falling hammer (even if stopped by safety mechanism) has enough force to detonate the cap, unfortunately.
- sometimes model goes full auto and shoots two cartridges in succession. It is probably same reason as the first problem mentioned.
- cartridges fly out TO THE LEFT, DUH! ;-)
Other than that I didn't have jams, ejection problems or other issues with this model.
Basic disassemblyMagazine: release catch, remove, nothing special. Clean from cap residue, check later to verify there is no brown/white leftovers.

Barrel: this is slightly different than real P38, because after turning takedown lever down you also need to remove a pin that holds barrel assembly to the frame. When slide is held back, the pin is just where the slide ends in the front. After you take out the pin, you can slide barrel out to the front.

Now you can also take out metal block that is under barrel, it just comes out.
Be careful not to loose spring!
You will have access to a small screw under barrel.

After you unscrew it, detonator pin together with two metal pieces holding it inside the barrel should fall out. If not, help it with thin pliers. Please note what it looks like, so you can put everything back together ;-)
You should carefully clean barrel (only the plastic part) with usual means. Detonator pin will have a lot of brown deposits - this is usually not rust, just residue from caps. You should clean it regularly, after each shooting.
From time to time you should also disassemble slide (careful! return springs will fly out!) and clean inside parts, lubing them with oil.
Instructions can be found here:
https://mp40modelguns.forumotion.net/modelgun-stripping-and-rebuild-guides-f12/marushin-p38-abs-slide-disassembly-t1578.htm
Cartridges - usual procedure. Make sure that threads are clean!
OverallMarushin P38 ABS Military is my favourite at the moment, thanks to it's status (recognizable WWII gun seen in many movies) and not too much noise. Except for occasional self-firing I do not have any complaints.
(edit: added photos, corrected minor errors)
