| | Marushin UZI ... Restoring Finish |  |
|
|
| Author | Message |
|---|
Cerwyn
Cerwyn (Site Admin)


Number of posts : 11090
Age : 65
Location / Country : North Wales
Registration date : 2008-07-20
 |  Subject: Marushin UZI ... Restoring Finish Subject: Marushin UZI ... Restoring Finish  Sat Mar 26, 2011 4:47 pm Sat Mar 26, 2011 4:47 pm | |
| Marushin UZI - Restoring Finish Everyone that has owned a Marushin UZI will know how easily the factory paint finish falls off all the metal parts. Having grown tired of seeing paint flaking off every time I handled my UZI I decided to attempt a complete restoration.This particular example is an all metal factory built type, the trigger group and magazine well is all metal as opposed to more recent ones that have ABS trigger group / mag'well assemblies.The Receiver and Top Cover plate are cast Aluminium Alloy, while the rest of the metal parts are Zinc Alloy. Magazine and Folding Stock are steel. The only plastic parts are pistol and foregrips as per the real gun. Here are a couple of photographs showing how untidy the model had become:First task was to strip the model completely. Basic stripdown guide can be found here:The only additional tasks being Stock, Receiver Top Plate and Cocking Handle, Foregrips, Ejector and Rear Sight assembly removalMy plan was to use Birchwood Casey's Aluminium Black fluid to restore all the Aluminium and Zinc parts, then Birchwood's Re-Bluing Compound on steel components.All these compounds are readily available on e-Bay or your local Gunsmith. Steel Wool, wet and Dry Abrasive Paper and Wire Brushes (steel and brass) are also required.Once the model is completely stripped, all the old paint has to be removed using Paint Stripper. Follow the manufacturers' instructions carefully as paint stripper can be caustic and gives off harmful fumes. Once the stripper has the old paint bubbling off, remove it with steel wool and wire brushes.More than one application of paint stripper may be needed to remove ALL traces of the paint.Next, rinse all parts with fresh clean water to neutralise the paint stripper. Begin preparing all metal surfaces for refinishing by rubbing down with wet and dry abrasive paper and plenty of soapy water. Use medium grade abrasive paper followed by Fine grade to achieve a good smooth polished surface finish. Steel wool and soap impregnated kitchen scouring pads can be used to good effect.Knurled metal parts such as the barrel nut and cocking handle need rubbing clean with wire brushes and steel wool.The parts should look like this:Receiver:Top Cover:Barrel Nut:Cocking Handle:Detonator Chamber:Bolt Carrier:For best results, Birchwood Casey recommend De-greasing for which I used Engine Degreaser rinsed off with warm water. Then prime the Aluminium and Zinc Parts with their Blue and Rust Remover.
***Follow the instructions very carefully as these chemicals give off dangerous and toxic fumes. Work outside, wear gloves and eye protection***As instructed, rinse the primed metal parts with cold water and dry thoroughly.Next step is to use the Aluminium Black. Again follow instructions very carefully. Apply the fluid which is a thin light blue liquid, to the zinc alloy parts with cotton wool balls or Cotton Buds (Q-Tips). Apply one light even coat at a time. Chemical reaction will make the Zinc turn Dark Grey/Black immediately. Allow to stand for a minute or two, following the instructions, then rinse under cold water. Dry immediately.Repeat this process 3 or 4 times. Each successive light even coat will darken the finish so don't be tempted to apply the chemical too heavily.After 3 or 4 coats, you'll notice the finish will appear slightly uneven, possibly discoloured looking almost like oil floating on water. Do not dispair, the cure for this is the last step... rub light mineral oil (3 in 1 or other light machine oil) into the blackened parts... the difference will amaze you  Finished Blackened Zinc Parts:Barrel and Nut:Barrel Nut:Detonator Chamber:Cocking Handle:For whatever reason, despite the fact that Birchwood's Aluminium Black clearly states "Aluminium" on the label, I could not achieve anything like satisfactory results when trying to blacken the Receiver, Top Cover and Bolt Carrier Finished Blackened Zinc Parts:Barrel and Nut:Barrel Nut:Detonator Chamber:Cocking Handle:For whatever reason, despite the fact that Birchwood's Aluminium Black clearly states "Aluminium" on the label, I could not achieve anything like satisfactory results when trying to blacken the Receiver, Top Cover and Bolt Carrier  I'm still puzzled why this could be. Surface preparation, degreasing and priming were all done as per instructions but when the fluid was applied it would leave patchy surfaces or simply not react at all. It had worked perfectly on Zinc, but not this Aluminium I'm still puzzled why this could be. Surface preparation, degreasing and priming were all done as per instructions but when the fluid was applied it would leave patchy surfaces or simply not react at all. It had worked perfectly on Zinc, but not this Aluminium  There may be another metal in the Alloy used, who knows, but it clearly wasn't going to react as I'd hoped.This left no other choice but to paint the Receiver and Top Cover. Knowing how easily Marushin's paint fell off, I wanted to make sure paint would stay firmly attached this time.I decided to use a primer specifically for Aluminium and a compatable finish coat. Plasti-kote's Primer and Satin Super Black looked promisingTo make sure the metal surface had a good keyed surface for paint to adhere too, I had the receiver and top cover plate lightly grit blasted. The parts came out of the blaster like this: There may be another metal in the Alloy used, who knows, but it clearly wasn't going to react as I'd hoped.This left no other choice but to paint the Receiver and Top Cover. Knowing how easily Marushin's paint fell off, I wanted to make sure paint would stay firmly attached this time.I decided to use a primer specifically for Aluminium and a compatable finish coat. Plasti-kote's Primer and Satin Super Black looked promisingTo make sure the metal surface had a good keyed surface for paint to adhere too, I had the receiver and top cover plate lightly grit blasted. The parts came out of the blaster like this:    The metal takes on a grey, matt appearance feeling slightly rough to touch. Notice though that the blasting process is only lightly done. The "UZI" markings on the receiver are still clearly visible:  Make sure all traces of grit are removed from the parts before proceeding with primer paint. For best results, apply 2 or 3 light thin coats of Primer. This avoids runs in paint, and helps give an even thickness to the surface. Follow Plasti-kote's instructions for best results. Primed Parts:    
All parts were left to dry completely for over a week.
Plastikote's Satin Super Black was my choice of top coat and the time had come to start painting. Again, light, thin coats are the key to success. Following Plastikote's instructions the first light coat was sprayed on. The paint is touch-dry in 1 hour and successive coats must be applied within 4 hrs to stop wrinkling according to the label on the can. I knew I couldn't apply the 2-3 light coats I thought I'd need in one day as parts would need turning over so I settled on spraying to cover all surfaces with an even coat on the first day and return to it in a day or two. The first coat had dried thoroughly during the couple of days I'd left it so before applying the second coat the surfaces were lightly rubbed over with fine wire wool. The second light coat was sprayed onto visible surfaces, left for an hour or more, parts turned and lightly sprayed until all surfaces were covered. In total, 3 coats were applied. The last coat was allowed to dry for 3 days before careful reassembly could begin. 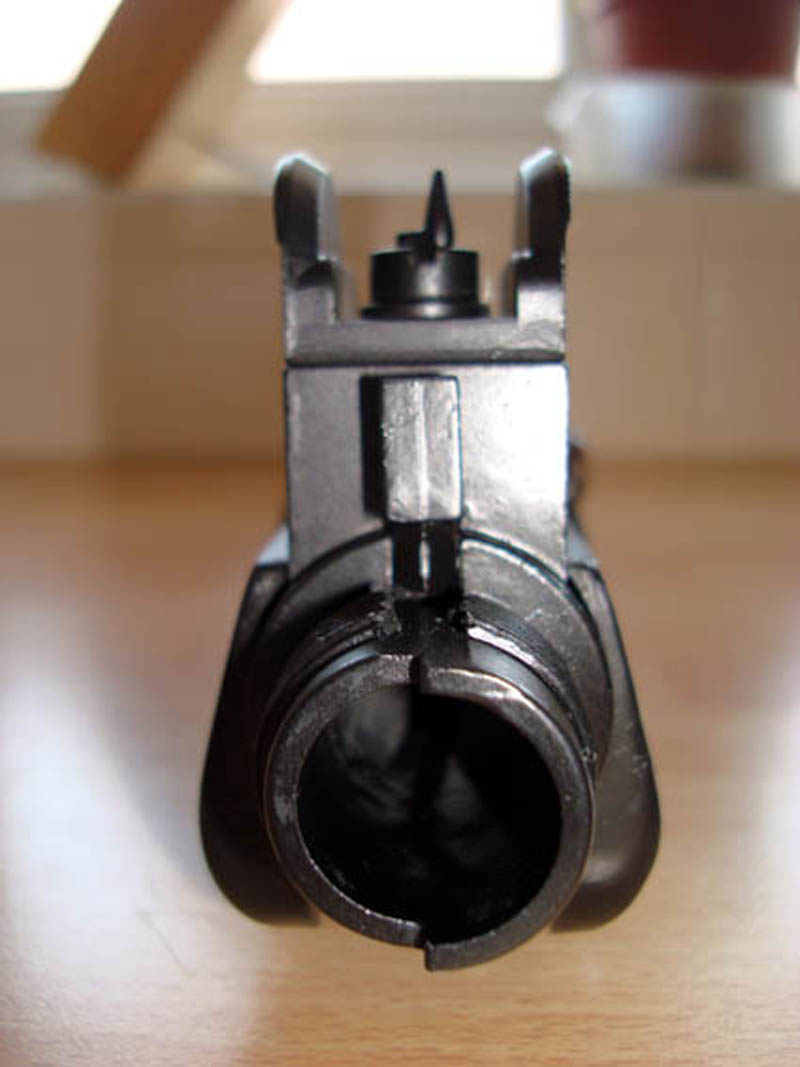 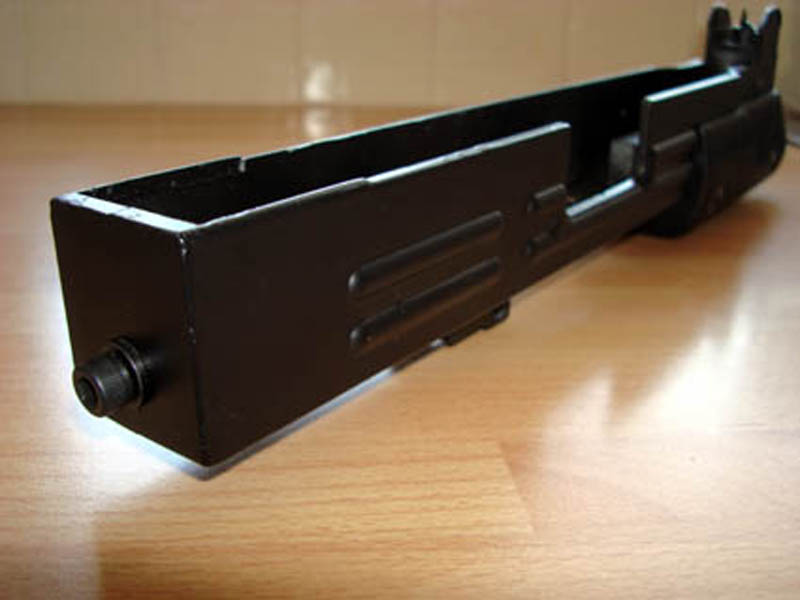 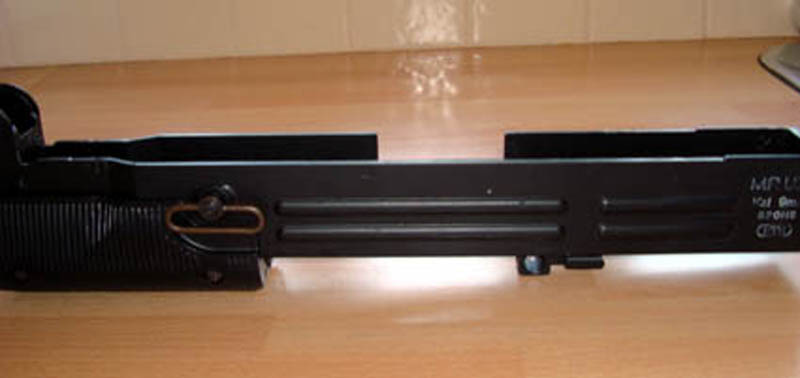    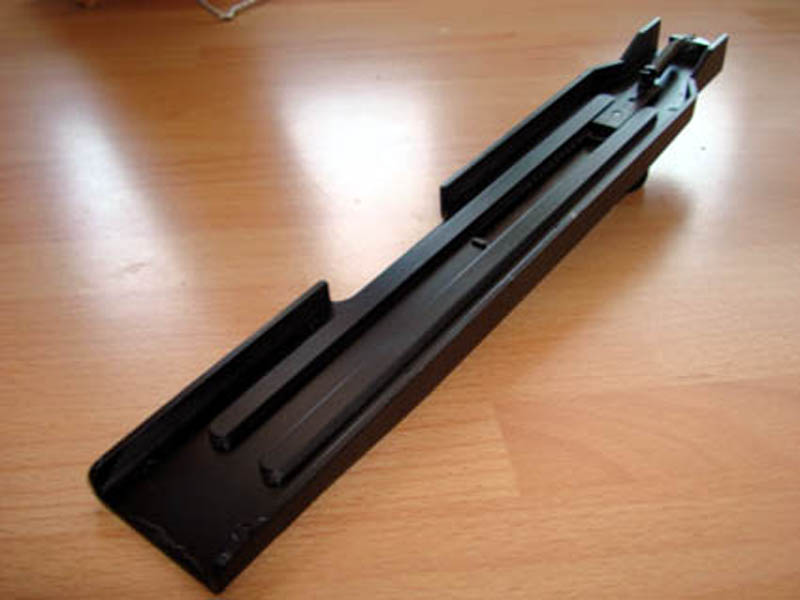 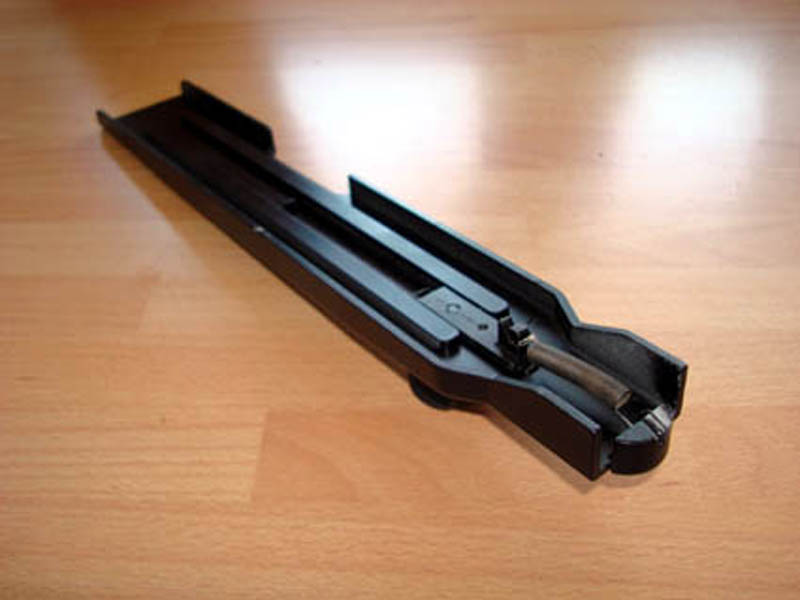  The finished UZI... As a finishing touch, a very small amount of household Vinyl Matt White paint was dabbed over and into the stamping marks on Receiver, Sights and above the selector switch. Applied with a soft cloth then immediately wiped across to remove the excess... The spring steel plate beneath the rear flip sight was stripped of it's original black paint and blued using Birchwood Casey's Perma-Blue Compound. By carefully following the manufacturer's instructions, 3 applications of the paste using a Cotton-bud gave a very pleasing finish.        I'm delighted with the end results. My UZI looks like new again I'm delighted with the end results. My UZI looks like new again  I'm confident the Aluminium Blackened parts will stay looking good with careful handling. Time will tell if Plasti-kote's paint will prove longer lasting than Marushin's factory finish.Some Before & After photos: I'm confident the Aluminium Blackened parts will stay looking good with careful handling. Time will tell if Plasti-kote's paint will prove longer lasting than Marushin's factory finish.Some Before & After photos:
_________________
Cerwyn
Hobby collector of Replica model guns and Militaria.
also member of Living History Reenactment Groups.
Last edited by Cerwyn on Thu Oct 19, 2017 3:35 pm; edited 10 times in total (Reason for editing : images updated using Servimg) | |
|
  | |
smootik
Modelgun Perfectionist


Number of posts : 1823
Location / Country : Poland
Registration date : 2009-03-03
 |  Subject: Re: Marushin UZI ... Restoring Finish Subject: Re: Marushin UZI ... Restoring Finish  Sat Mar 26, 2011 5:20 pm Sat Mar 26, 2011 5:20 pm | |
| Wow! what a difference! Cerwyn, huge thanks for taking time to document the process and posting it here. I now feel more confident to try the same thing with my UZI model, especially seeing the results, as well as having all steps described in more detail than manufacturer's label  | |
|
  | |
metradio
Modelgun Enthusiast


Number of posts : 68
Location / Country : Slough, Berkshire, UK
Registration date : 2008-09-11
 |  Subject: Re: Marushin UZI ... Restoring Finish Subject: Re: Marushin UZI ... Restoring Finish  Sat Mar 26, 2011 9:01 pm Sat Mar 26, 2011 9:01 pm | |
| Nice one Cerwyn, the only comments I can think of are:
For de-greasing small parts I use Dry Cleaning fluid applied with kitchen paper roll tissue.
Highligting the gun markings can be done with a child's white drawing wax crayon rubbed into the markings, it can finished off by rubbing over with gun oil, or completly removed with soap and water or dry cleaning fluid/de-greaser..
Reminds me I will have to strip my deactivated L1A1 Self Loading Rifle down and repaint it black. The original finish is a high temp black paint, but where parts have been welded to deactivate it the paint has stripped off.
Mike
| |
|
  | |
JohnnyV
Modelgun Perfectionist

Number of posts : 552
Location / Country : Cambridgeshire UK
Registration date : 2009-08-24
 |  Subject: Re: Marushin UZI ... Restoring Finish Subject: Re: Marushin UZI ... Restoring Finish  Sun Mar 27, 2011 12:10 am Sun Mar 27, 2011 12:10 am | |
| Nice one Cerwyn !!!!
Good work!! | |
|
  | |
Cerwyn
Cerwyn (Site Admin)


Number of posts : 11090
Age : 65
Location / Country : North Wales
Registration date : 2008-07-20
 | |
  | |
8ace
Modelgun Perfectionist


Number of posts : 2560
Location / Country : UK
Registration date : 2008-08-06
 |  Subject: Re: Marushin UZI ... Restoring Finish Subject: Re: Marushin UZI ... Restoring Finish  Sun Mar 27, 2011 12:10 pm Sun Mar 27, 2011 12:10 pm | |
| Excellent finish  looks like all your hard work has paid off  8ace | |
|
  | |
kiwigunner
Modelgun Master


Number of posts : 556
Age : 73
Location / Country : Auckland/New Zealand
Registration date : 2010-03-10
 |  Subject: Re: Marushin UZI ... Restoring Finish Subject: Re: Marushin UZI ... Restoring Finish  Fri Sep 16, 2011 11:25 am Fri Sep 16, 2011 11:25 am | |
| Inspired by Cerwyn's results I've attempted to do a similar repaint .... and the final black coats have been applied. A couple more and I'll post the finished Uzi photos shortly! I thought members might be interested in the comparisons,  Just a quick series of photos emulating the great job Cerwyb did, with a couple of differences. I blued my Uzi bolt instead of painting it; and sand blasting the receiver and cover was not an option for me, so I felt them with slightly rough sanded surfaces before priming.
RUST NEVER SLEEPS  ... and I think it's worth the effort to restore these iconic modelguns to better condition!  Examples of Sanding & CleaningBlued barrel & bolt - and other parts primed - left for 2 weeks before final black top coats.Stay tuned folks, for the next installment!: the return of the Black Coats! Examples of Sanding & CleaningBlued barrel & bolt - and other parts primed - left for 2 weeks before final black top coats.Stay tuned folks, for the next installment!: the return of the Black Coats! 
Kiwigunner | |
|
  | |
Cerwyn
Cerwyn (Site Admin)


Number of posts : 11090
Age : 65
Location / Country : North Wales
Registration date : 2008-07-20
 |  Subject: Re: Marushin UZI ... Restoring Finish Subject: Re: Marushin UZI ... Restoring Finish  Fri Sep 16, 2011 11:34 am Fri Sep 16, 2011 11:34 am | |
| I tried bluing my UZIs bolt carrier but the metal wouldn't react at all with Birchwood Casey's Aluminum Black, same as the Receiver and Top Cover hence the need to paint them. Which bluing compound did you use on yours please Kiwi 
_________________
Cerwyn
Hobby collector of Replica model guns and Militaria.
also member of Living History Reenactment Groups.
| |
|
  | |
kiwigunner
Modelgun Master


Number of posts : 556
Age : 73
Location / Country : Auckland/New Zealand
Registration date : 2010-03-10
 |  Subject: Re: Marushin UZI ... Restoring Finish Subject: Re: Marushin UZI ... Restoring Finish  Fri Sep 16, 2011 12:44 pm Fri Sep 16, 2011 12:44 pm | |
| Hi Cerwyn: I used Birchwood Casey's Perma Blue paste on the barrel & the bolt! 3 coats! My bolt is zinc; is yours aluminium?   Kiwigunner Kiwigunner | |
|
  | |
Cerwyn
Cerwyn (Site Admin)


Number of posts : 11090
Age : 65
Location / Country : North Wales
Registration date : 2008-07-20
 |  Subject: Re: Marushin UZI ... Restoring Finish Subject: Re: Marushin UZI ... Restoring Finish  Fri Sep 16, 2011 3:06 pm Fri Sep 16, 2011 3:06 pm | |
|
I can only assume my UZI's bolt carrier is Aluminium. All the Zinc parts, including the barrel, reacted very well with Birchwood's Aluminium Black, but the Aluminium receiver and top cover shrugged the liquid off like water off a duck's back
The Bolt carrier behaved just like the receiver but did just about start to take colour. However, as soon as the carrier was rubbed gently all the colour wiped off instantly.
Perma Blue paste didn't work on the carrier or receiver either. That seems far better suited to steel which it blues instantly
I have since bought a Zinc Blue/Black liquid from Francky which needs to be polished with a fine abrasive paste. This worked really well on my MGC MP40 zinc barrel so I may try it on the UZI's bolt carrier
_________________
Cerwyn
Hobby collector of Replica model guns and Militaria.
also member of Living History Reenactment Groups.
| |
|
  | |
kiwigunner
Modelgun Master


Number of posts : 556
Age : 73
Location / Country : Auckland/New Zealand
Registration date : 2010-03-10
 |  Subject: Re: Marushin UZI ... Restoring Finish Subject: Re: Marushin UZI ... Restoring Finish  Sat Sep 17, 2011 2:43 pm Sat Sep 17, 2011 2:43 pm | |
| Thanks Cerwyn. That's good to know....I'd like to get some to try if it's not too expensive!  Her's a look at most of the bits coated in Matt black,; think I might do final coats in a gloss?? What did you use? Is super satin a full gloss paint?  The stock block (in the photo above) will be blued to see if I like it. If not; then black paint it will be!  Kowigunner Kowigunner | |
|
  | |
Cerwyn
Cerwyn (Site Admin)


Number of posts : 11090
Age : 65
Location / Country : North Wales
Registration date : 2008-07-20
 |  Subject: Re: Marushin UZI ... Restoring Finish Subject: Re: Marushin UZI ... Restoring Finish  Sat Sep 17, 2011 4:46 pm Sat Sep 17, 2011 4:46 pm | |
| The Satin Black is mid-way between matt and gloss (the only way I can describe it really:) )
It is very close to the finish on my KWC Mini UZi (Co2 Airsoft GBB).
The bluing liquid supplied by Francky is "Indy Zinc Blue", the polish to finish it off is "Medicom Kingbright" Both work out at about £9 - £10 each
The Bluing liquid is as thin as water and I needed to apply several coats to achieve a dark black/blue colour. To minimise waste I used a plastic container and reapplied fluid that flowed off the barrel with cottn wool. I still ended up using about 1/5th of the bottle on the MP40 barrel alone.
The polish on the other hand is used very sparingly, that'll last for ages yet.
_________________
Cerwyn
Hobby collector of Replica model guns and Militaria.
also member of Living History Reenactment Groups.
| |
|
  | |
kiwigunner
Modelgun Master


Number of posts : 556
Age : 73
Location / Country : Auckland/New Zealand
Registration date : 2010-03-10
 |  Subject: Re: Marushin UZI ... Restoring Finish Subject: Re: Marushin UZI ... Restoring Finish  Fri Oct 07, 2011 12:44 pm Fri Oct 07, 2011 12:44 pm | |
| Thanks for the details Cerwyn. I took your advice and made the final top coats a satin black. I'll try and get the bluing chemicals from Francky and compare the finishes. For now, here are the some photos of my refurbished Uzi - a few differences to your magnificent end product, but finally it looks like new.  THE FINAL REFURBISHED UZI COMPARED TO IT'S ORIGINAL CONDITION THE FINAL REFURBISHED UZI COMPARED TO IT'S ORIGINAL CONDITIONSo thanks again Cerwyn for proving the inspiration. Last weekend I went to the Auckland Gun Show and got my hot little hands on a real Uzi (with Hebrew markings) for comparison. The real Uzi is much heavier as members have mentioned. Those plastic parts of the pistol grip really make the Marushin lighter!  I didn't want to leave the real Uzi behind, but the price tag of NZ$8000 was way far above my means!    Anyway, what would I do with it? I can use the modelgun Uzi more often, indoors, and not cost $2 a bullet to shoot!  Marushin did a great job in their modelgun copy! KiwigunnerPS Along the way I discovered why the folding stock kept dropping unexpectedly!  https://mp40modelguns.forumotion.net/t3117-marushin-uzi-loose-folding-stock https://mp40modelguns.forumotion.net/t3117-marushin-uzi-loose-folding-stock
Last edited by kiwigunner on Fri Oct 07, 2011 12:54 pm; edited 2 times in total (Reason for editing : typo correction; add link) | |
|
  | |
Cerwyn
Cerwyn (Site Admin)


Number of posts : 11090
Age : 65
Location / Country : North Wales
Registration date : 2008-07-20
 |  Subject: Re: Marushin UZI ... Restoring Finish Subject: Re: Marushin UZI ... Restoring Finish  Thu Oct 19, 2017 3:38 pm Thu Oct 19, 2017 3:38 pm | |
| Photos updated with Servimg
_________________
Cerwyn
Hobby collector of Replica model guns and Militaria.
also member of Living History Reenactment Groups.
| |
|
  | |
Chris Rush
New Member

Number of posts : 72
Age : 75
Location / Country : 19352 Pennsylvania United States
Registration date : 2015-03-07
 |  Subject: Marushin Uzi Subject: Marushin Uzi  Thu Nov 02, 2017 8:06 am Thu Nov 02, 2017 8:06 am | |
| You did a fantastic job! Thanks. | |
|
  | |
Cerwyn
Cerwyn (Site Admin)


Number of posts : 11090
Age : 65
Location / Country : North Wales
Registration date : 2008-07-20
 |  Subject: Re: Marushin UZI ... Restoring Finish Subject: Re: Marushin UZI ... Restoring Finish  Thu Nov 02, 2017 9:44 am Thu Nov 02, 2017 9:44 am | |
| - Chris Rush wrote:
- You did a fantastic job! Thanks.
Thanks very much Chris! I am really pleased with the end result. All that work and time was well worth it.
_________________
Cerwyn
Hobby collector of Replica model guns and Militaria.
also member of Living History Reenactment Groups.
| |
|
  | |
Sponsored content
 |  Subject: Re: Marushin UZI ... Restoring Finish Subject: Re: Marushin UZI ... Restoring Finish  | |
| |
|
  | |
| | Marushin UZI ... Restoring Finish |  |
|
